Configuring an Amazon VPC
Project Overview
Reflecting on my experience of configuring an Amazon Virtual Private Cloud (VPC) within the Amazon Web Services (AWS) environment, here's a detailed, step-by-step account of how I successfully completed each task, including relevant side notes for clarity.
Task 1: Creating a VPC
Step 1: Accessing the VPC Management Console
- I began by navigating to the AWS Management Console.
- In the Search bar, I entered "VPC" to access the VPC Management Console.
Step 2: Creating a New VPC
- In the left navigation pane, under "Virtual private cloud," I selected "Your VPCs."
- Noting the presence of a default VPC with a CIDR block of 172.31.0.0/16, I knew it was crucial to create my own VPC for specific configurations.
- I chose "Create VPC" and configured the following options:
- Resources to create: VPC only
- Name tag: Lab VPC
- IPv4 CIDR block: IPv4 CIDR manual input (10.0.0.0/16)
- IPv6 CIDR block: No IPv6 CIDR block
- Tenancy: Default
Step 3: Editing VPC Settings
- After successfully creating the VPC, I saw a confirmation message indicating the creation of "vpc-NNNNNNNNNNN / Lab VPC."
- To ensure EC2 instances launched into the VPC automatically received public IPv4 DNS hostnames, I chose "Actions" and selected "Edit VPC settings."
- In the DNS settings section, I enabled "DNS hostnames" and saved the changes.
Note: EC2 instances launched into the VPC now automatically receive a public IPv4 Domain Name System (DNS) hostname.
Task 2: Creating Subnets
Task 2.1: Creating a Public Subnet
Step 1: Accessing the Subnets Section
- In the left navigation pane, under "Virtual private cloud," I selected "Subnets."
Step 2: Creating the Public Subnet
- I clicked on "Create subnet" and set the following configurations:
- VPC ID: Lab VPC
- Subnet name: Public Subnet
- Availability Zone: First Availability Zone in the list (instead of "No preference")
- IPv4 CIDR block: 10.0.0.0/24
Step 3: Enabling Auto-Assign Public IP
- After creating the public subnet, I selected "Public Subnet."
- I chose "Actions" and then "Edit subnet settings."
- In the "Auto-assign IP settings" section, I enabled "auto-assign public IPv4 address" and saved the changes.
Note: Even though this subnet has been named Public Subnet, it is not yet public. A public subnet must have an internet gateway, which I attached in a later task.
Task 2.2: Creating a Private Subnet
Step 1: Repeating the Steps for Creating a Subnet
- I repeated the steps from Task 2.1 with the following configurations:
- VPC ID: Lab VPC
- Subnet name: Private Subnet
- Availability Zone: First Availability Zone in the list
- IPv4 CIDR block: 10.0.2.0/23
Note: The CIDR block of 10.0.2.0/23 includes all IP addresses that start with 10.0.2.x and 10.0.3.x. This range is twice as large as the public subnet because most resources should be kept in private subnets unless they specifically need to be accessible from the internet.
Task 3: Creating an Internet Gateway
Step 1: Accessing the Internet Gateways Section
- In the left navigation pane, under "Virtual private cloud," I selected "Internet gateways."
Step 2: Creating the Internet Gateway
- I clicked on "Create internet gateway," named it "Lab IGW," and created the gateway.
Step 3: Attaching the Internet Gateway to the VPC
- I chose "Actions" and selected "Attach to a VPC."
Note: Your public subnet now has a connection to the internet. However, to route traffic to the internet, you must also configure the public subnet's route table so that it uses the internet gateway.
Task 4: Configuring Route Tables
Step 1: Accessing the Route Tables Section
- In the left navigation pane, under "Virtual private cloud," I selected "Route tables."
Step 2: Renaming the Existing Route Table
- I selected the route table that included "Lab VPC" in the VPC column.
- I clicked the edit icon in the "Name" column, entered "Private Route Table," and saved the changes.
Note: There is currently only one route, which shows that all traffic destined for 10.0.0.0/16 (the range of the Lab VPC) will be routed locally. This option allows all subnets within a VPC to communicate with each other.
Step 3: Creating a Public Route Table
- I created a new public route table with the following options:
- Name: Public Route Table
- VPC: Lab VPC
- After creating the route table, I chose the "Routes" tab and selected "Edit routes."
- I added a route with the following options:
- Destination: 0.0.0.0/0
- Target: Internet Gateway (Lab IGW)
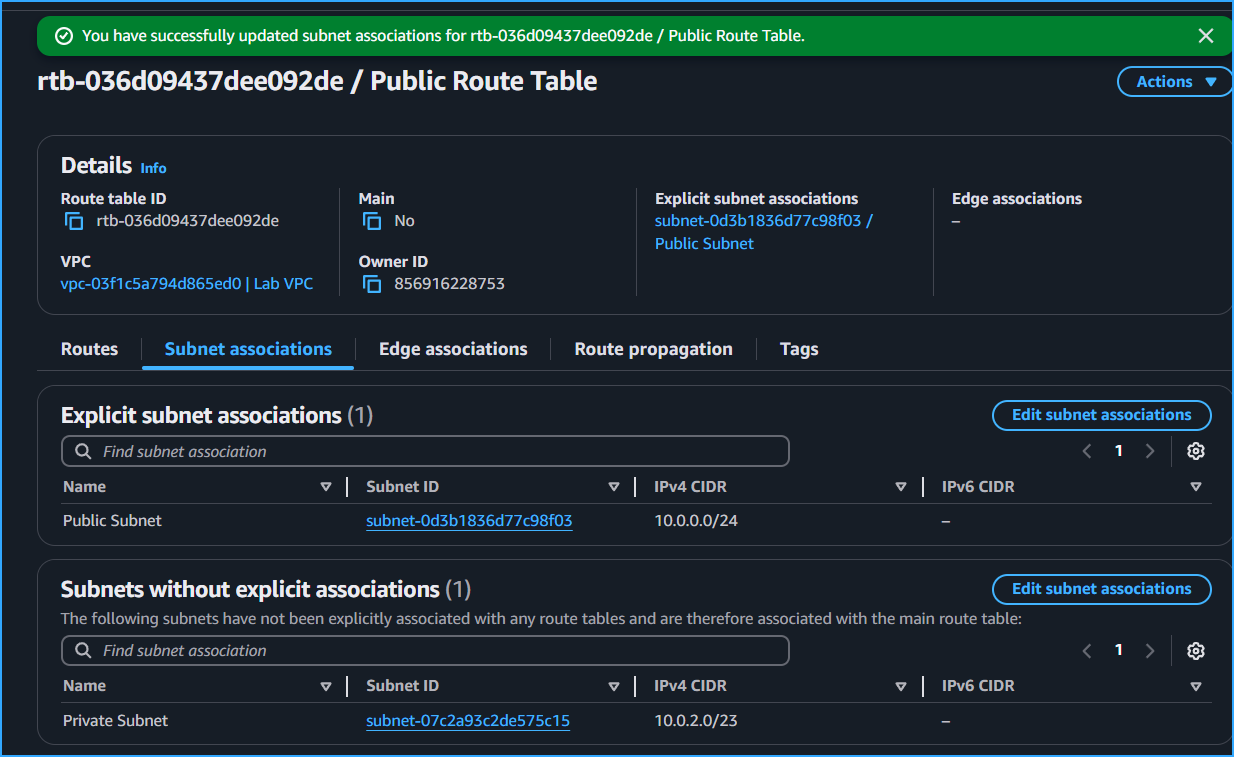
Step 4: Associating the Public Route Table with the Public Subnet
- I chose the "Subnet associations" tab.
- I clicked "Edit subnet associations," selected "Public Subnet," and saved the associations.
Note: The public subnet is now public because it has a route table entry that sends traffic to the internet through the internet gateway.
Task 5: Launching a Bastion Server
Step 1: Accessing the EC2 Management Console
- I navigated to the AWS Management Console and typed "EC2" in the Search bar to access the EC2 Management Console.
Step 2: Launching the Bastion Server
- In the left navigation pane, I selected "Instances."
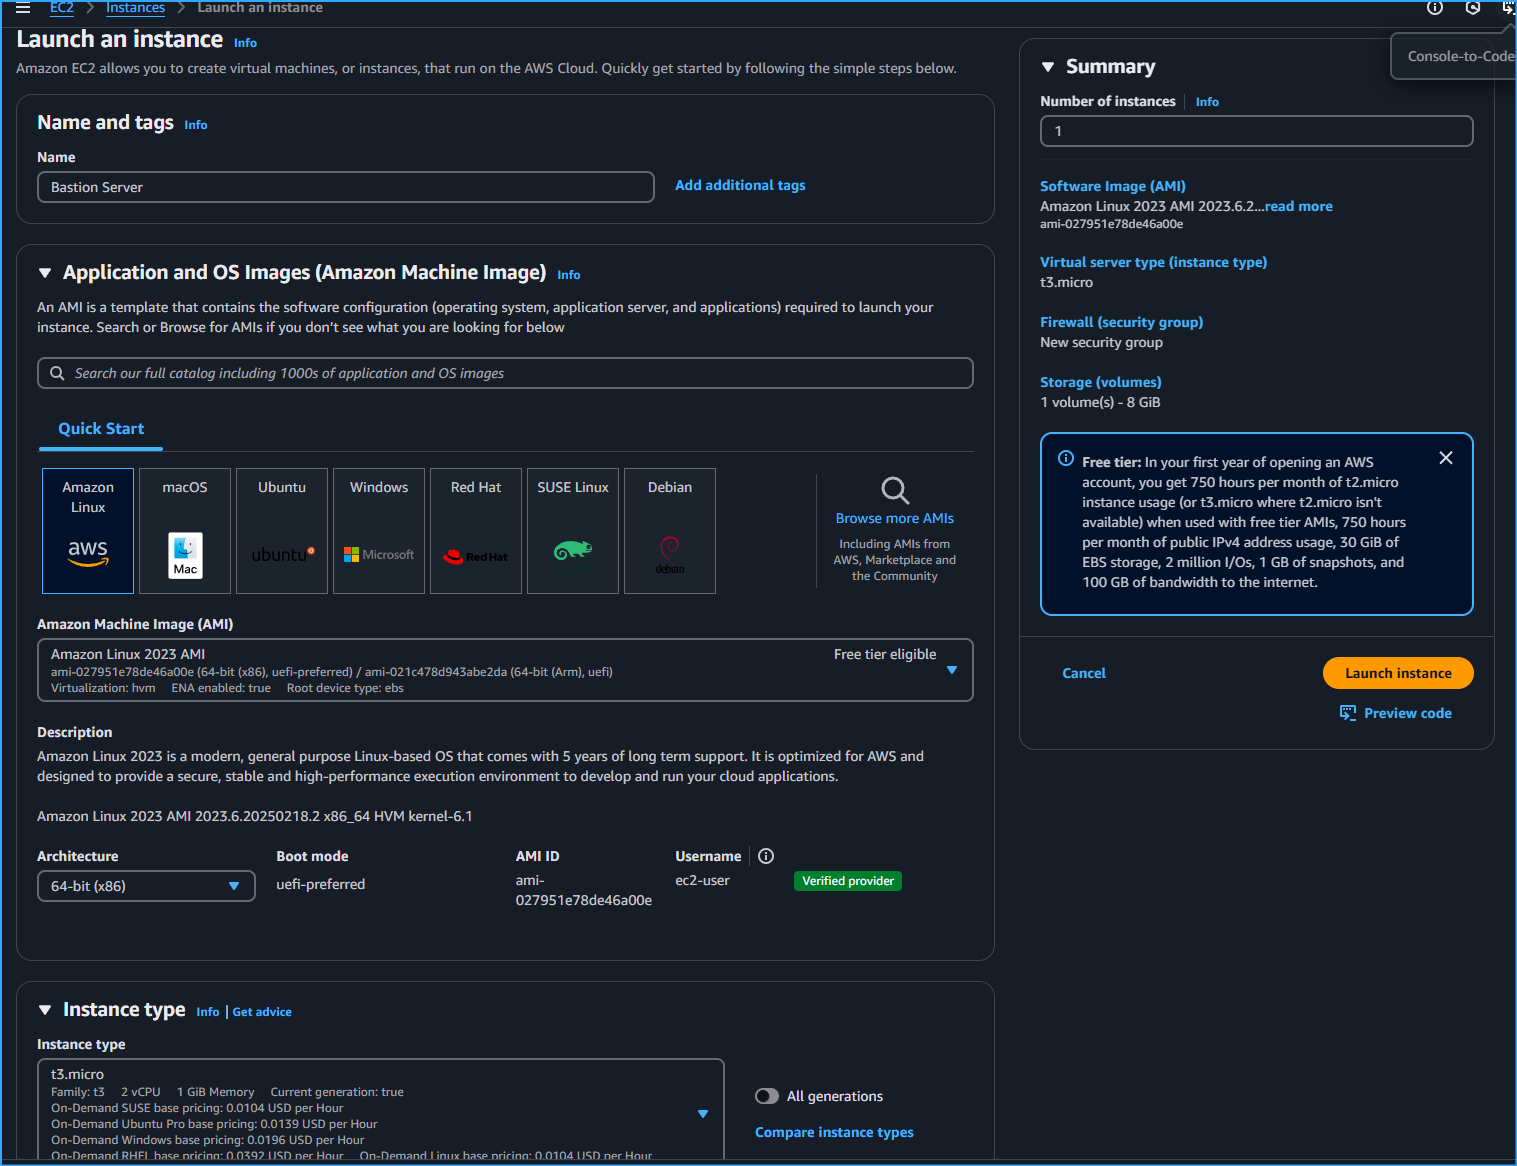
- I clicked "Launch instances" and configured the following options:
- Name: Bastion Server
- Amazon Machine Image: Amazon Linux 2023 AMI
- Instance type: t3.micro
- VPC: Lab VPC
- Subnet: Public Subnet
- Auto-assign public IP: Enabled
- Security group: Bastion Security Group with SSH access
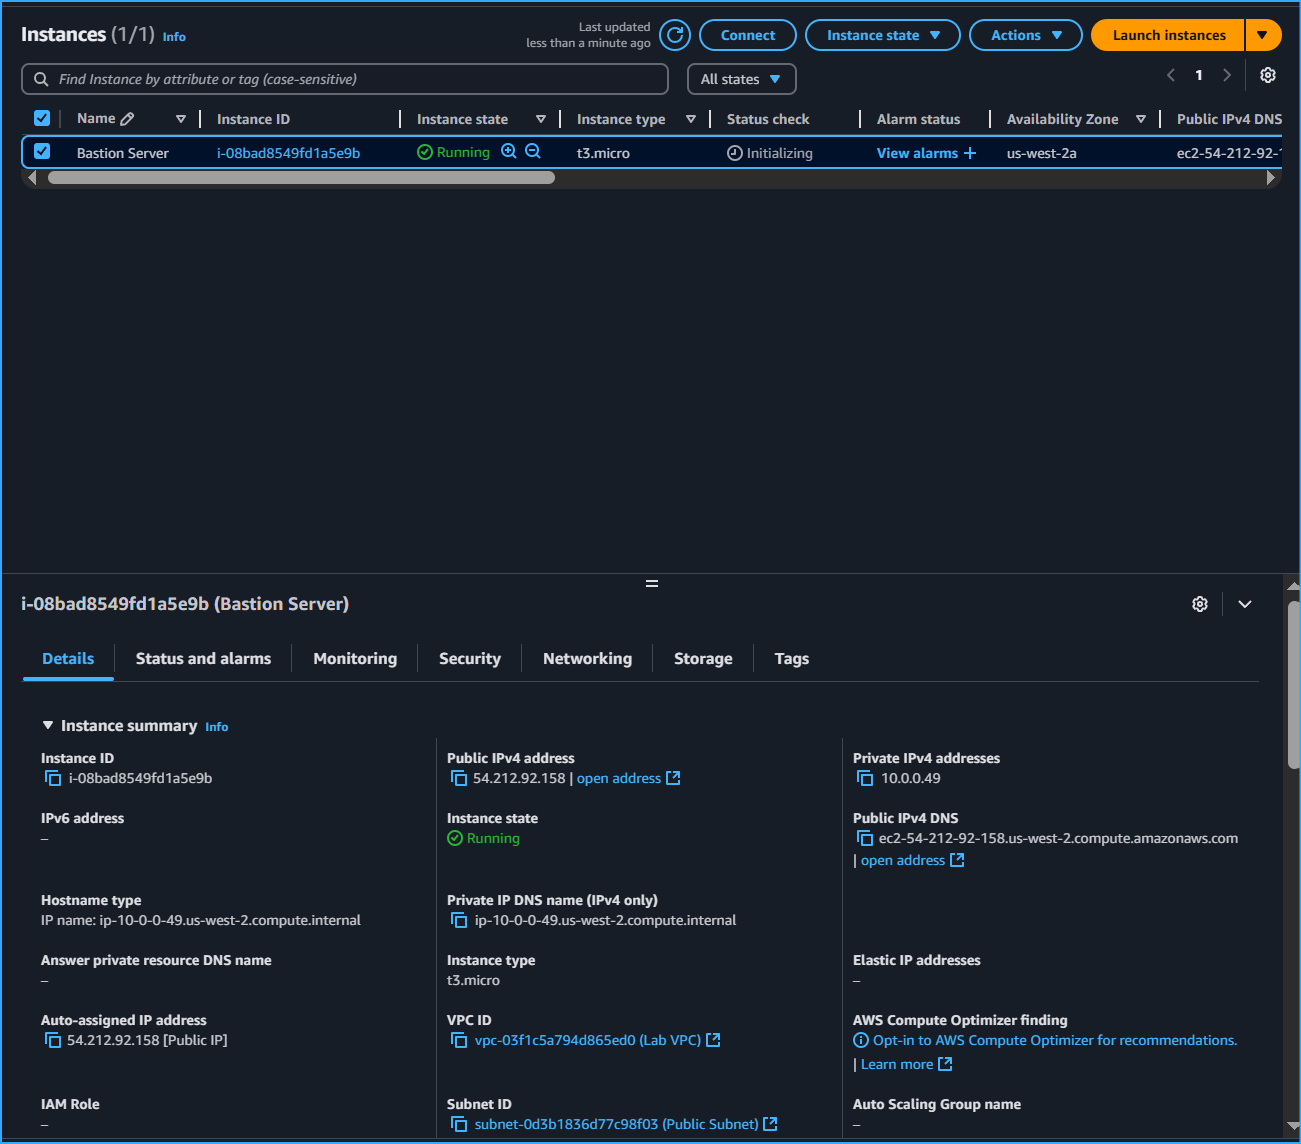
- I chose "Launch instance" and then "View all instances."
- The Bastion Server transitioned from a "Pending" state to "Running," indicating it was fully booted in the public subnet.
Note: A bastion server (also known as a jump box) is an EC2 instance in a public subnet that is securely configured to provide access to resources in a private subnet. Systems operators can connect to the bastion server and then jump into resources in the private subnet.
Task 6: Creating a NAT Gateway
Step 1: Accessing the NAT Gateways Section
- I navigated to the AWS Management Console, entered "NAT gateways" in the Search bar, and chose "NAT gateways" from the Features list.
Step 2: Creating the NAT Gateway
- I clicked "Create NAT gateway" and configured the following options:
- Name: Lab NAT gateway
- Subnet: Public Subnet
- Choose: Allocate Elastic IP
- I clicked "Create a NAT gateway."
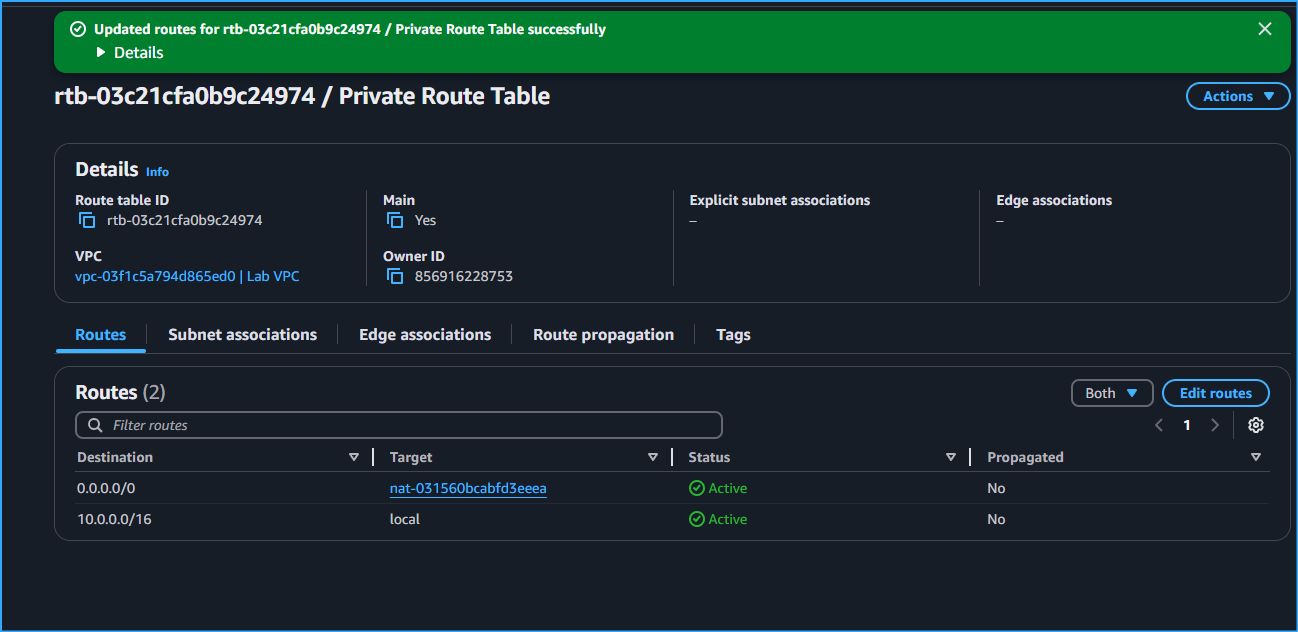
Step 3: Configuring the Private Subnet Route Table
- In the left navigation pane, I selected "Route tables," and chose "Private Route Table."
- I chose the "Routes" tab and selected "Edit routes."
- I added a route with the following options:
- Destination: 0.0.0.0/0
- Target: NAT Gateway (nat-)
- I saved the changes.
Note: Resources in the private subnet that wish to communicate with the internet now have their network traffic directed to the NAT gateway, which forwards the request to the internet. Responses flow through the NAT gateway back to the private subnet.
By following these steps, I successfully configured a robust VPC with public and private subnets, an Internet Gateway, appropriate route tables, a bastion server, and a NAT Gateway. Each task built upon the previous one, culminating in a fully functional and secure virtual network. This thorough and methodical process provided me with a comprehensive understanding of AWS networking and its critical components.
Testing the Private Subnet
Task: Launching an Instance in the Private Subnet
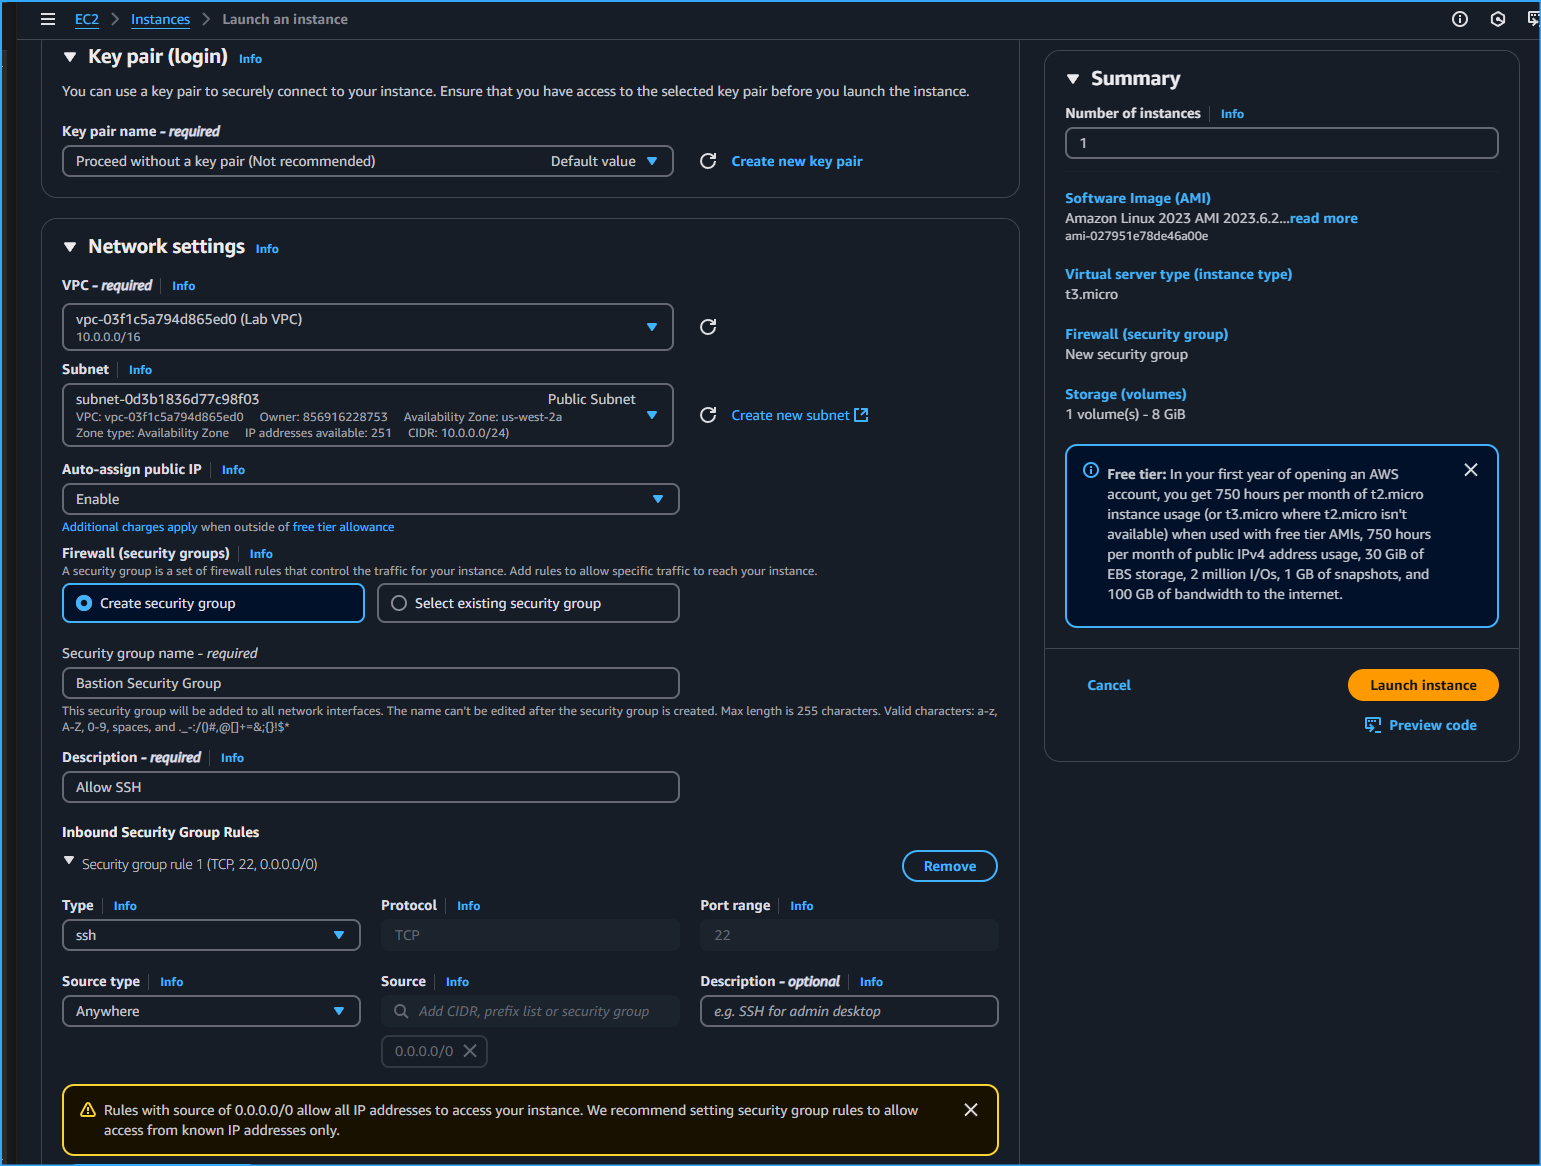
Step 1: Launching the Instance
- I followed the same instructions used to launch the bastion server and configured the following options:
- Name and tags section: Entered "Private Instance."
- Application and OS Images (Amazon Machine Image) section:
- Quick Start: Chose Amazon Linux.
- Amazon Machine Image (AMI): Chose Amazon Linux 2023 AMI.
- Instance type section: Chose t3.micro.
- Key pair (login) section: Chose "Proceed without a key pair" (not recommended).
- Network settings section:
- Edited and configured the following options:
- VPC (required): Chose Lab VPC.
- Subnet: Chose Private Subnet (not the public subnet).
- Firewall (security groups): Chose "Create security group."
- Security group name (required): Entered "Private Instance SG."
- Description (required): Entered "Allow SSH from Bastion."
- Inbound security groups rules:
- Type: Chose SSH.
- Source type: Chose Custom.
- Source: Chose 10.0.0.0/16.
- Expanded the Advanced Details section and pasted the following user data script:
#!/bin/bash
# Turn on password authentication for lab challenge
echo 'lab-password' | passwd ec2-user --stdin
sed -i 's|[#]*PasswordAuthentication no|PasswordAuthentication yes|g' /etc/ssh/sshd_config
systemctl restart sshd.service
Note: This script permits login by using a password. It is included to help make the lab steps shorter but is not recommended for normal instance deployments.
- Chose "Launch instance."
- To display the launched instance, I selected "View all instances."
Task: Logging in to the Bastion Server
Step 1: Accessing the EC2 Management Console
- On the AWS Management Console, I entered and chose "EC2" in the Search bar to open the EC2 Management Console.
Step 2: Connecting to the Bastion Server
- In the navigation pane, I selected "Instances."
- From the list of instances, I selected the "Bastion Server" instance.
- Chose "Connect."
- On the EC2 Instance Connect tab, I chose "Connect."
Note: If preferred, an SSH client could be used to connect to the EC2 instance by following the guidance to Connect to Your Linux Instance.
AWS Management Console, I entered and chose "EC2" in the Search bar to open the EC2 Management Console.
Step 2: Connecting to the Bastion Server
In the navigation pane, I selected "Instances."
From the list of instances, I selected the "Bastion Server" instance.
Chose "Connect."
On the EC2 Instance Connect tab, I chose "Connect."
Note: If preferred, an SSH client could be used to connect to the EC2 instance by following the guidance to Connect to Your Linux Instance.
Task: Logging in to the Private Instance
Step 1: Copying the Private Instance IP Address
- I was now logged in to the bastion server, located in the public subnet. I kept this terminal window open for use later.
- In the Amazon EC2 console, I chose "Instances" and selected "Private Instance" (clearing any other instances).
- I copied the Private IPv4 addresses (shown in the lower half of the page) to my clipboard.
Note: This IP address is a private IP address starting with 10.0.2.x or 10.0.3.x. This address is not reachable directly from the internet, which is why logging in to the bastion server was necessary first.
Step 2: Connecting to the Private Instance
- I returned to the terminal window and ran the following command, replacing PRIVATE-IP with the copied IP address:
ssh PRIVATE-IP
- The command I ran looked similar to the following: ssh 10.0.2.123.
- If prompted with the message "Are you sure you want to continue connecting?", I entered "yes."
- When prompted for a password, I entered "lab-password."
Note: I should now be connected to the private instance. This task was accomplished by first connecting to the bastion server (in the public subnet) and then connecting to the private instance (in the private subnet).
Task: Testing the NAT Gateway
Step 1: Confirming Internet Access
- The final part of this challenge was to confirm that the private instance could access the internet.
- I ran the following ping command:
ping -c 3 amazon.com
- The results were similar to the following:
PING amazon.com (176.32.98.166) 56(84) bytes of data.
64 bytes from 176.32.98.166 (176.32.98.166): icmp_seq=1 ttl=222 time=79.2 ms
64 bytes from 176.32.98.166 (176.32.98.166): icmp_seq=2 ttl=222 time=79.2 ms
64 bytes from 176.32.98.166 (176.32.98.166): icmp_seq=3 ttl=222 time=79.0 ms
Note: This output indicated that the private instance successfully communicated with amazon.comon the internet. The private instance was in the private subnet, and the only way this was possible in the current scenario was by going through the NAT gateway. This output confirmed that my network configuration was successful.
Conclusion
I successfully completed the following:
- Created a VPC with a private and public subnet, an internet gateway, and a NAT gateway.
- Configured route tables associated with subnets to local and internet-bound traffic by using an internet gateway and a NAT gateway.
- Launched a bastion server in a public subnet.
- Used a bastion server to log in to an instance in a private subnet.
This thorough process provided me with practical insights into AWS networking and validated my configurations in a secure and controlled environment.
×
![]()
 Associated Public Route Table With Public Subnet
 Bastion Server Running Finished Booting Will Now Be Launched In Public Subnet
 Configured Private Subnet To Send Internet Bound Traffic To NAT GW
 Configuring EC2 Instance Application And OS Images For Bastion Server
 Configuring EC2 Instance Network Settings For Bastion Server
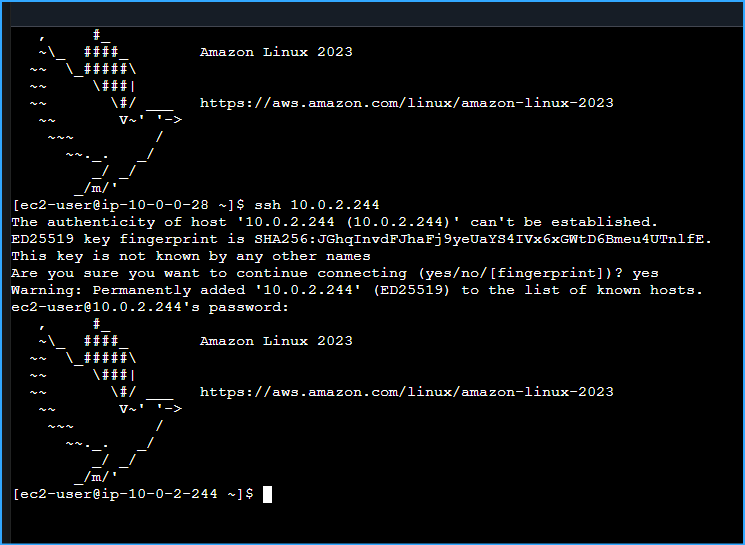 Connection To Private Instance From Bastion Server In Public Subnet Established
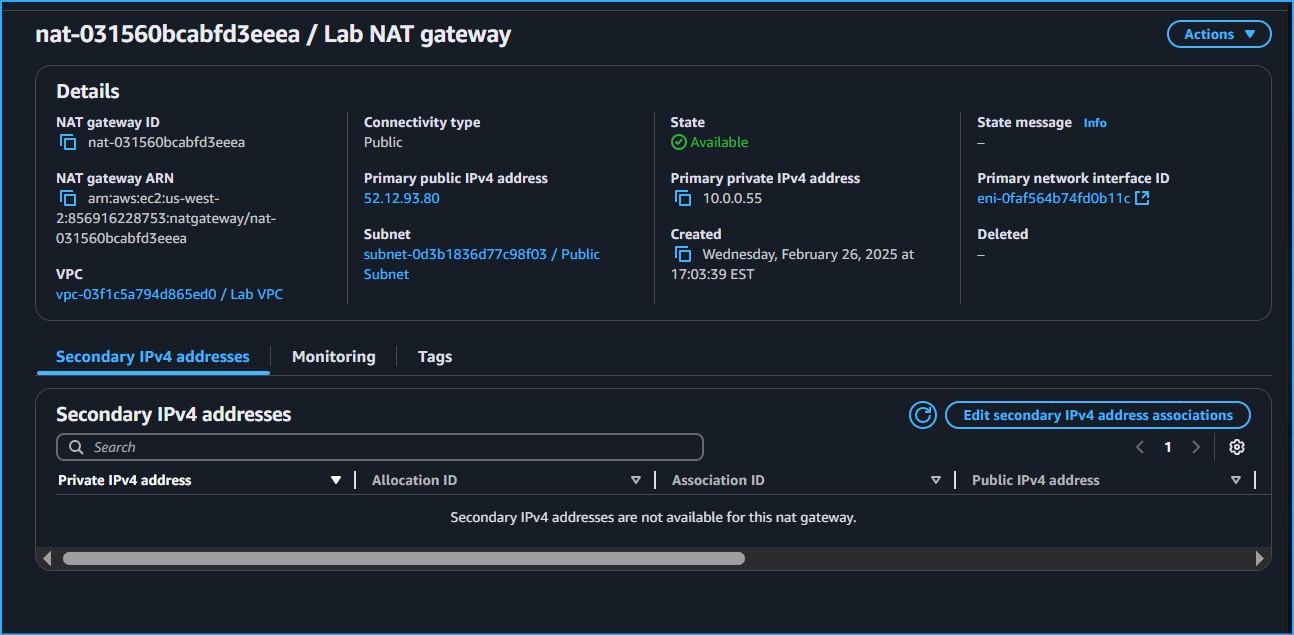 Created NAT GW Associated Elastic IP In Config
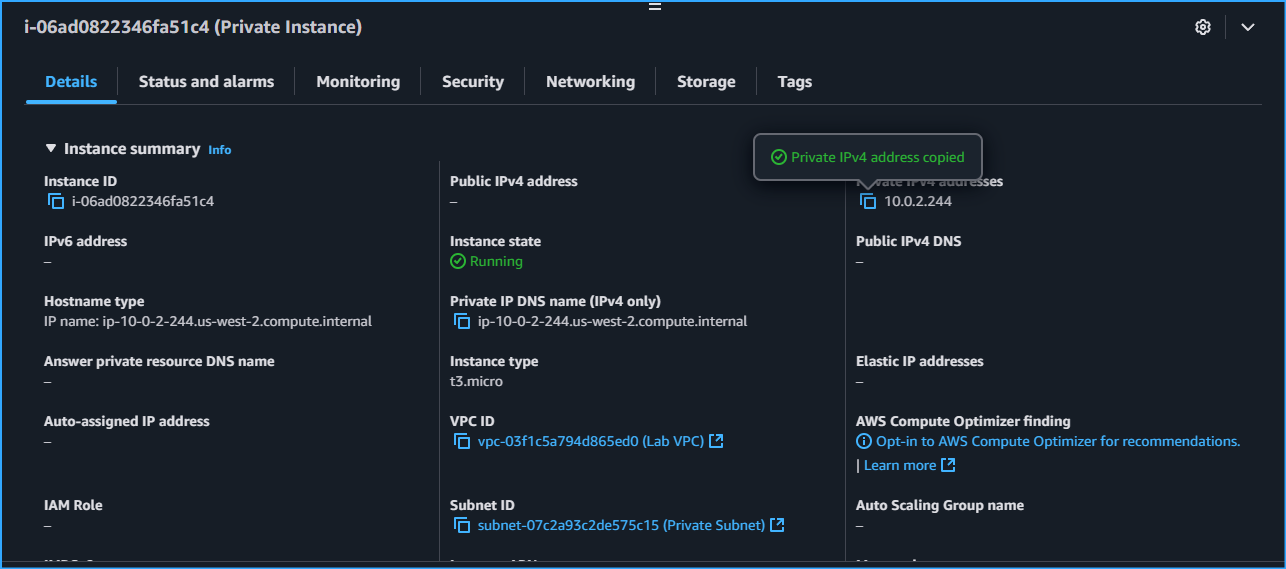 Created Private Instance To SSH Into From Bastion Server Instance Which Is In Public Subnet
 Created Private Subnet Where Most Resources Will Exist Hence Why The CIDR Block Is Bigger
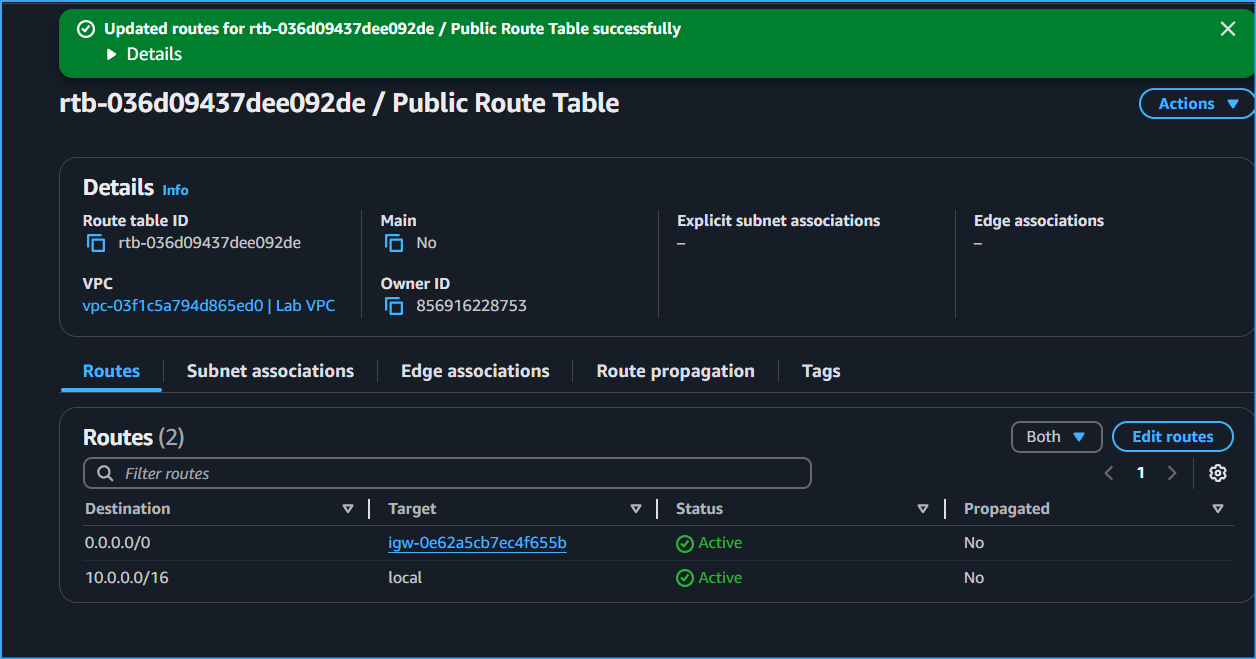 Created Public Route Table Added Route To Direct Traffic To IGW
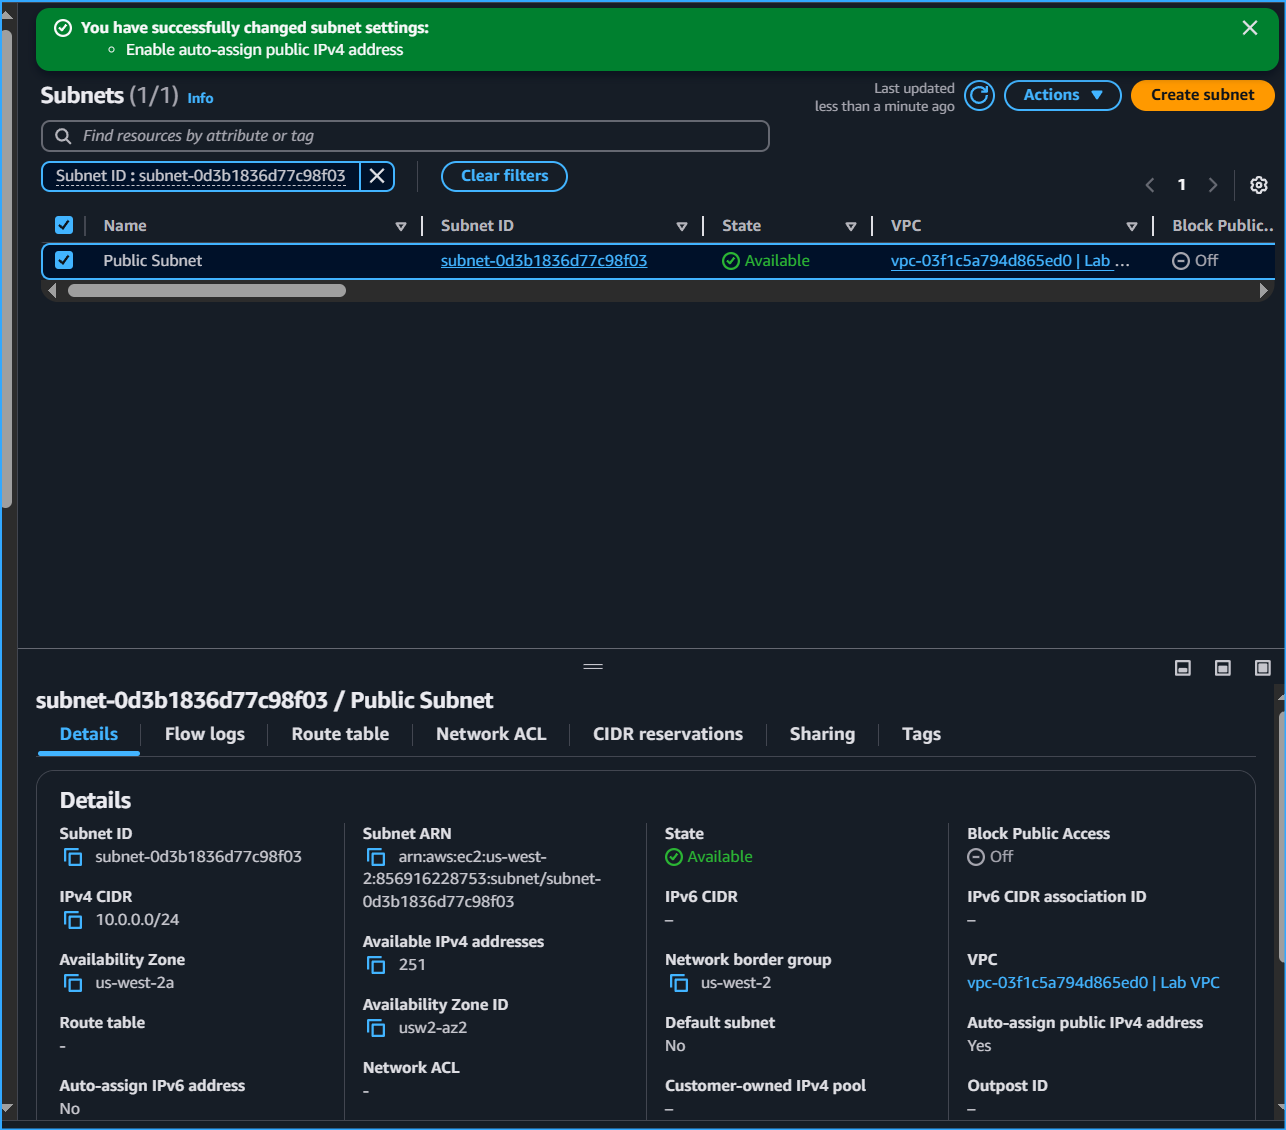 Created Public Subnet Enabled Auto Assign IPv4 But Not Yet Public Needs IGW
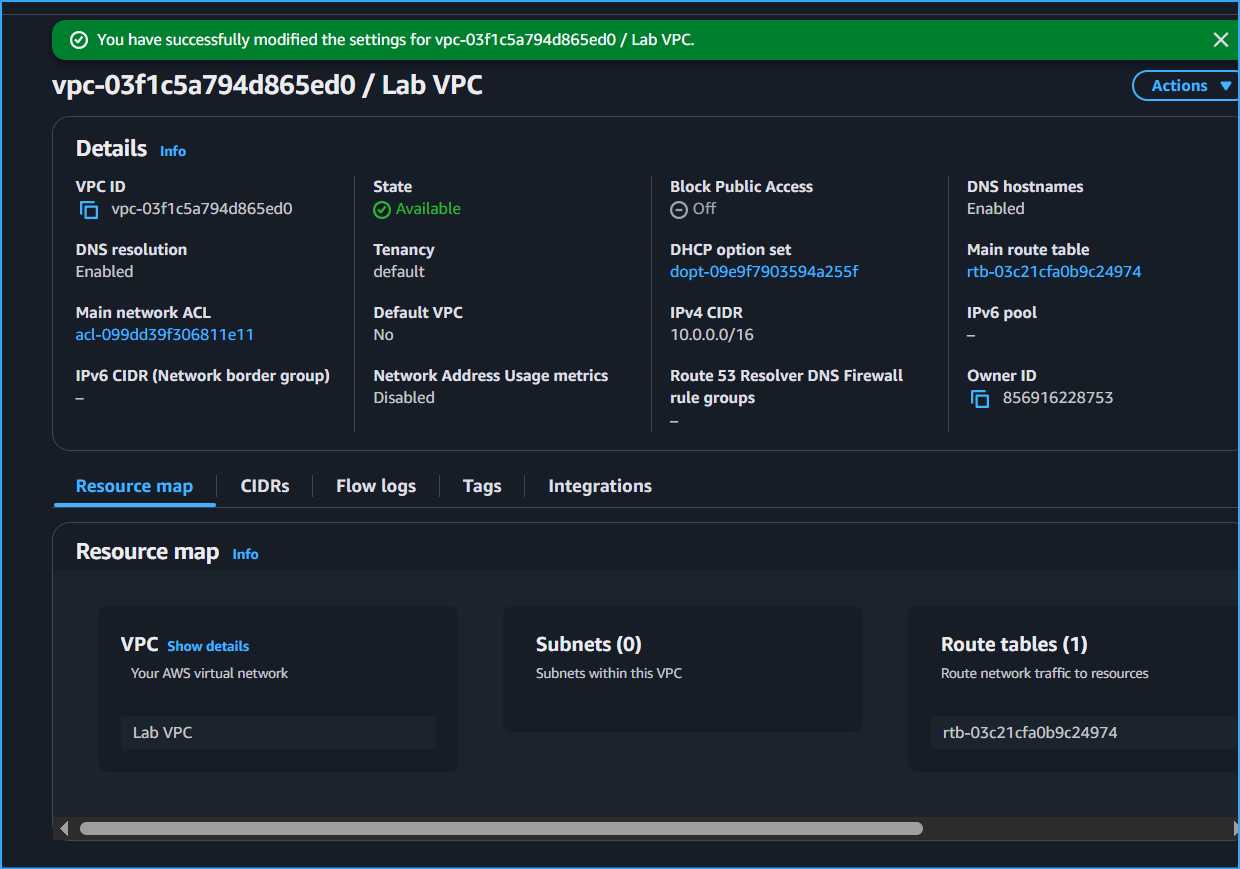 Created VPC Enabled DNS Host Names
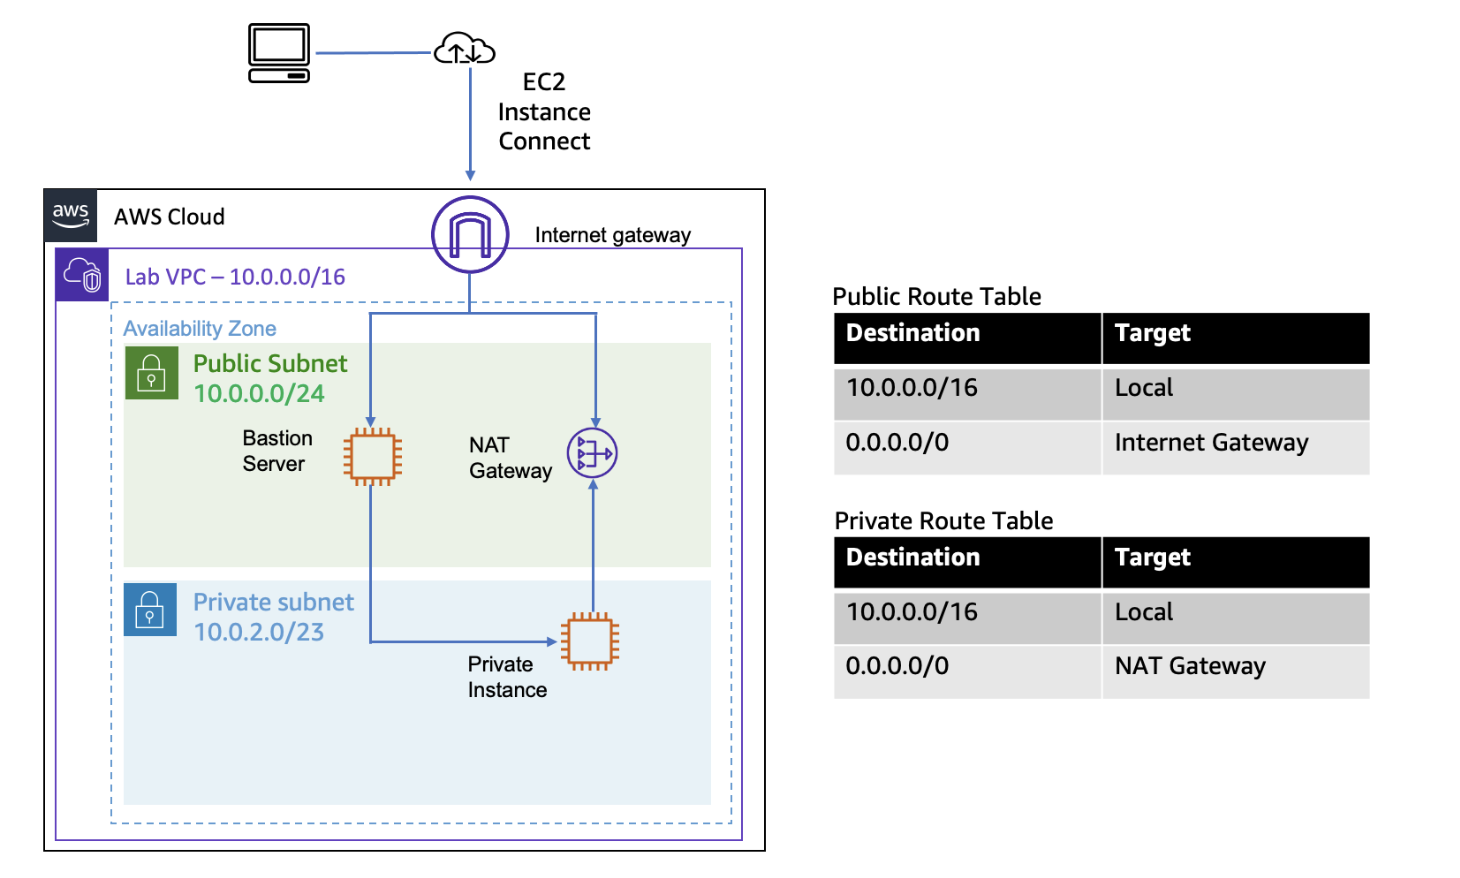 Final Architecture
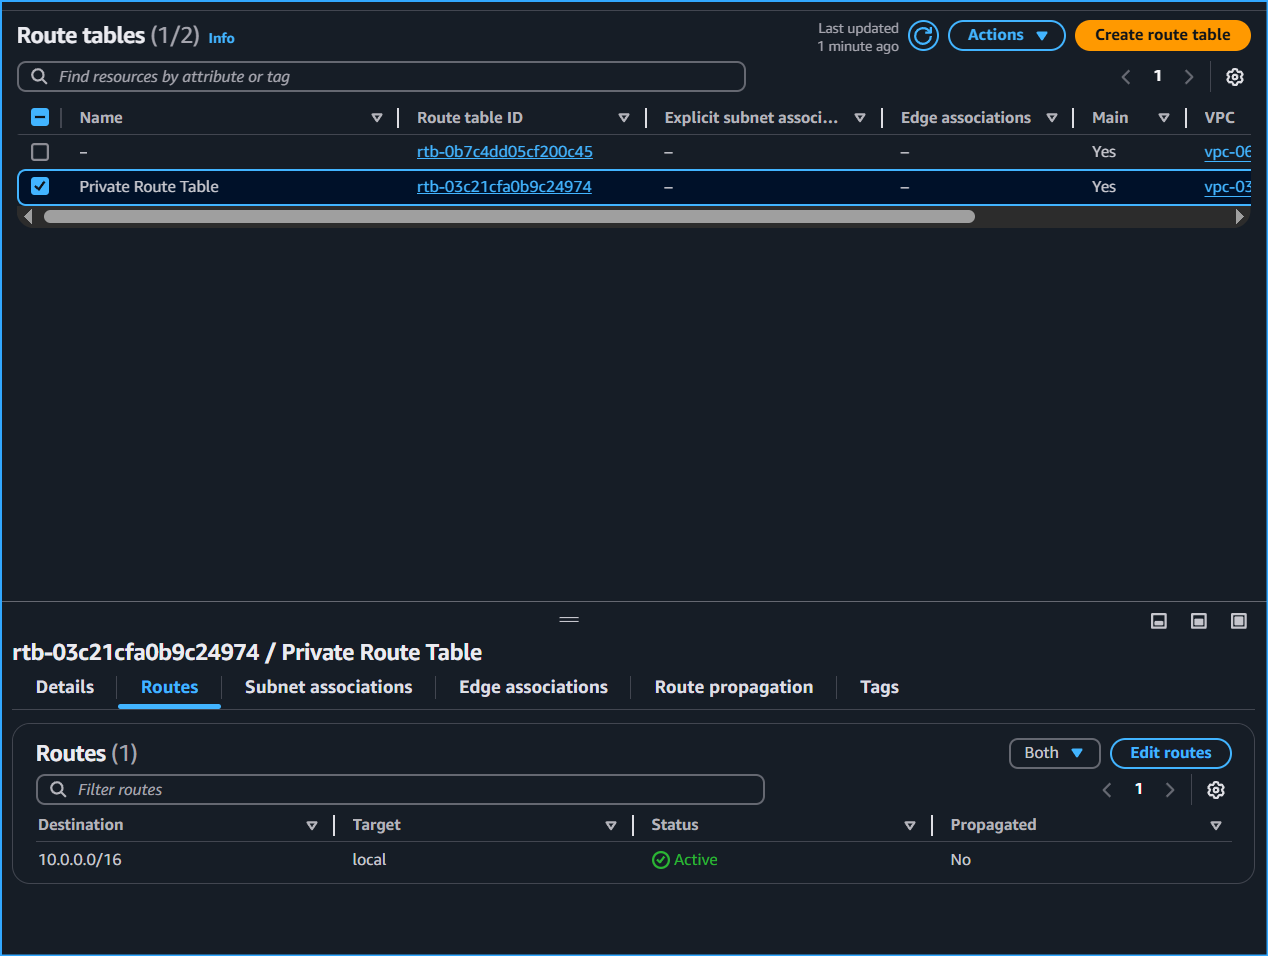 Private Route Table Routes Traffic Only To Range Of VPC Destination Which Will Be Routed Locally
 Ran Ping CMD Output Indicates Private Instance Communicated Thorugh Internet Via NAT GW Only Way