Introduction to Amazon EC2
Project Overview
This project provided me with a basic overview of launching, resizing,
managing, and monitoring an Amazon EC2 instance.
Amazon Elastic Compute Cloud (Amazon EC2) is a web service that provides
resizable compute capacity in the cloud. It is designed to make
web-scale cloud computing easier for developers.
Amazon EC2's simple web service interface allowed me to obtain and
configure capacity with minimal friction. It provides complete control
of computing resources and lets you run on Amazon's proven computing
environment. Amazon EC2 reduces the time required to obtain and boot new
server instances to minutes, allowing you to quickly scale capacity,
both up and down, as your computing requirements change.
Amazon EC2 changes the economics of computing by allowing you to pay
only for capacity that you actually use. Amazon EC2 provides developers
the tools to build failure resilient applications and isolate themselves
from common failure scenarios.
Topics covered
By the end, I was able to:
- Launch a web server with termination protection enabled
- Monitor my EC2 instance
-
Modify the security group that my web server is using to allow HTTP
access
- Resize my Amazon EC2 instance to scale
- Test termination protection
- Terminate my EC2 instance
Task 1: Launching my EC2 instance
In this task, I launched an Amazon EC2 instance with termination
protection. Termination protection prevents you from accidentally
terminating an EC2 instance. I deployed my instance with a User Data
script that allowed me to deploy a simple web server.
In the AWS Management Console on the Services menu, I chose EC2.
In the left navigation pane, I chose EC2 Dashboard to ensure that I was
on the dashboard page.
I chose Launch instance, and then selected Launch instance.
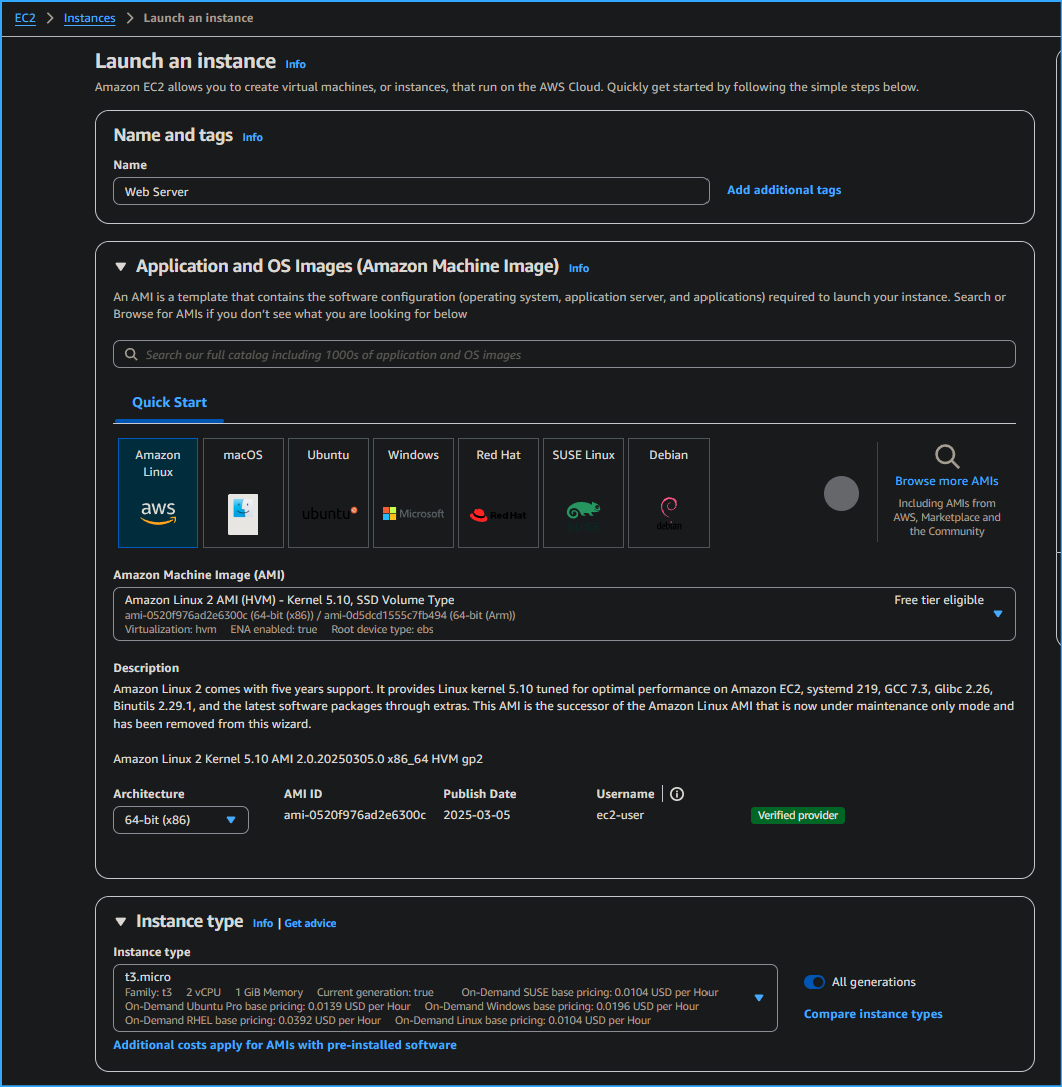
Step 1: Naming my EC2 instance
When I named my instance, AWS created a key value pair. The key for this
pair is Name, and the value is the name I entered for my EC2 instance.
In the Name and tags pane, in the Name text box, I entered Web Server.
Step 2: Choosing an Amazon Machine Image (AMI)
An AMI provides the information required to launch an instance, which is
a virtual server in the cloud. An AMI includes the following:
-
A template for the root volume for the instance (for example, an
operating system or an application server with applications)
-
Launch permissions that control which AWS accounts can use the AMI to
launch instances
-
A block device mapping that specifies the volumes to attach to the
instance when it is launched
The Quick Start list contains the most commonly used AMIs. You can also
create your own AMI or select an AMI from the AWS Marketplace, an online
store where you can sell or buy software that runs on AWS.
I located the Application and OS Images (Amazon Machine Image) pane.
Under AMI Machine Image (AMI), I noticed that the Amazon Linux 2 AMI
image was selected by default. I kept this setting.
Step 3: Choosing an instance type
Amazon EC2 provides a wide selection of instance types optimized to fit
different use cases. Instance types comprise varying combinations of
CPU, memory, storage, and networking capacity and give you the
flexibility to choose the appropriate mix of resources for your
applications. Each instance type includes one or more instance sizes so
that you can scale your resources to the requirements of your target
workload.
I selected a t3.micro instance. This instance type has 2 virtual CPU and
1 GiB of memory.
From the dropdown, I selected t3.micro.
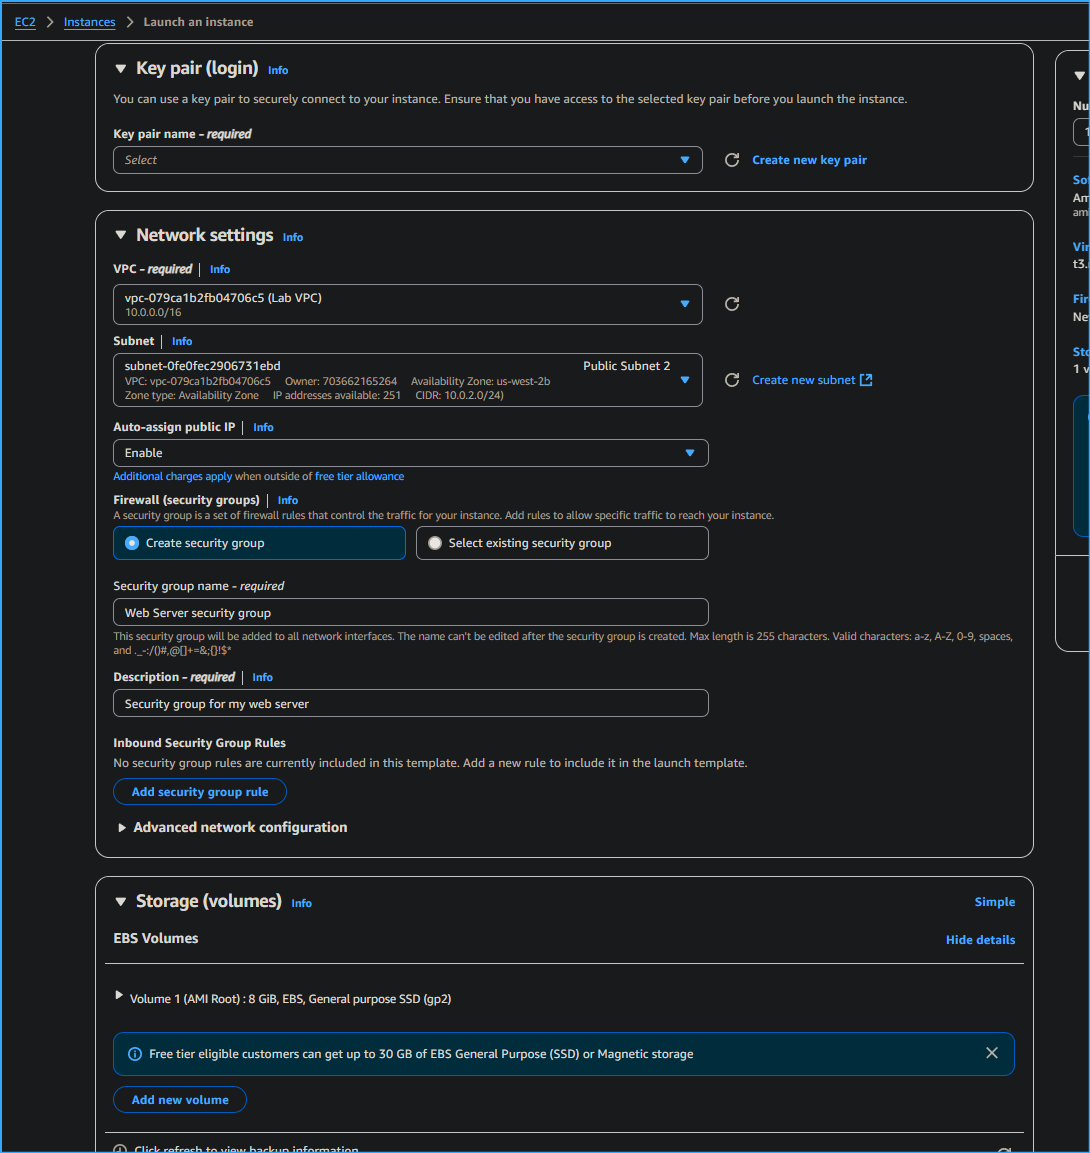
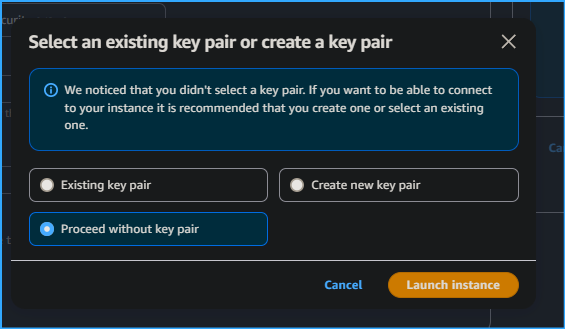
Step 4: Configuring a key pair
Amazon EC2 uses public–key cryptography to encrypt and decrypt login
information. To log in to your instance, you must create a key pair,
specify the name of the key pair when you launch the instance, and
provide the private key when you connect to the instance.
I did not log in to my instance, so I did not require a key pair.
In the Key pair (login) pane, I selected Proceed without a key pair (Not
recommended).
Step 5: Configuring the network settings
I used this pane to configure networking settings.
The VPC indicates which virtual private cloud (VPC) you want to launch
the instance into. You can have multiple VPCs, including different ones
for development, testing, and production.
In the Network settings pane, I chose Edit
For VPC - required, I selected Lab VPC.
Still in the Network settings pane, I configured the Security Group as
follows:
- Security group name - required: Web Server security group
- Description: Security group for my web server
A security group acts as a virtual firewall that controls the traffic
for one or more instances. When you launch an instance, you associate
one or more security groups with the instance. You add rules to each
security group that allow traffic to or from its associated instances.
You can modify the rules for a security group at any time; the new rules
are automatically applied to all instances that are associated with the
security group.
Under Inbound security groups rules I selected the Remove
I did not log into my instance using SSH. Removing SSH access improved
the security of the instance.
Step 6: Adding storage
Amazon EC2 stores data on a network-attached virtual disk called Amazon
Elastic Block Store (Amazon EBS).
I launched the EC2 instance using a default 8 GiB disk volume. This is
my root volume (also known as a boot volume).
In the Configure storage pane, I kept the default storage configuration.
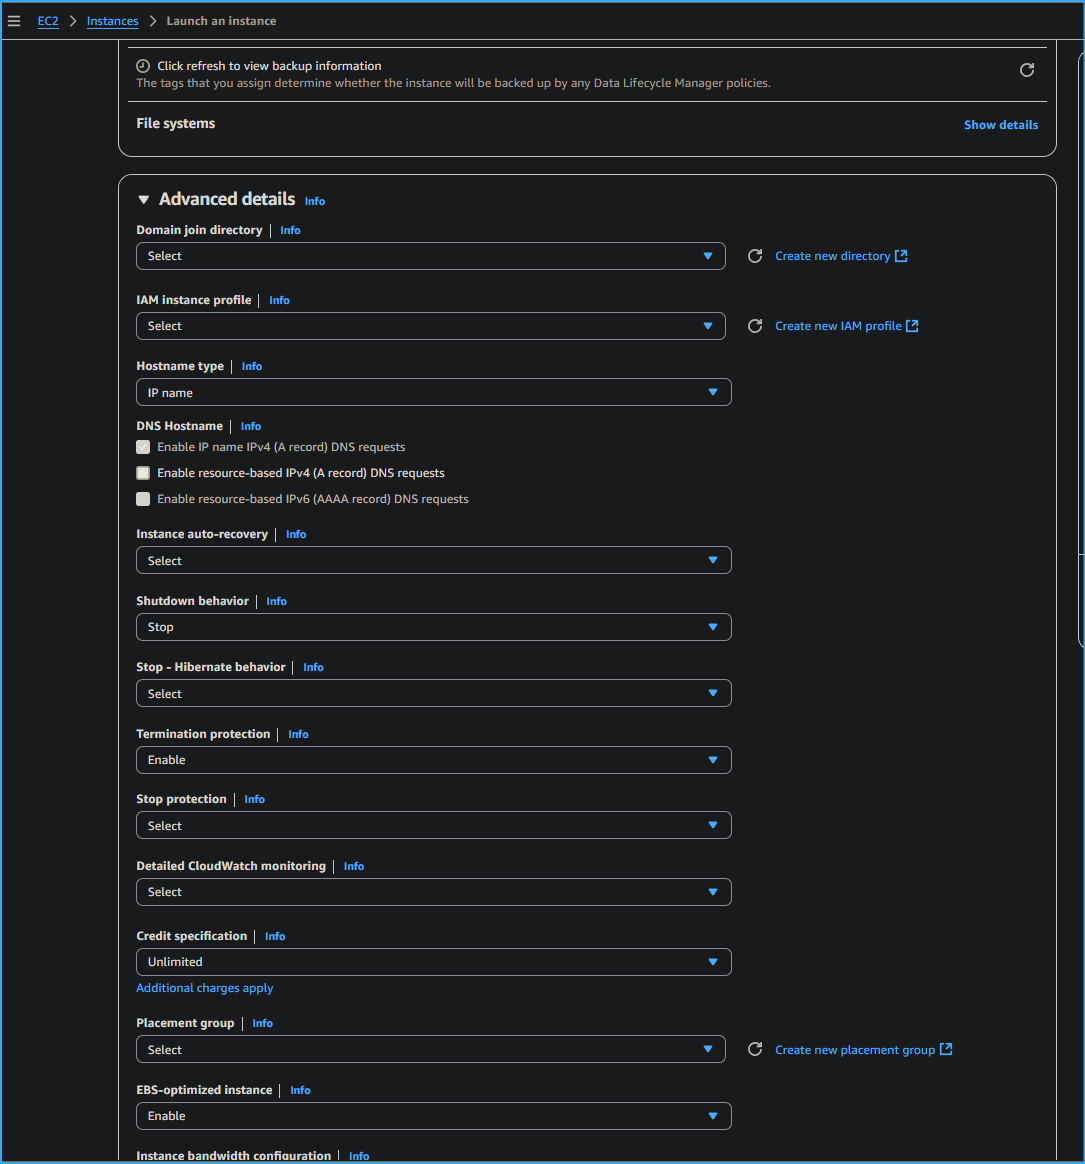
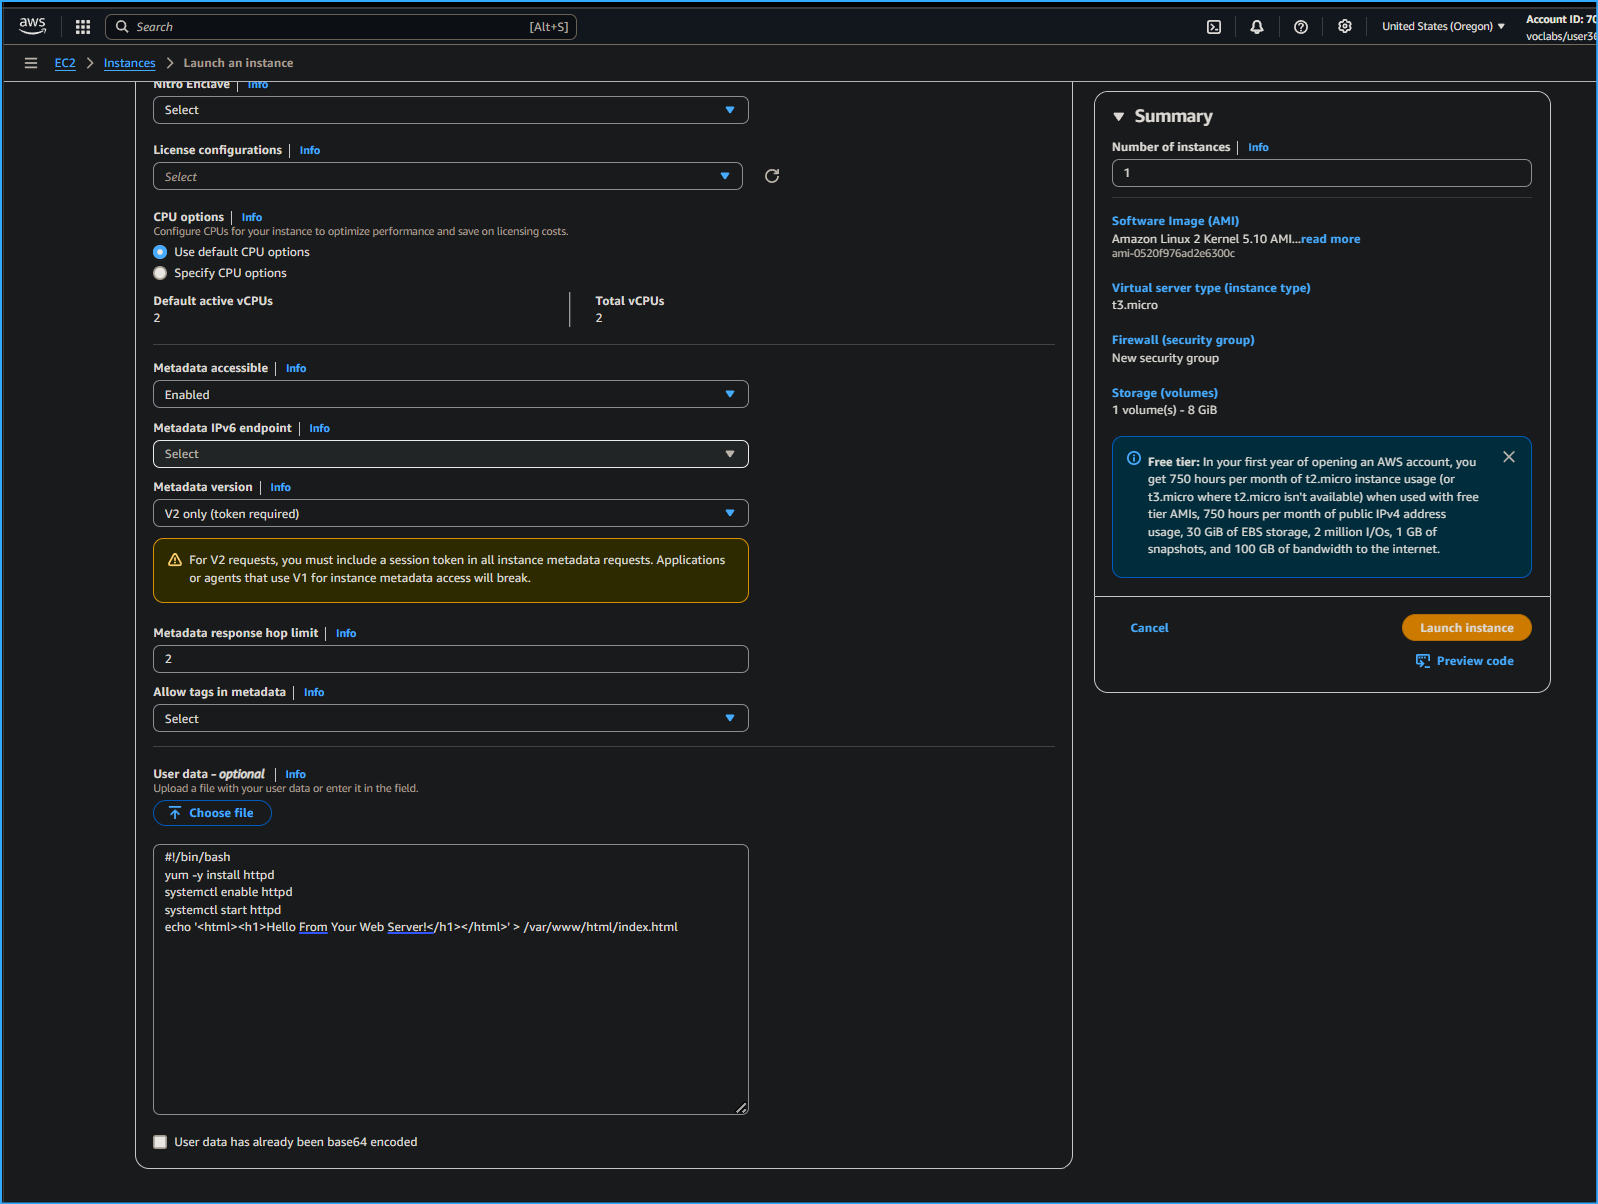
Step 7: Configuring advanced details
I expanded the Advanced details pane.
I selected the dropdown for Termination protection, then chose Enable.
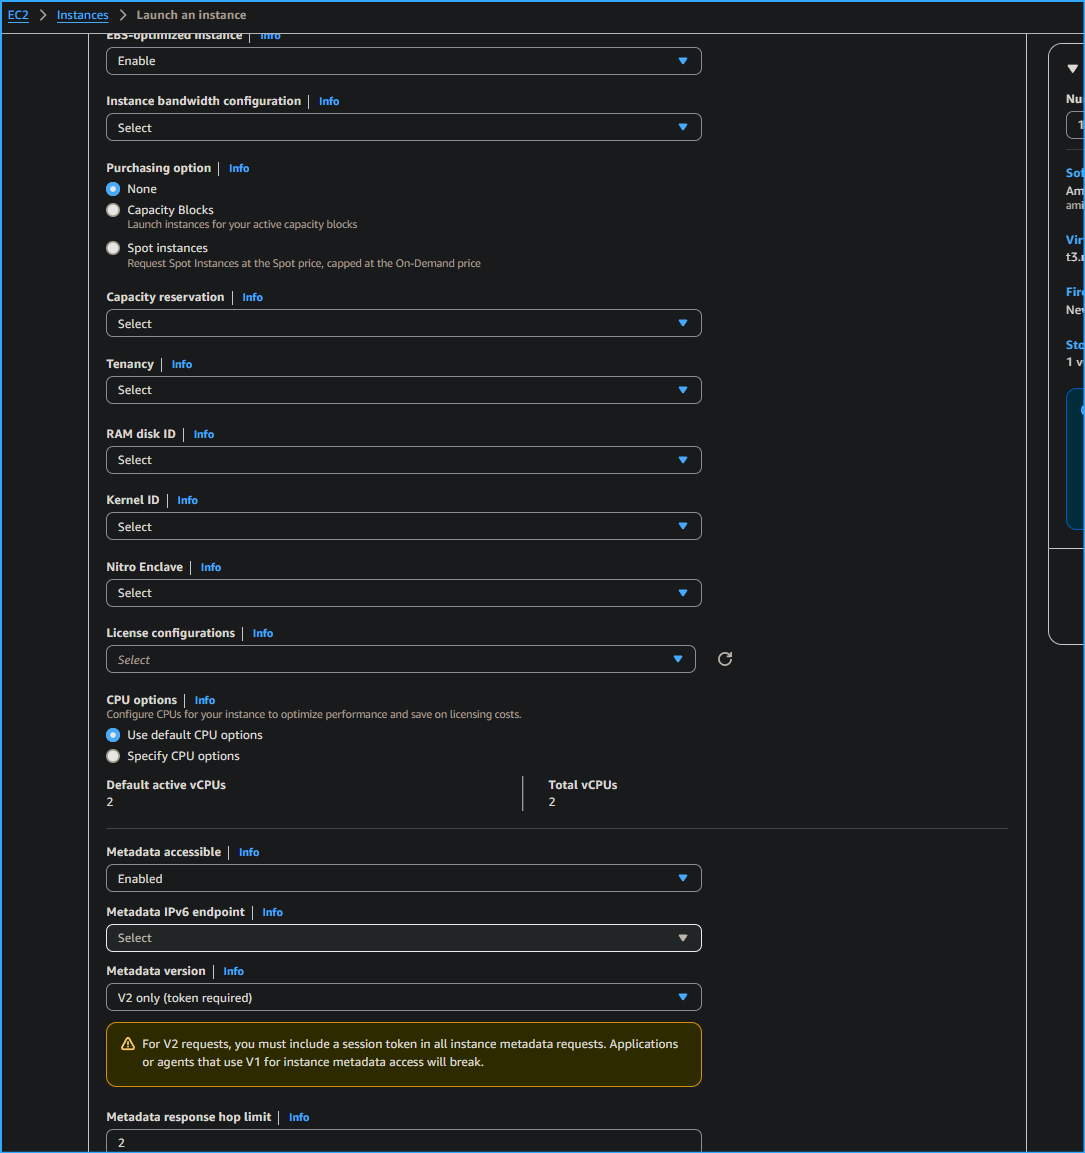
When you launch an instance in Amazon EC2, you have the option of
passing user data to the instance. These commands can be used to perform
common automated configuration tasks and even run scripts after the
instance starts.
I copied the following commands, and pasted them into the User data text
box.
#!/bin/bash yum -y install httpd systemctl enable httpd systemctl start
httpd echo '
Hello From Your Web Server!
' > /var/www/html/index.html
The script does the following:
- Install an Apache web server (httpd)
- Configure the web server to automatically start on boot
- Activate the Web server
- Create a simple web page
Step 8: Launching an EC2 instance
Now that I had configured my EC2 instance settings, it was time to
launch my instance.
In the right pane, I chose Launch instance
I chose View all instances
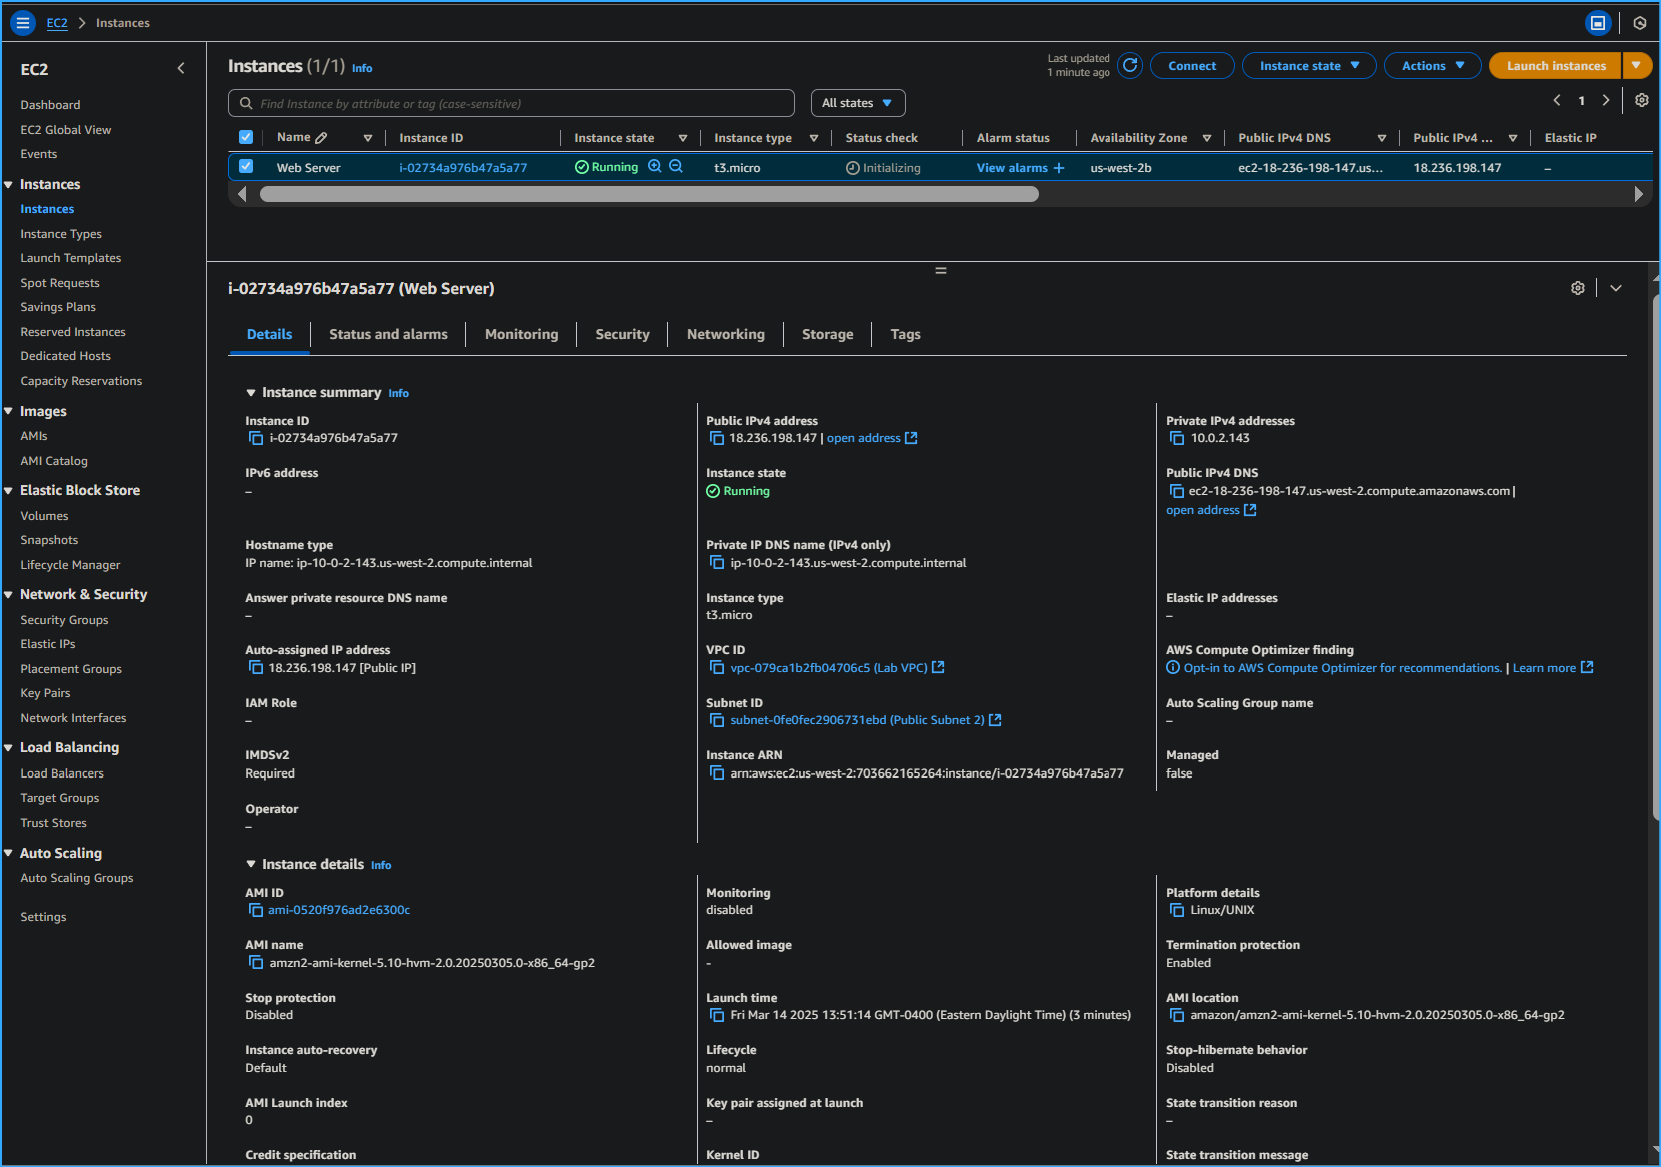
The instance appeared in a Pending state, which means it was being
launched. It then changed to Running, which indicated that the instance
had started booting. There was a short time before I could access the
instance.
The instance received a public DNS name that I could use to contact the
instance from the Internet.
I selected the box next to my Web Server. The Details tab displayed
detailed information about my instance.
To view more information in the Details tab, I dragged the window
divider upward.
I reviewed the information displayed in the Details, Security and
Networking tabs.
I waited for my instance to display the following:
Note: Refresh if needed.
- Instance State: Running
- Status Checks: 2/2 checks passed
Task 2: Monitor My Instance
Monitoring is an important part of maintaining the reliability,
availability, and performance of your Amazon Elastic Compute Cloud
(Amazon EC2) instances and your AWS solutions.
I selected the instance by checking the box next to the instance and
navigated to the bottom of the screen to the Status checks tab.
With instance status monitoring, you can quickly determine whether
Amazon EC2 has detected any problems that might prevent your instances
from running applications. Amazon EC2 performs automated checks on every
running EC2 instance to identify hardware and software issues.
I noticed that both the System reachability and Instance reachability
checks had passed.
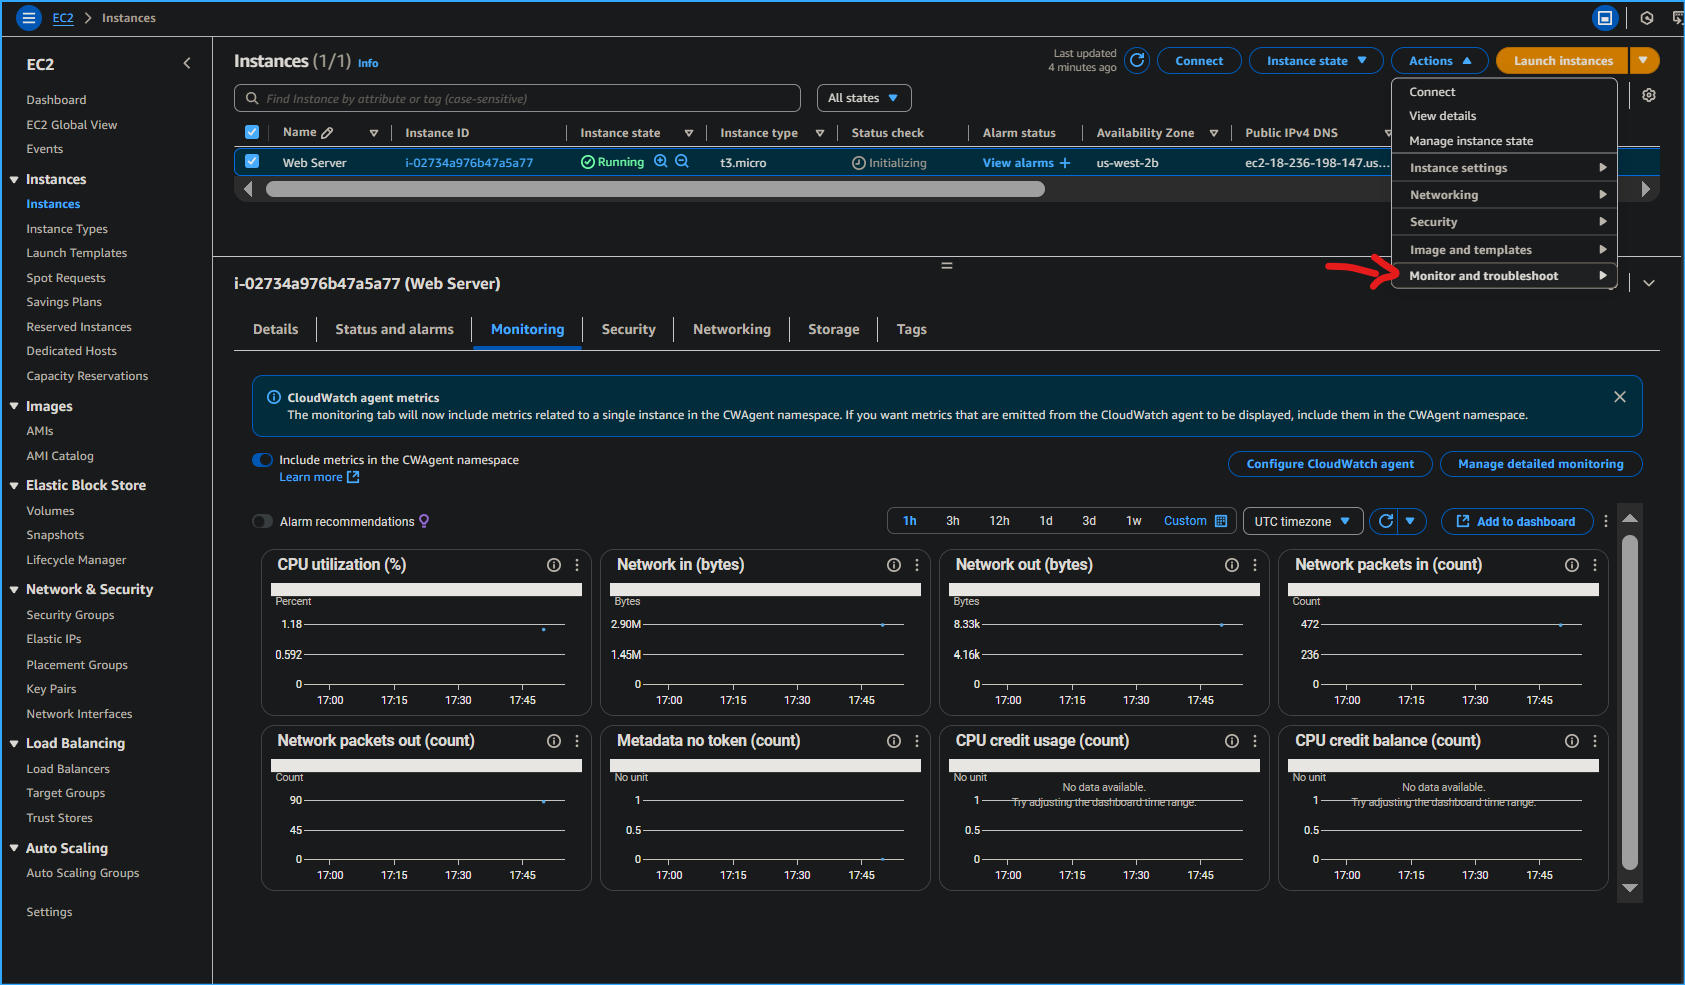
I selected the Monitoring tab.
This tab displays Amazon CloudWatch metrics for your instance.
Currently, there were not many metrics to display because the instance
was recently launched.
I could choose a graph to see an expanded view.
Amazon EC2 sends metrics to Amazon CloudWatch for your EC2 instances.
Basic (five-minute) monitoring is enabled by default. You can enable
detailed (one-minute) monitoring.
In the Actions menu, I selected Monitor and troubleshoot Get Instance
Screenshot.
This showed me what my Amazon EC2 instance console would look like if a
screen were attached to it.
If you are unable to reach your instance via SSH or RDP, you can capture
a screenshot of your instance and view it as an image. This provides
visibility as to the status of the instance, and allows for quicker
troubleshooting.
I selected Cancel located at the bottom of the instance screenshot.
I successfully explored several ways to monitor my instance.
Task 3: Update My Security Group and Access the Web Server
When I launched the EC2 instance, I provided a script that installed a
web server and created a simple web page. In this task, I accessed
content from the web server.
I selected the instance by checking the box and selected the Details
tab.
I copied the Public IPv4 address of my instance to my clipboard.
I opened a new tab in my web browser, pasted the IP address I just
copied, then pressed Enter.
I was not able to access my web server because the security group was
not permitting inbound traffic on port 80, which is used for HTTP web
requests. This is a demonstration of using a security group as a
firewall to restrict the network traffic that is allowed in and out of
an instance.
To correct this, I updated the security group to permit web traffic on
port 80.
I kept the browser tab open, but returned to the EC2 Management Console
tab.
In the left navigation pane, I selected Security Groups located under
Network & Security.
I selected Web Server security group.
I selected the Inbound rules tab.
The security group currently had no rules.
I selected Edit inbound rules then selected Add rule and configured the
rule with the following settings:
- Type: HTTP
- Source: Anywhere-IPv4
I selected Save rules
I returned to the web server tab that I previously opened and refreshed
the page.
I saw the message Hello From Your Web Server!
I successfully modified my security group to permit HTTP traffic into my
Amazon EC2 Instance.
Task 4: Resize My Instance: Instance Type and EBS Volume
As your needs change, you might find that your instance is over-utilized
(too small) or under-utilized (too large). If so, you can change the
instance type. For example, if a t3.micro instance is too small for its
workload, you can change it to an m5.medium instance. Similarly, you can
change the size of a disk.
Stop My Instance
Before I could resize an instance, I had to stop it.
When you stop an instance, it is shut down. There is no charge for a
stopped EC2 instance, but the storage charge for attached Amazon EBS
volumes remains.
On the EC2 Management Console, in the left navigation pane, I selected
Instances.
Web Server was already selected.
I selected Instance state > Stop instance.
I selected Stop
My instance performed a normal shutdown and then stopped running.
I waited for the Instance State to display: stopped
Change The Instance Type
In the Actions menu, I selected Instance Settings Change Instance Type,
then configured:
I selected Apply
When the instance was started again it would be a t3.small, which has
twice as much memory as a t3.micro instance.
Resize the EBS Volume
In the left navigation menu, I selected Volumes located under Elastic
Block Store.
I selected the volume by checking the box, and navigated to the Actions
menu, selected Modify Volume.
The disk volume currently had a size of 8 GiB. I increased the size of
this disk.
I changed the size to: 10
I selected Modify
I selected Modify to confirm and increase the size of the volume.
Start the Resized Instance
I started the instance again, which now had more memory and more disk
space.
In left navigation pane, I selected Instances.
I selected the Web Server instance by checking the box, then navigated
to Instance state > Start instance.
I successfully resized my Amazon EC2 Instance. In this task I changed my
instance type from t3.micro to t3.small. I also modified my root disk
volume from 8 GiB to 10 GiB.
Task 5: Test Termination Protection
You can delete your instance when you no longer need it. This is
referred to as terminating your instance. You cannot connect to or
restart an instance after it has been terminated.
In this task, I learned how to use termination protection.
In left navigation pane, I selected Instances.
I selected the Web Server instance by checking the box and navigated to
the top and selected Instance state menu, selected Terminate instance.
Note: There is a message that says: On an EBS-backed instance, the
default action is for the root EBS volume to be deleted when the
instance is terminated. Storage on any local drives will be lost. It
will ask if you are sure that you want to terminate the instance. You
will be able to select the Terminate button.
Note: I noticed that the instance did not terminate and a red error
message popped up at the top that said: Failed to terminate an instance:
The instance may not be terminated. This is because it has termination
protection enabled.
In the Actions menu, I selected Instance settings Change termination
protection.
I unchecked Enable followed by Save
I could now terminate the instance.
In the Actions menu, I selected Instance State Terminate instance.
I selected Terminate
I successfully tested termination protection and terminated my instance.
×
![]()
 Navigated to launch instance
 Launch an instance one
 Launch an instance two
 Launch an instance three
 Launch an instance four
 Launch an instance five
 Proceeding without key pair not recommended
 Web server instance details
 Selecting monitor and troubleshoot and monitoring tab shows
metrics
Selecting monitor and troubleshoot and monitoring tab shows
metrics
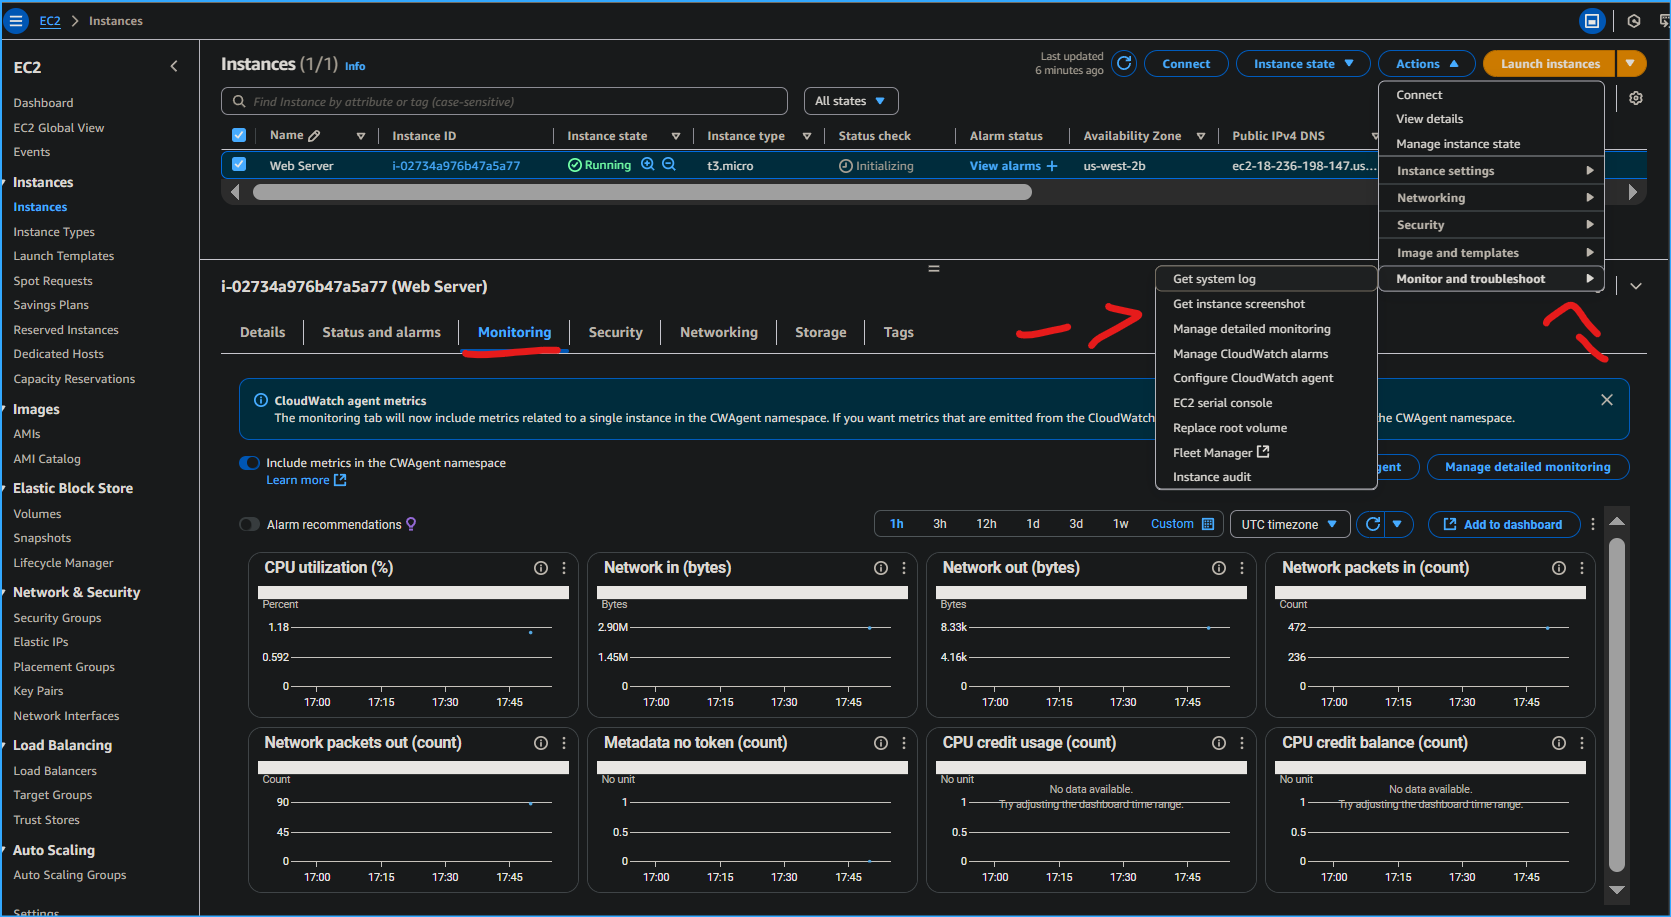 Selecting monitor and troubleshoot get instance screenshot
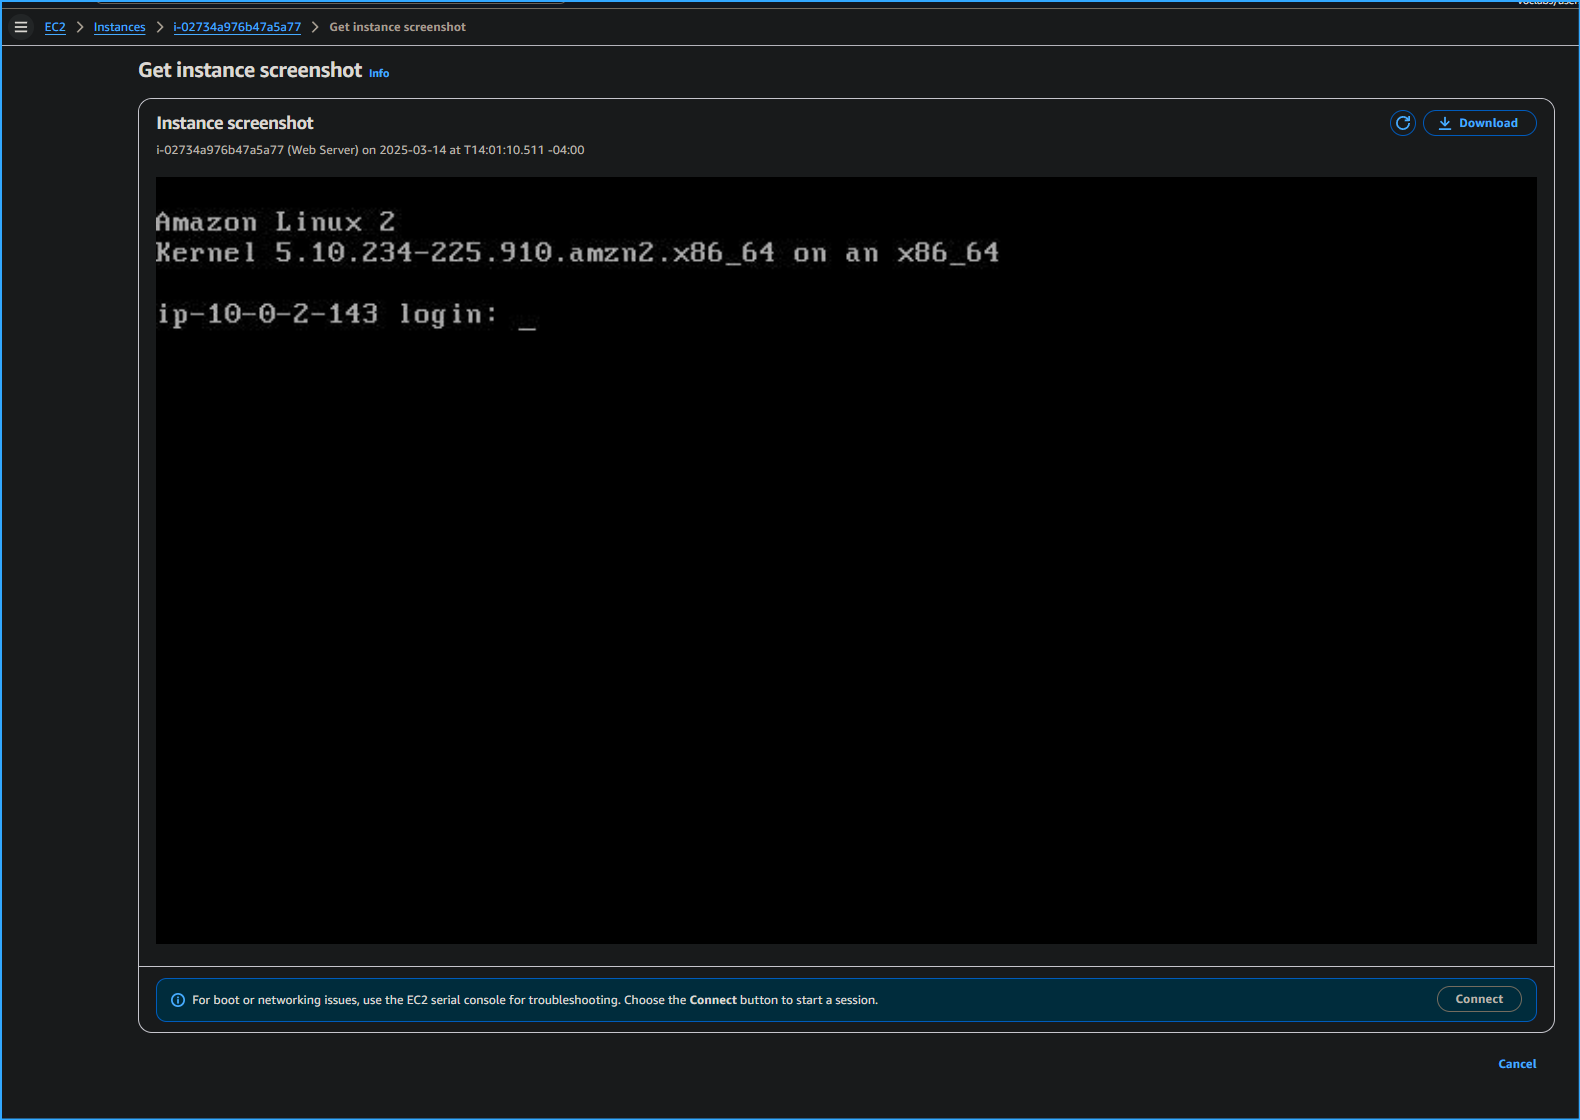 Get instance screenshot
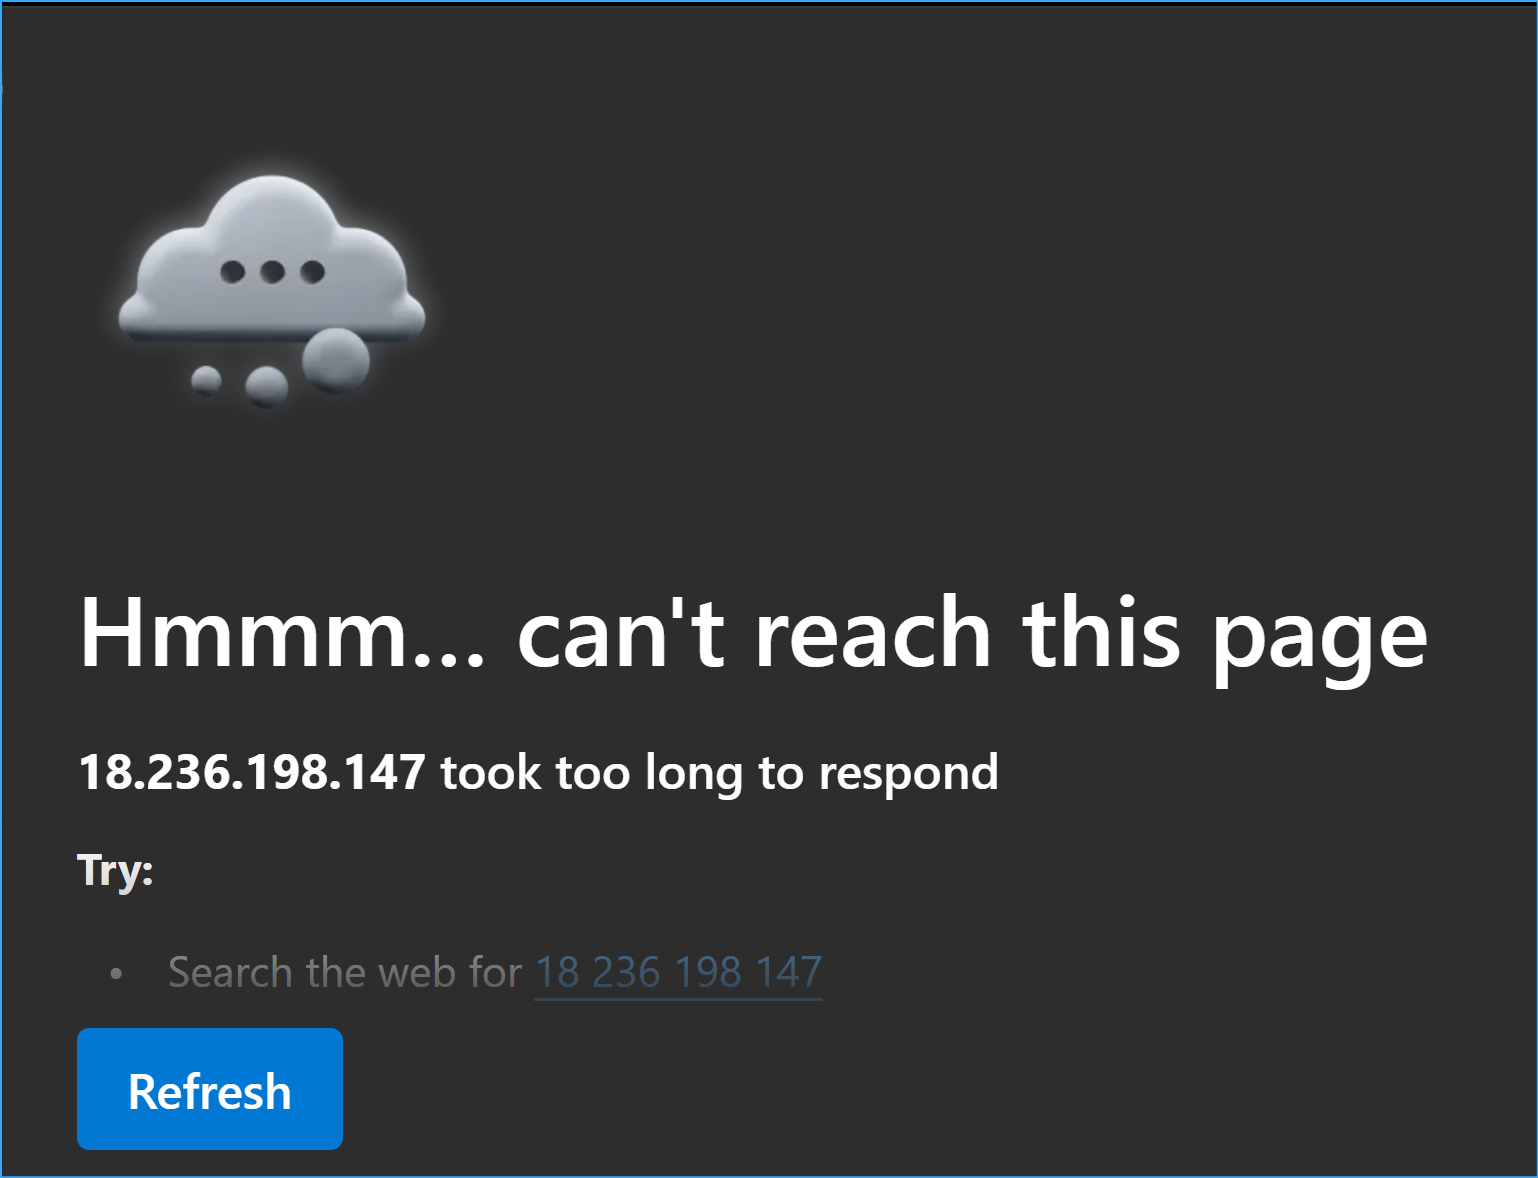 Website not loading need to edit sg inbound rules
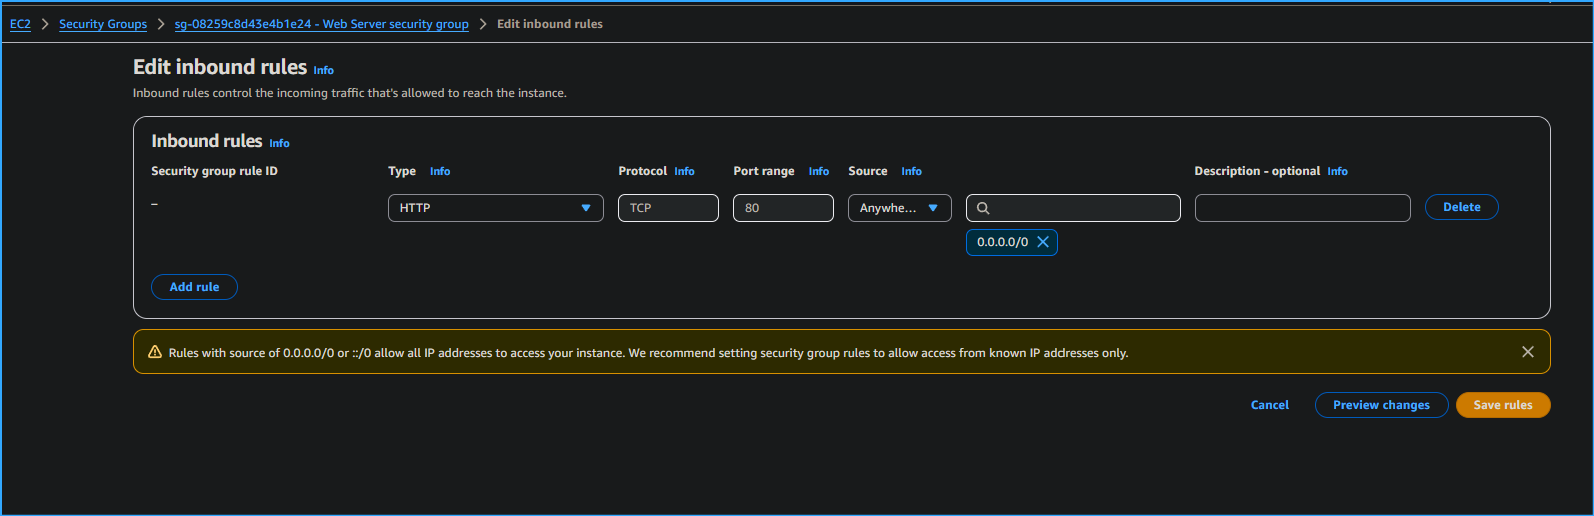 Allowing access to website by editing sg inbound rules
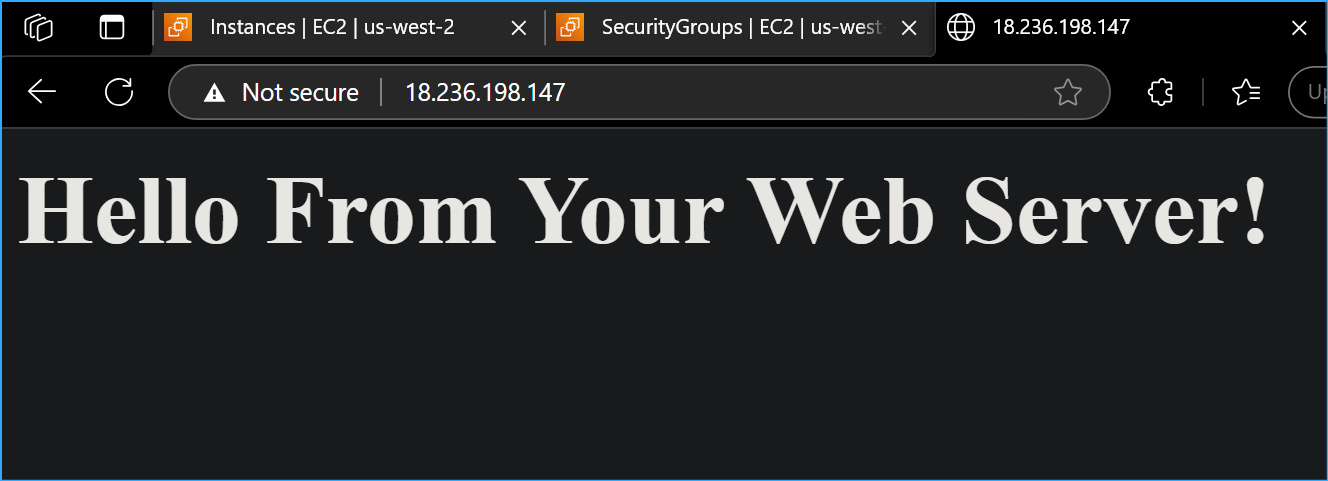 Web server loads now
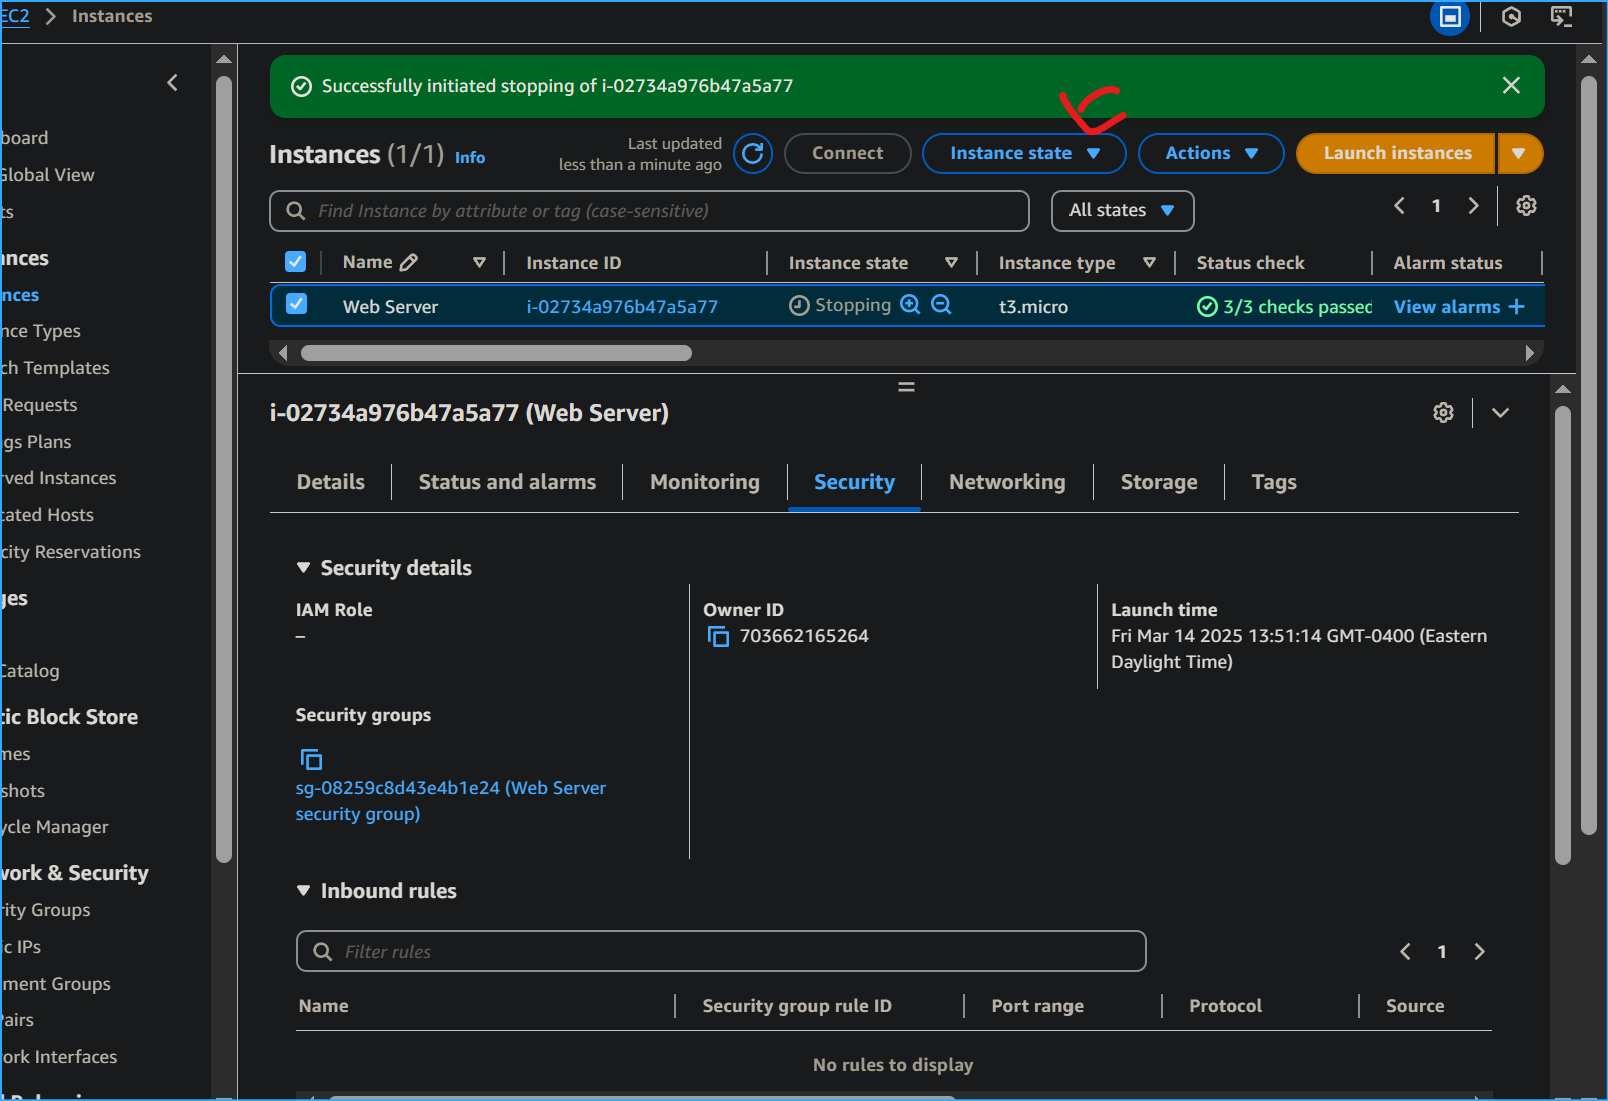 Stopped instance here
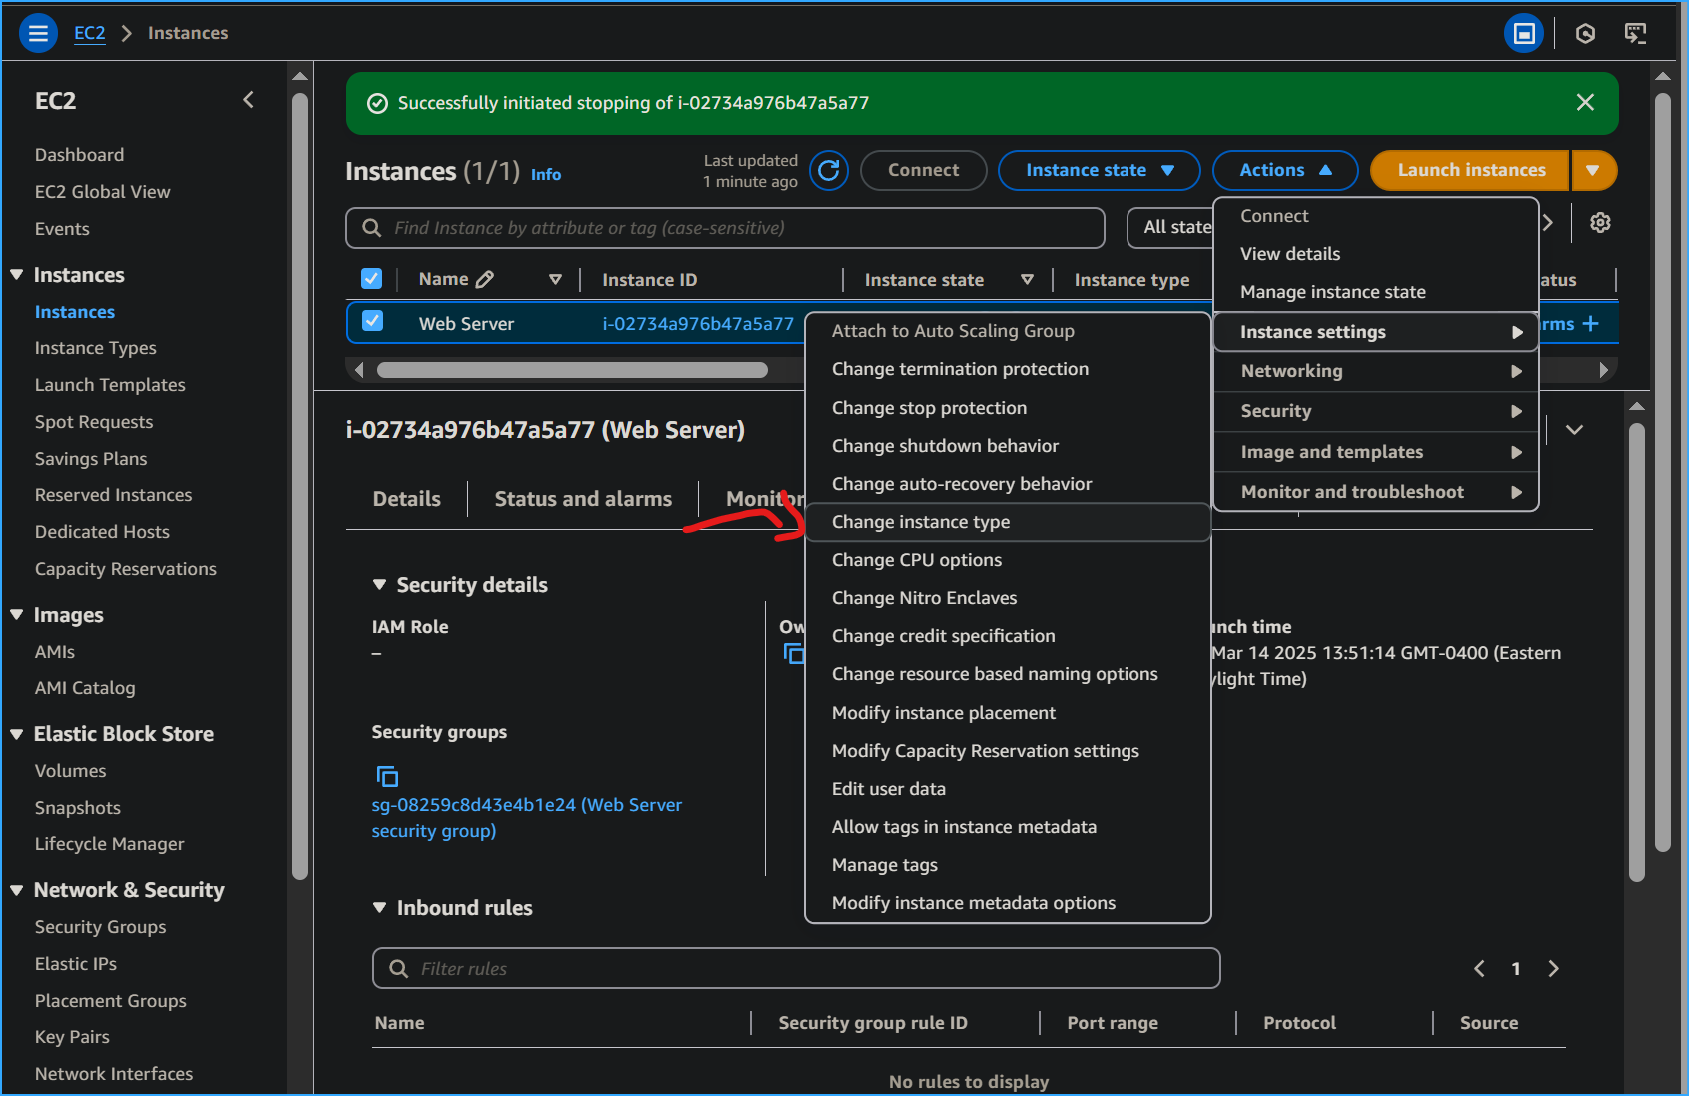 After stopping instance changing type here
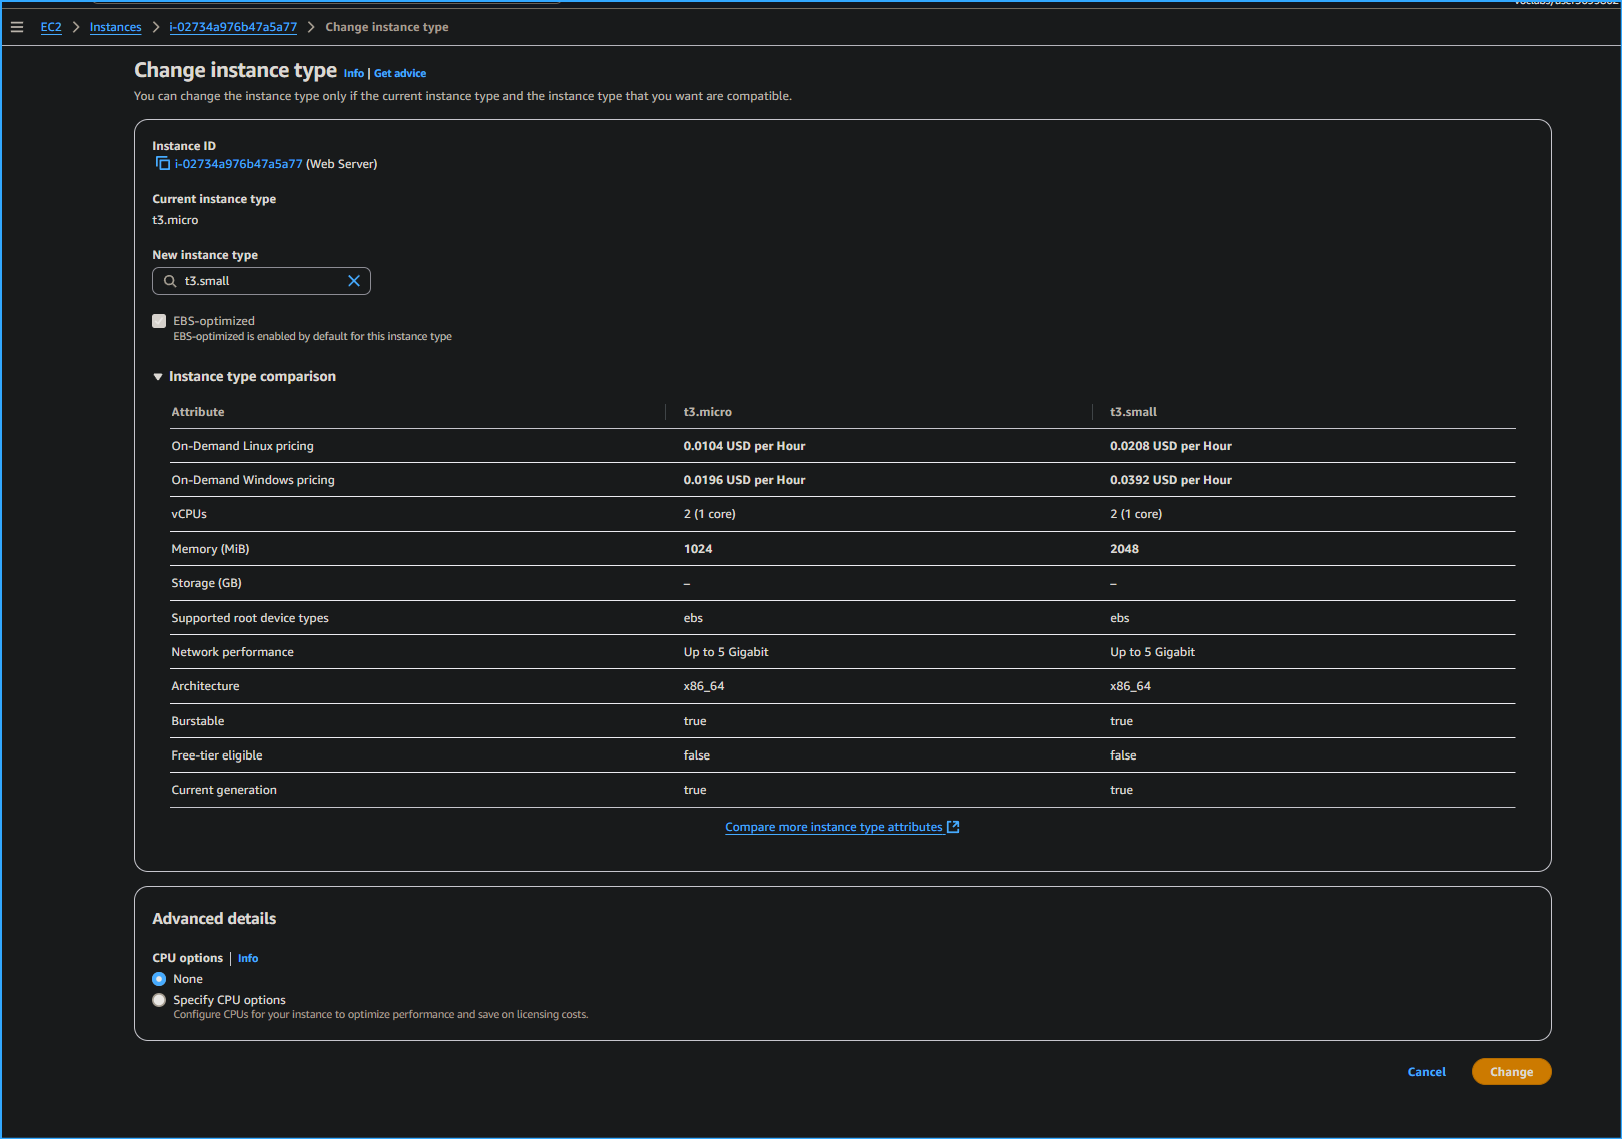 Changed instance type doubling memory volume
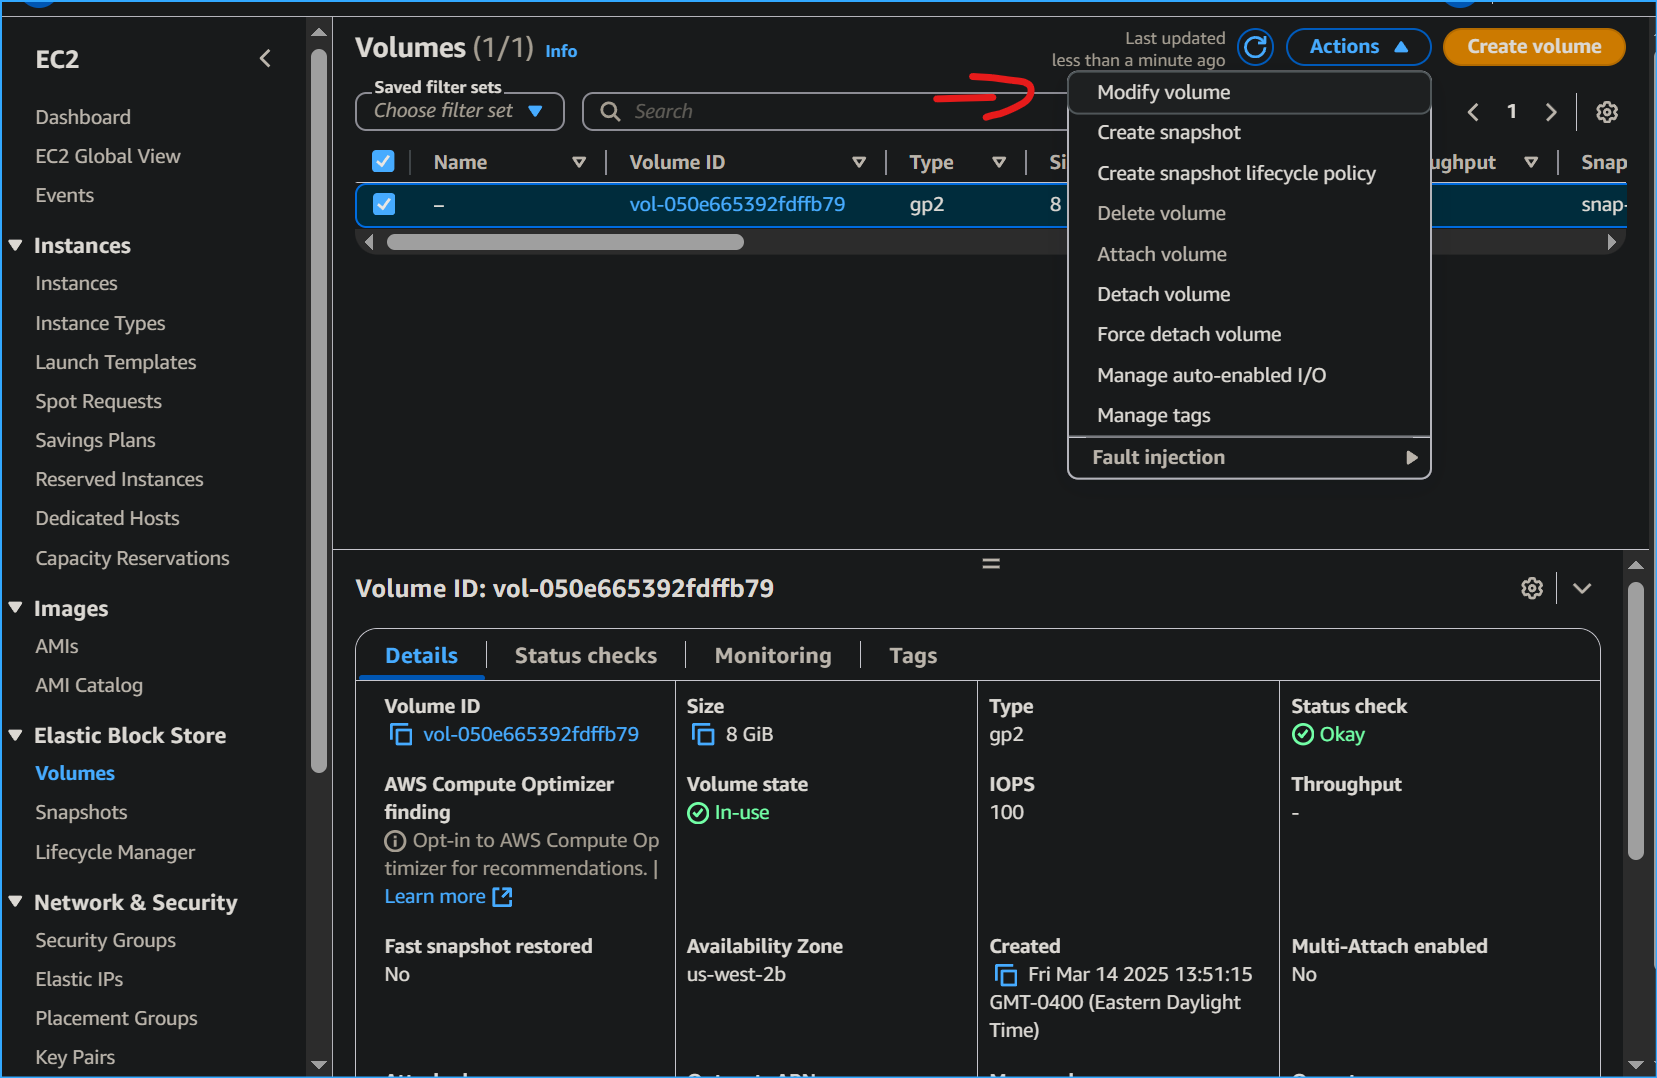 Modifying ebs volume
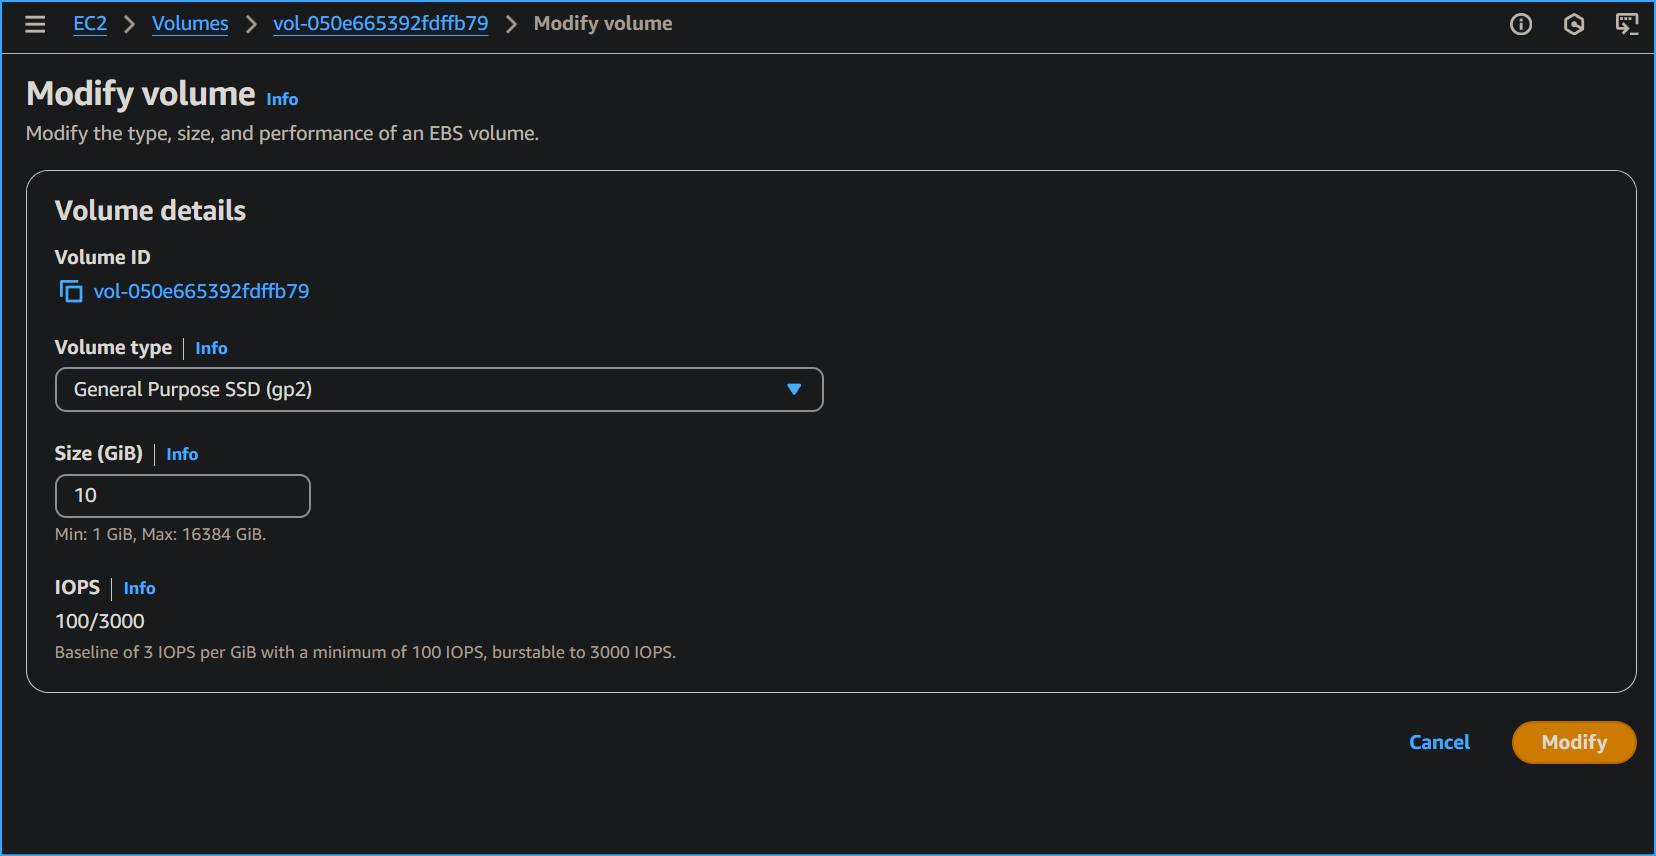 Modified ebs size to ten
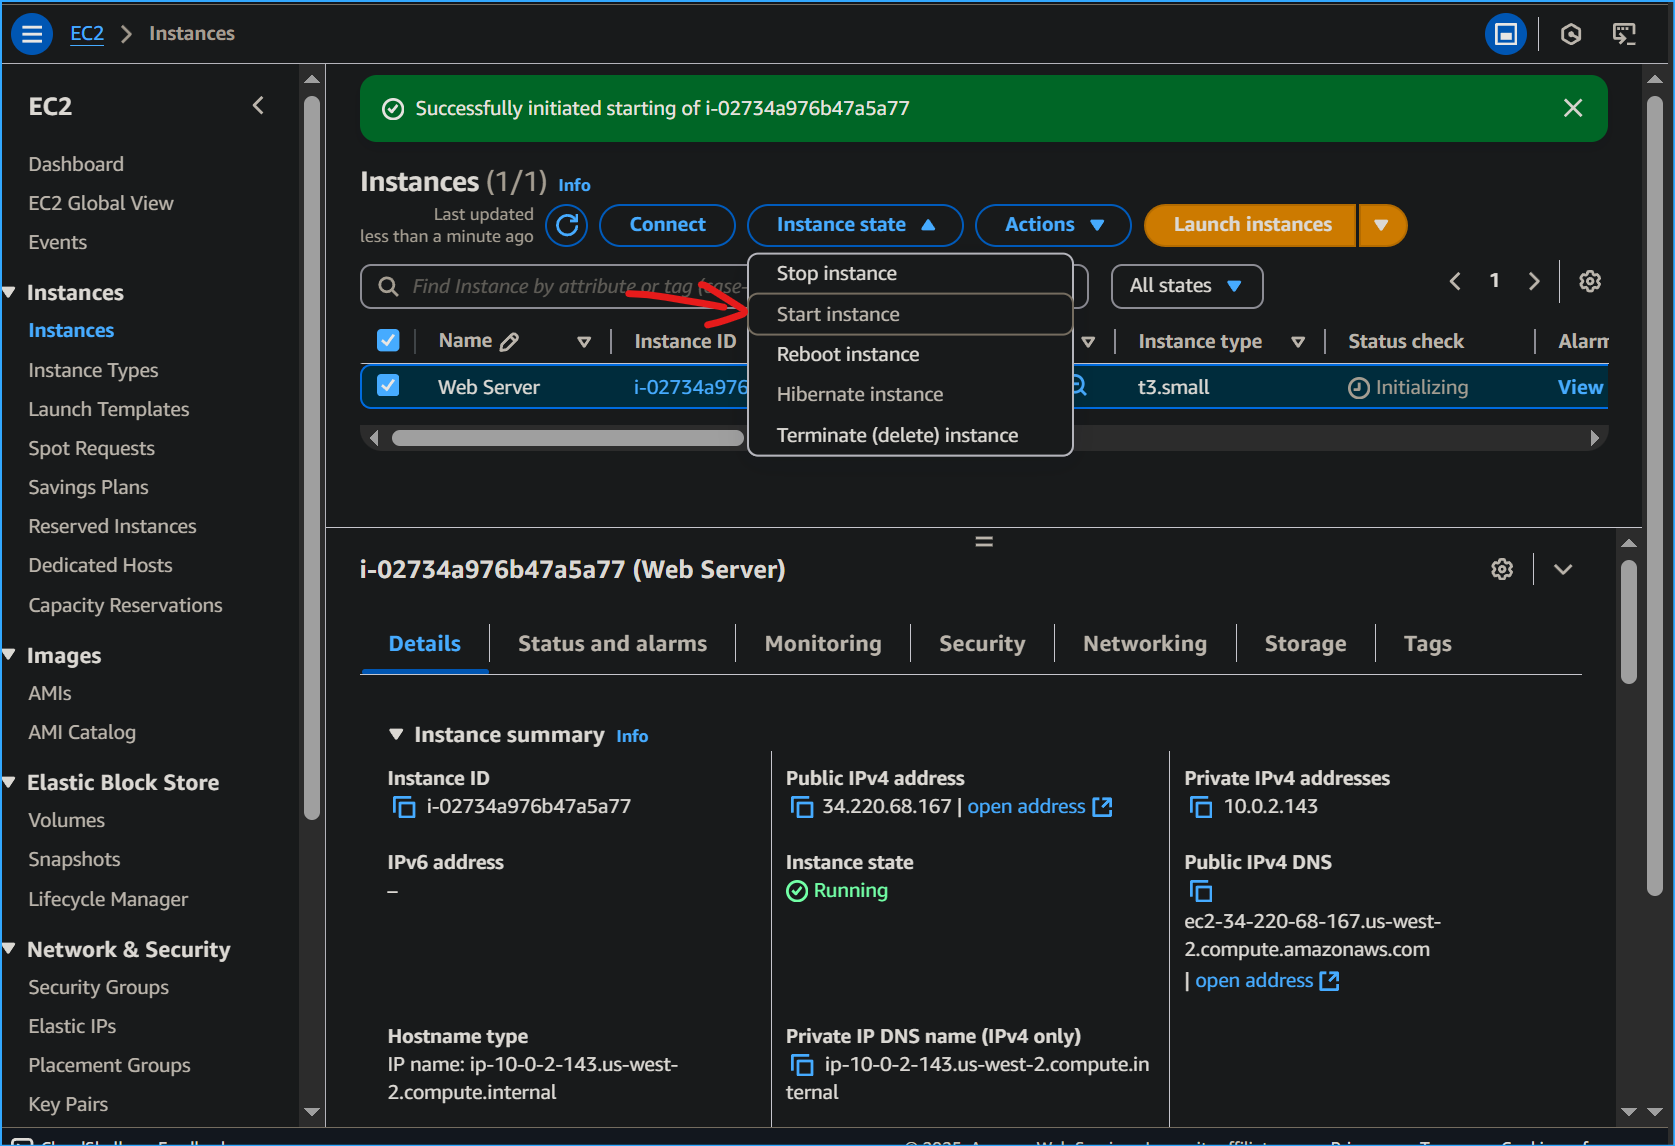 Restarted instance
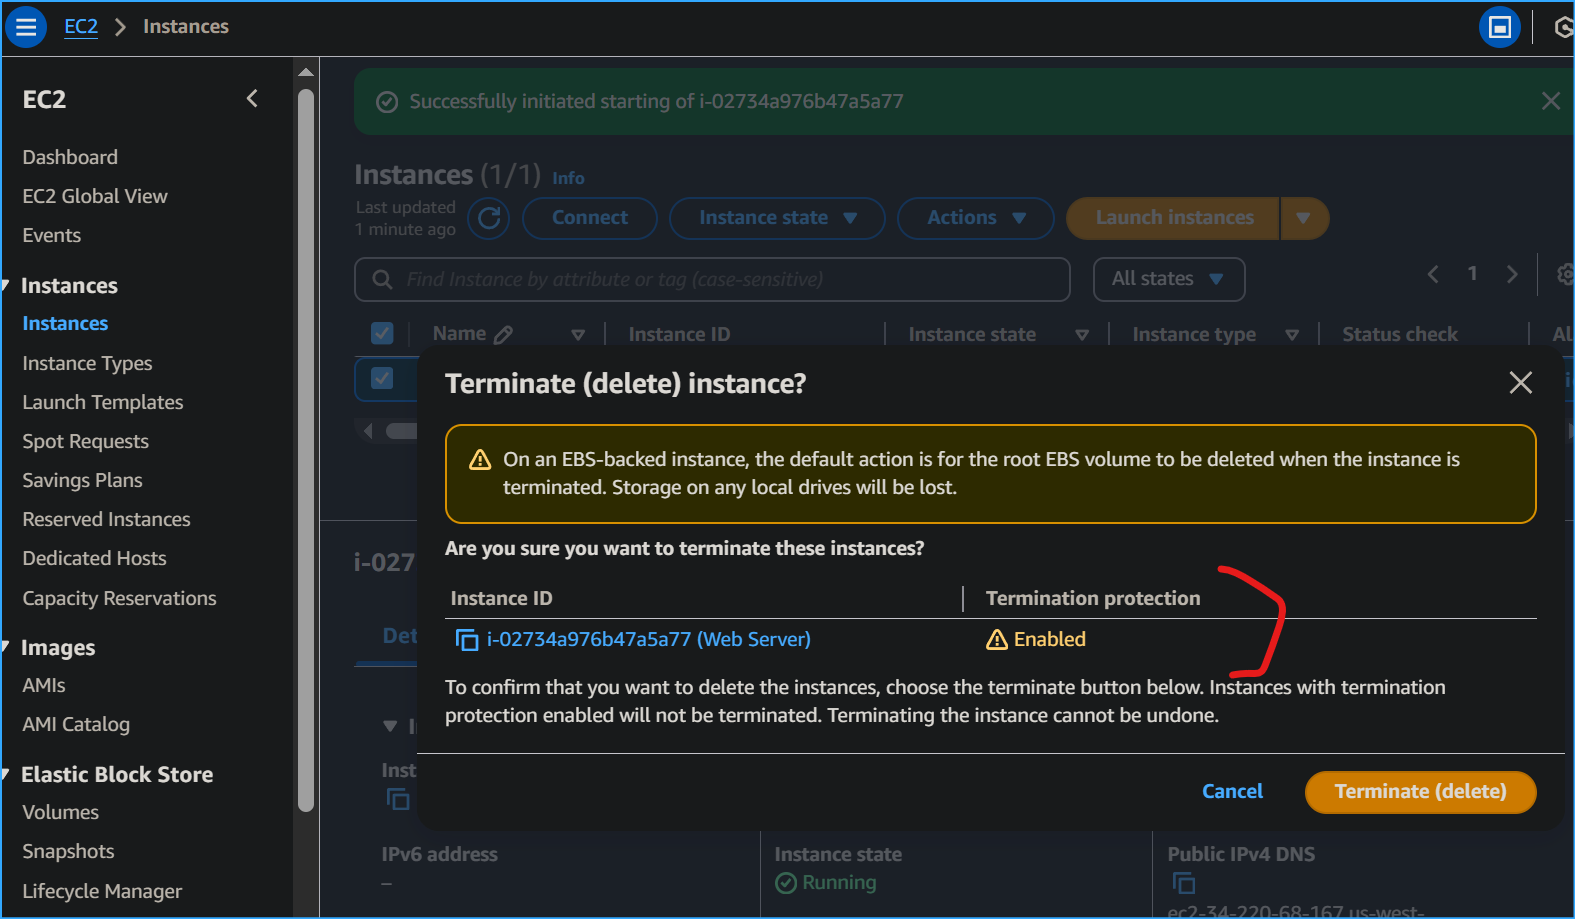 Termination protection on
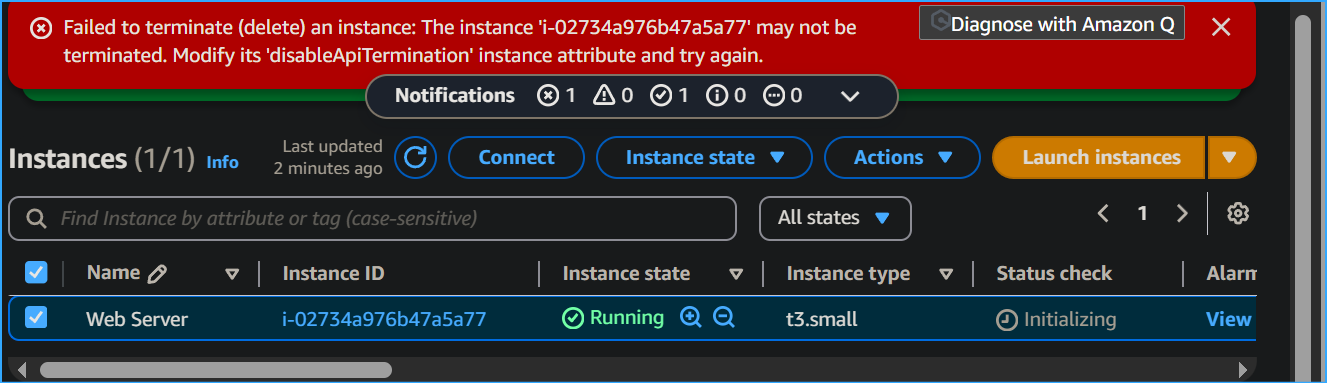 Failed to terminate error
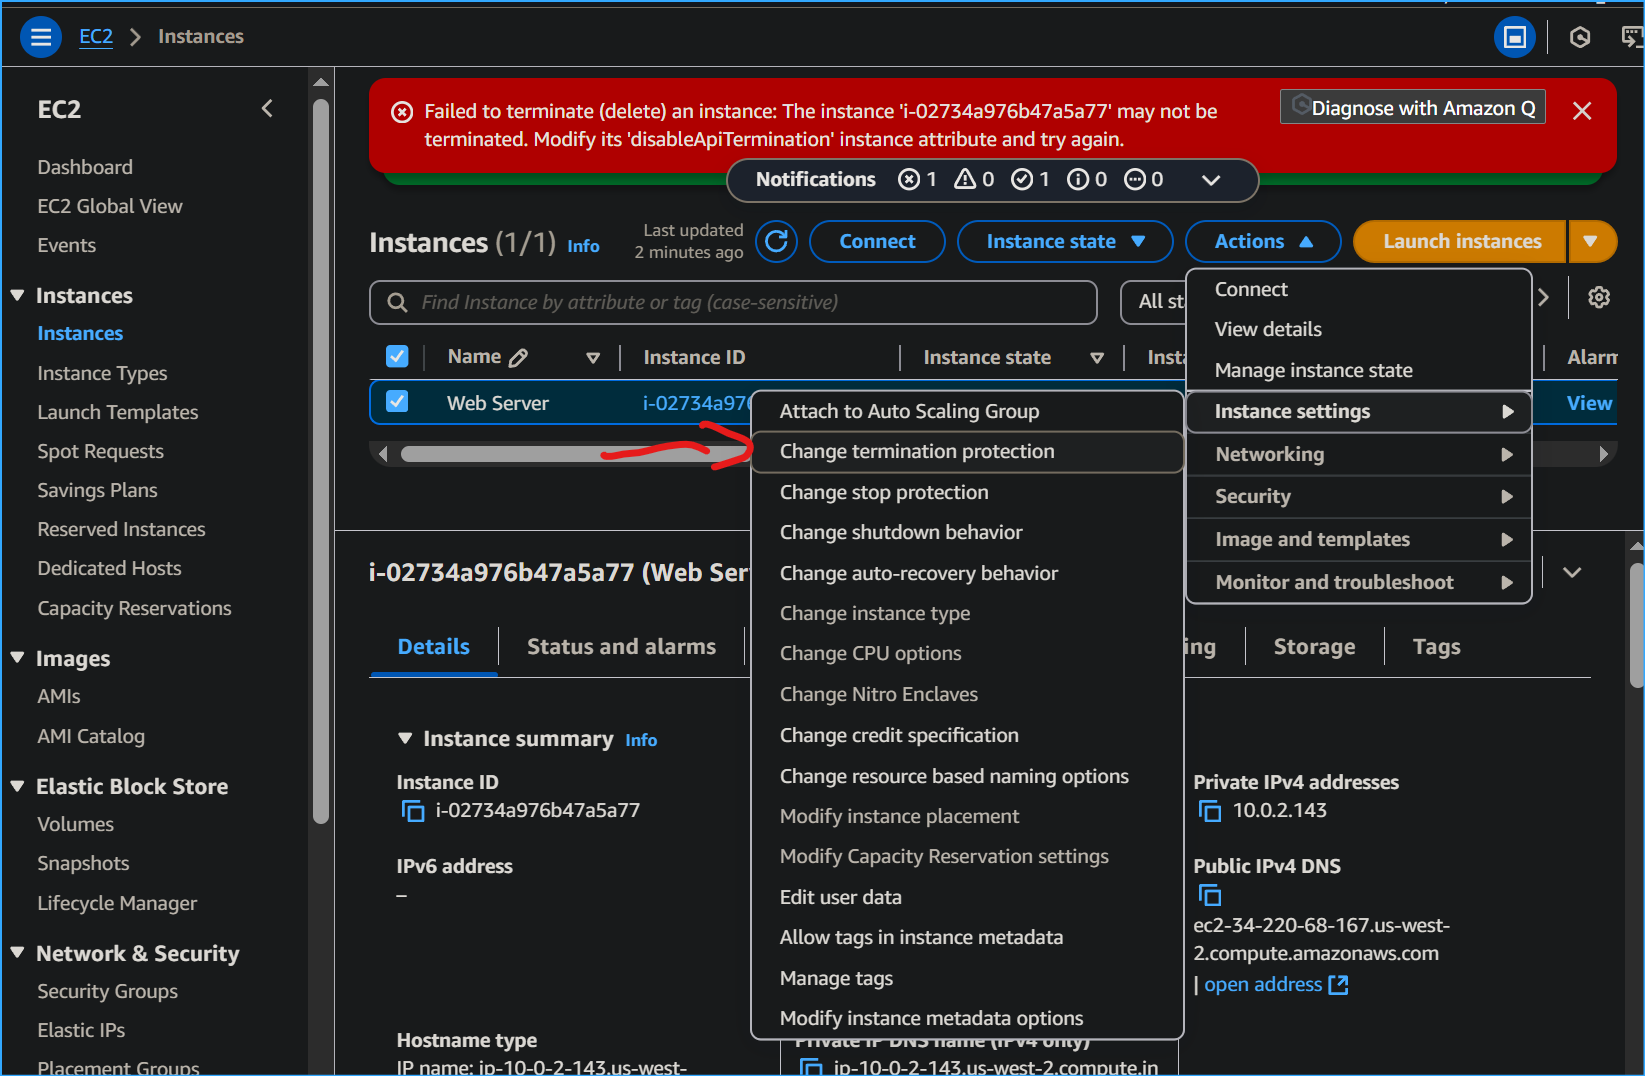 Changing termination protection
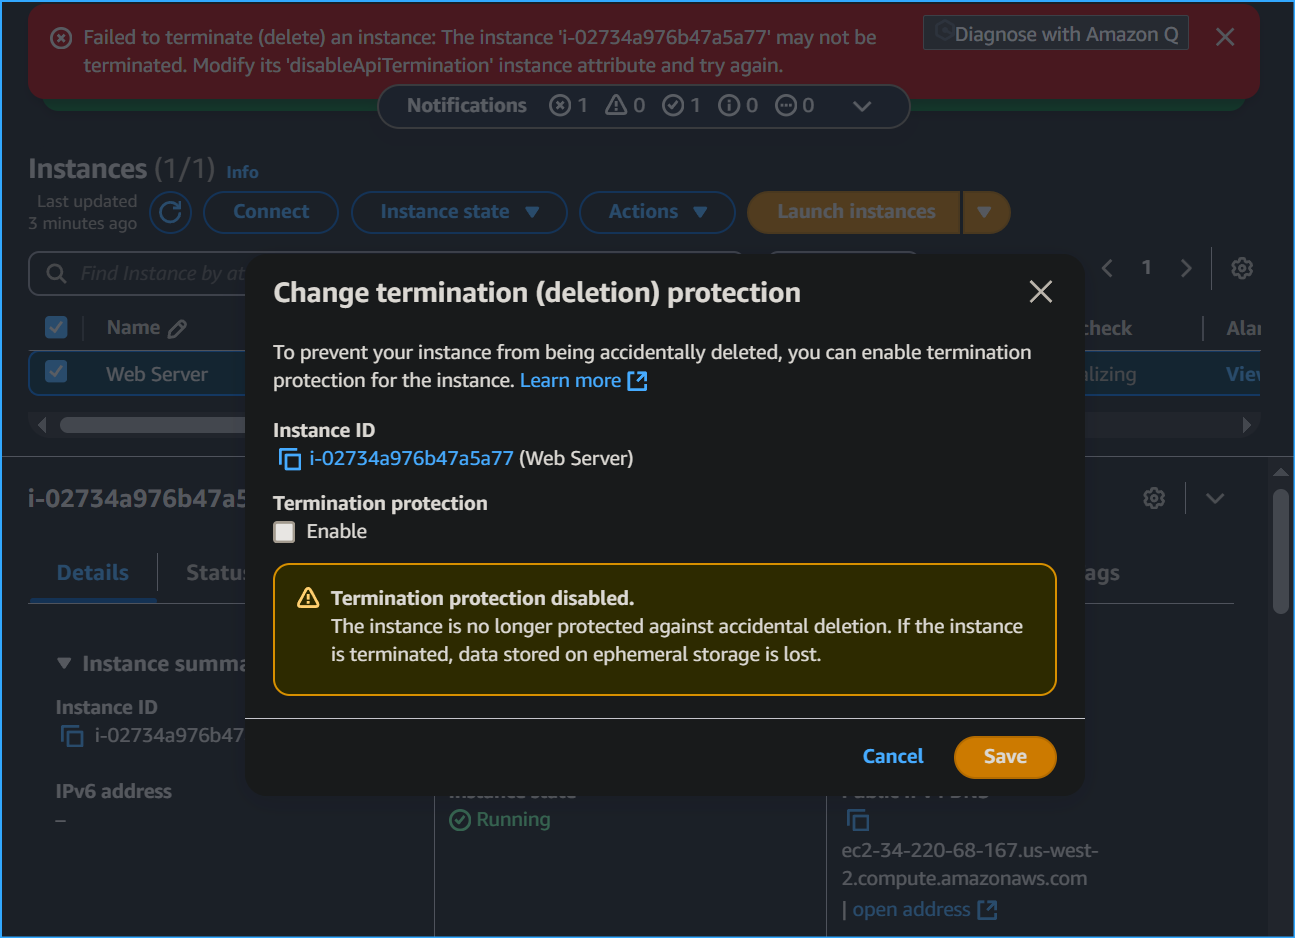 Unchecked enable
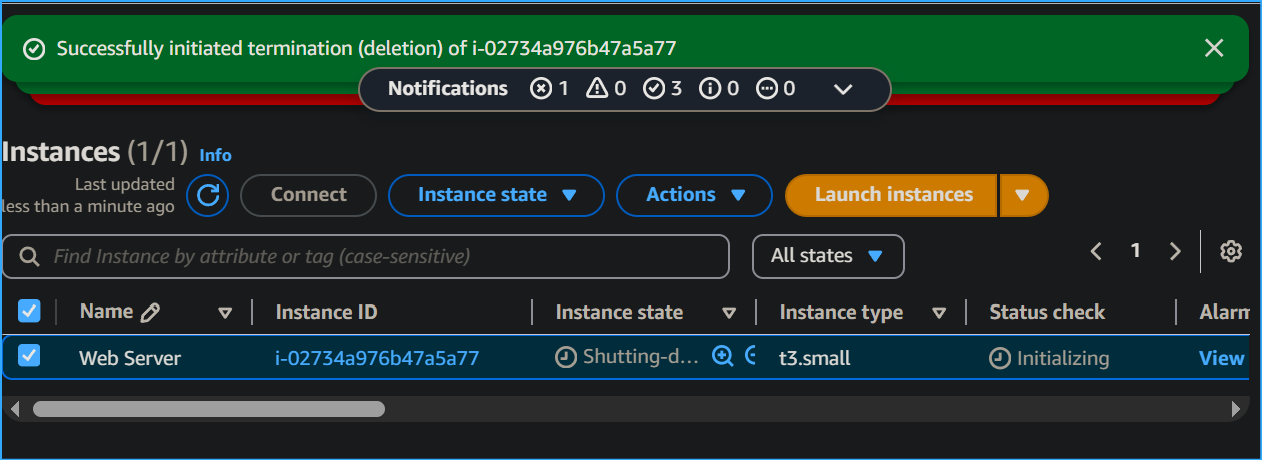 Now the instance successfully terminated
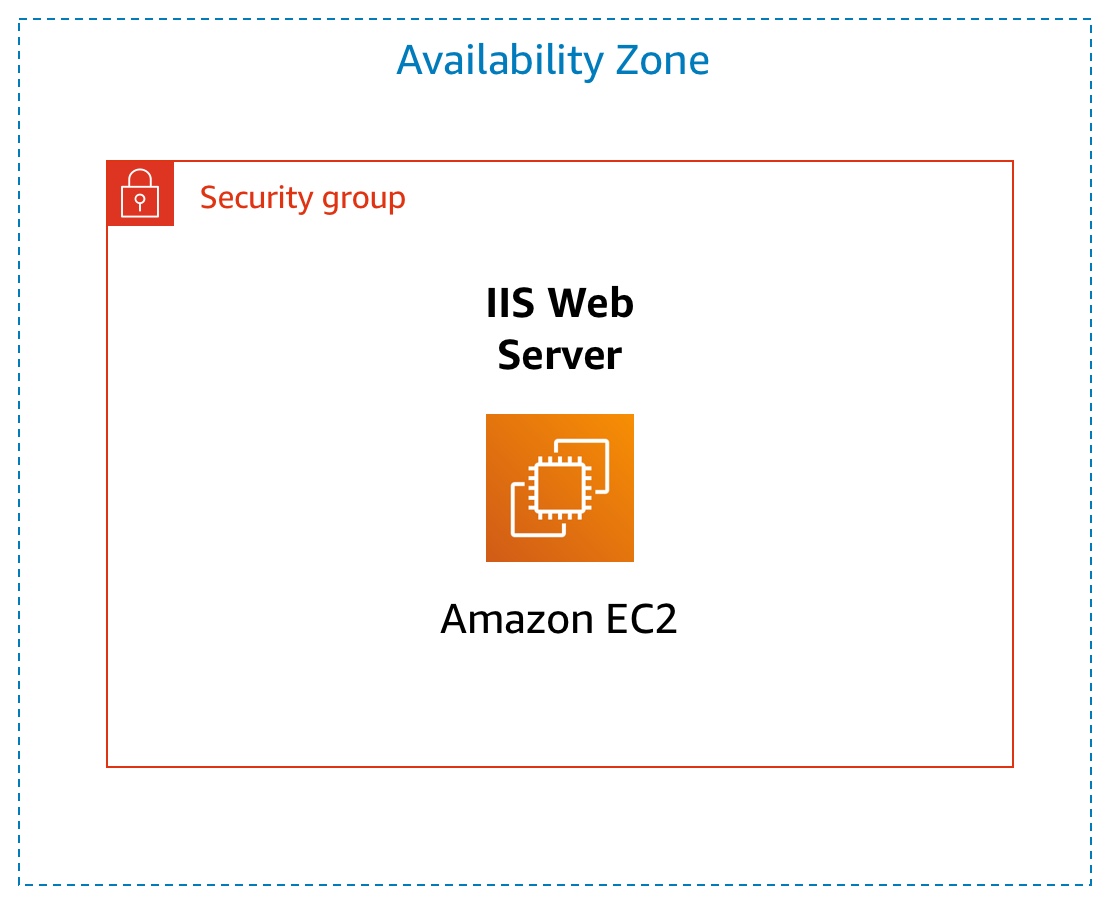 Diagram