Building a Database Server with RDS
Project Overview
In this project, I worked with Amazon Relational Database Service
(Amazon RDS) to set up, operate, and scale a relational database in the
cloud. Amazon RDS made it easy to manage time-consuming database
administration tasks, allowing me to focus on the application rather
than the infrastructure.
Amazon RDS provides six familiar database engines to choose from: Amazon
Aurora, Oracle, Microsoft SQL Server, PostgreSQL, MySQL and MariaDB. For
this project, I chose to work with MySQL.
Project Objectives
- Launch an Amazon RDS DB instance with high availability
-
Configure the DB instance to permit connections from my web server
- Open a web application and interact with the database
Task 1: Create a Security Group for the RDS DB Instance
First, I needed to create a security group to allow my web server to
access the RDS DB instance. This security group would be used when
launching the database instance.
-
I opened the AWS Management Console, selected the Services menu, and
then selected VPC under Networking & Content Delivery.
- In the left navigation pane, I clicked Security Groups.
-
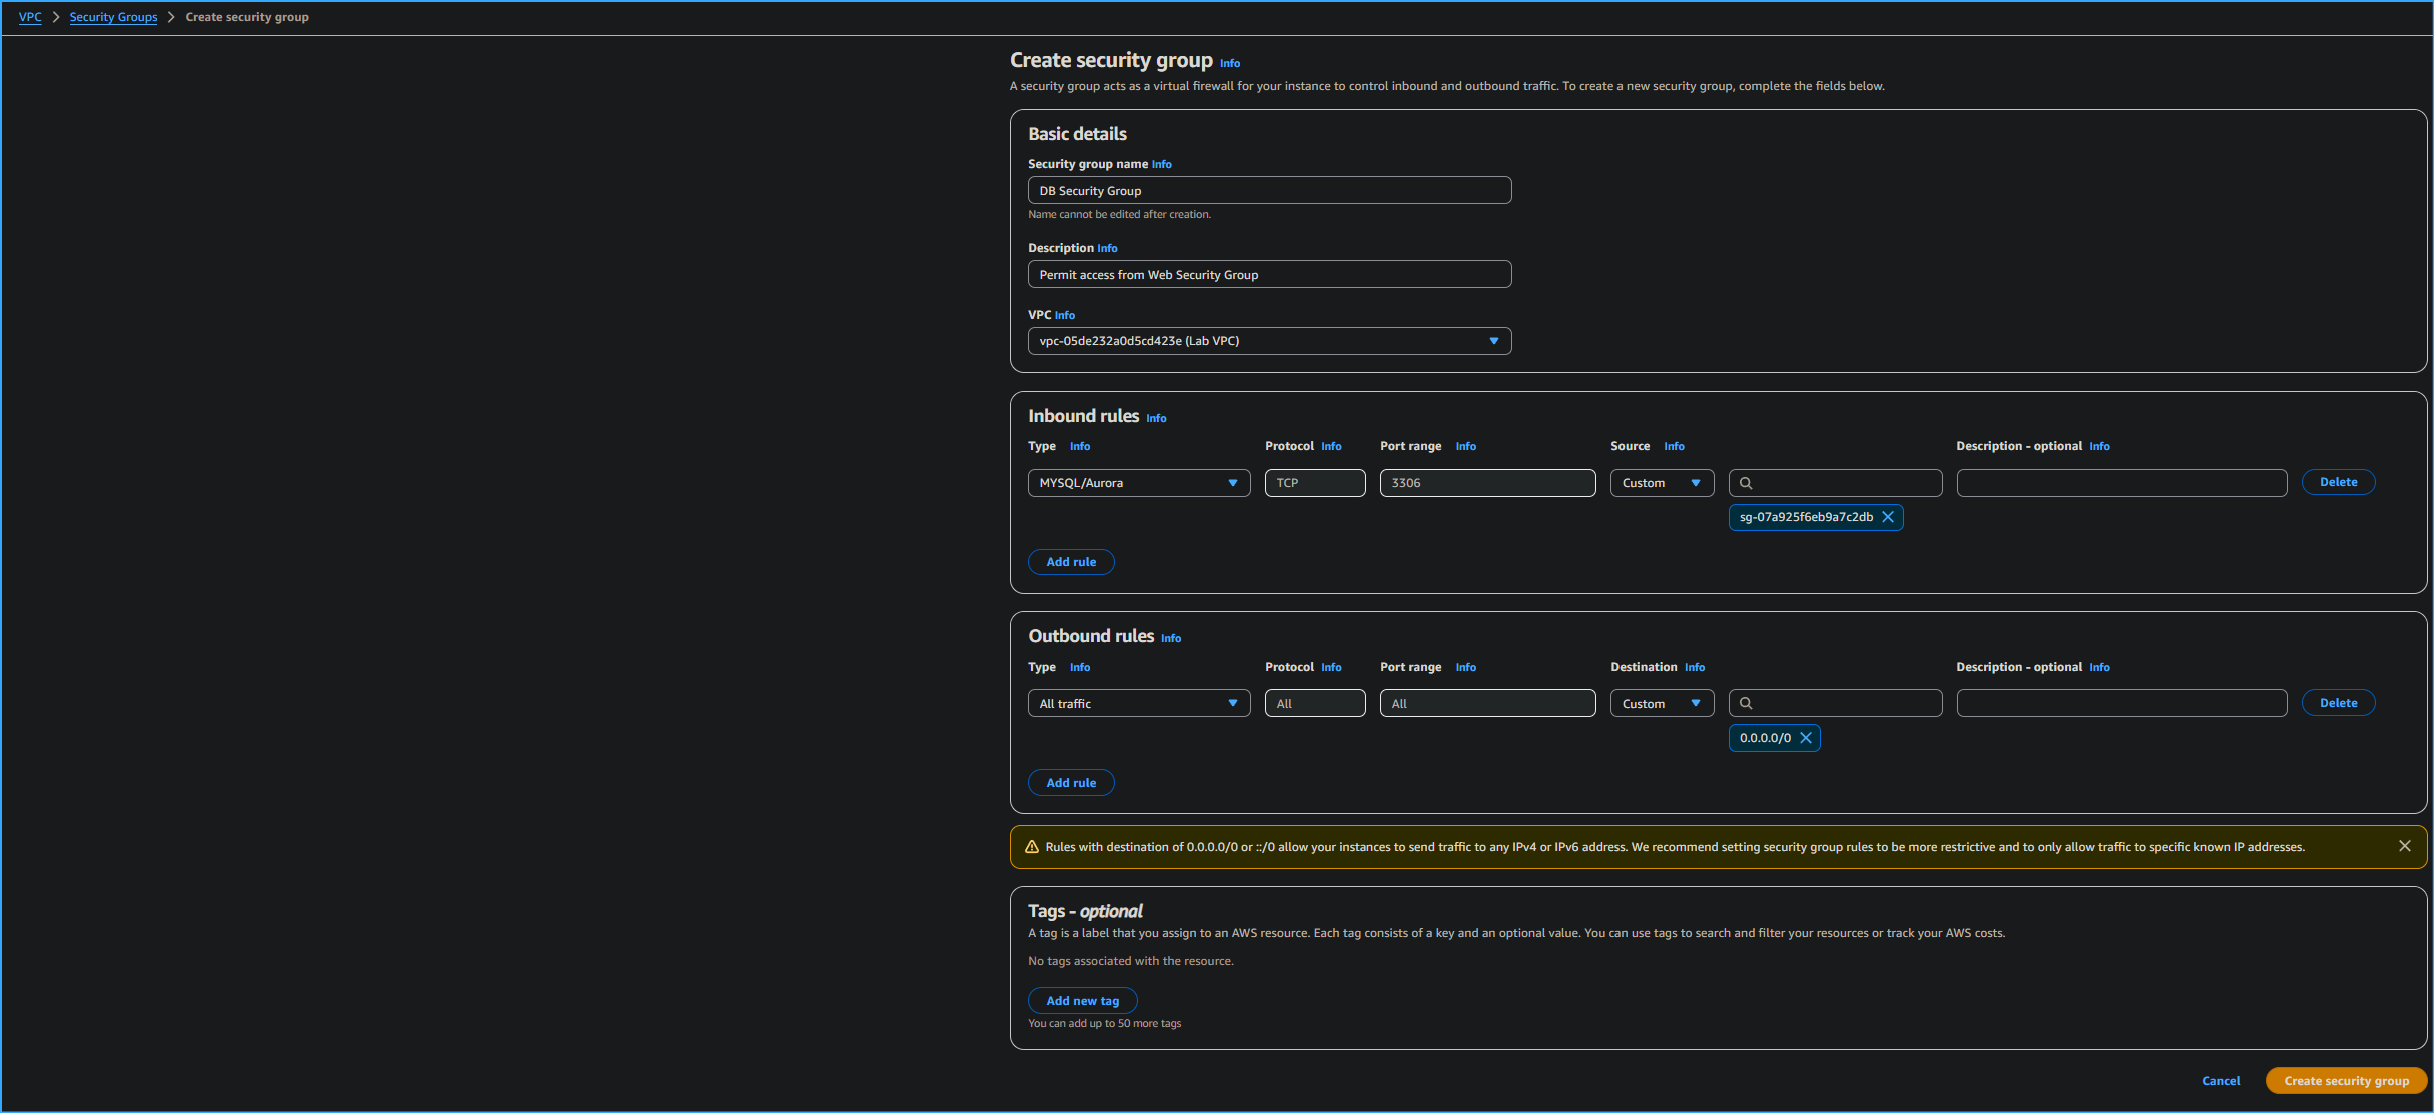
I clicked Create security group and configured it with the following
settings:
- Security group name: DB Security Group
- Description: Permit access from Web Security Group
- VPC: Lab VPC
Next, I added a rule to the security group to permit inbound database
requests:
-
In the Inbound rules section, I clicked Add rule and configured:
- Type: MySQL/Aurora (3306)
-
Source: I typed sg in the search field and then selected Web
Security Group
This configured the Database security group to permit inbound traffic on
port 3306 from any EC2 instance associated with the Web Security Group.
Finally, I scrolled to the bottom of the screen and clicked Create
security group. This security group would be used when launching the
Amazon RDS database.
Task 2: Create a DB Subnet Group
For this task, I created a DB subnet group to tell RDS which subnets
could be used for the database. Each DB subnet group requires subnets in
at least two Availability Zones.
-
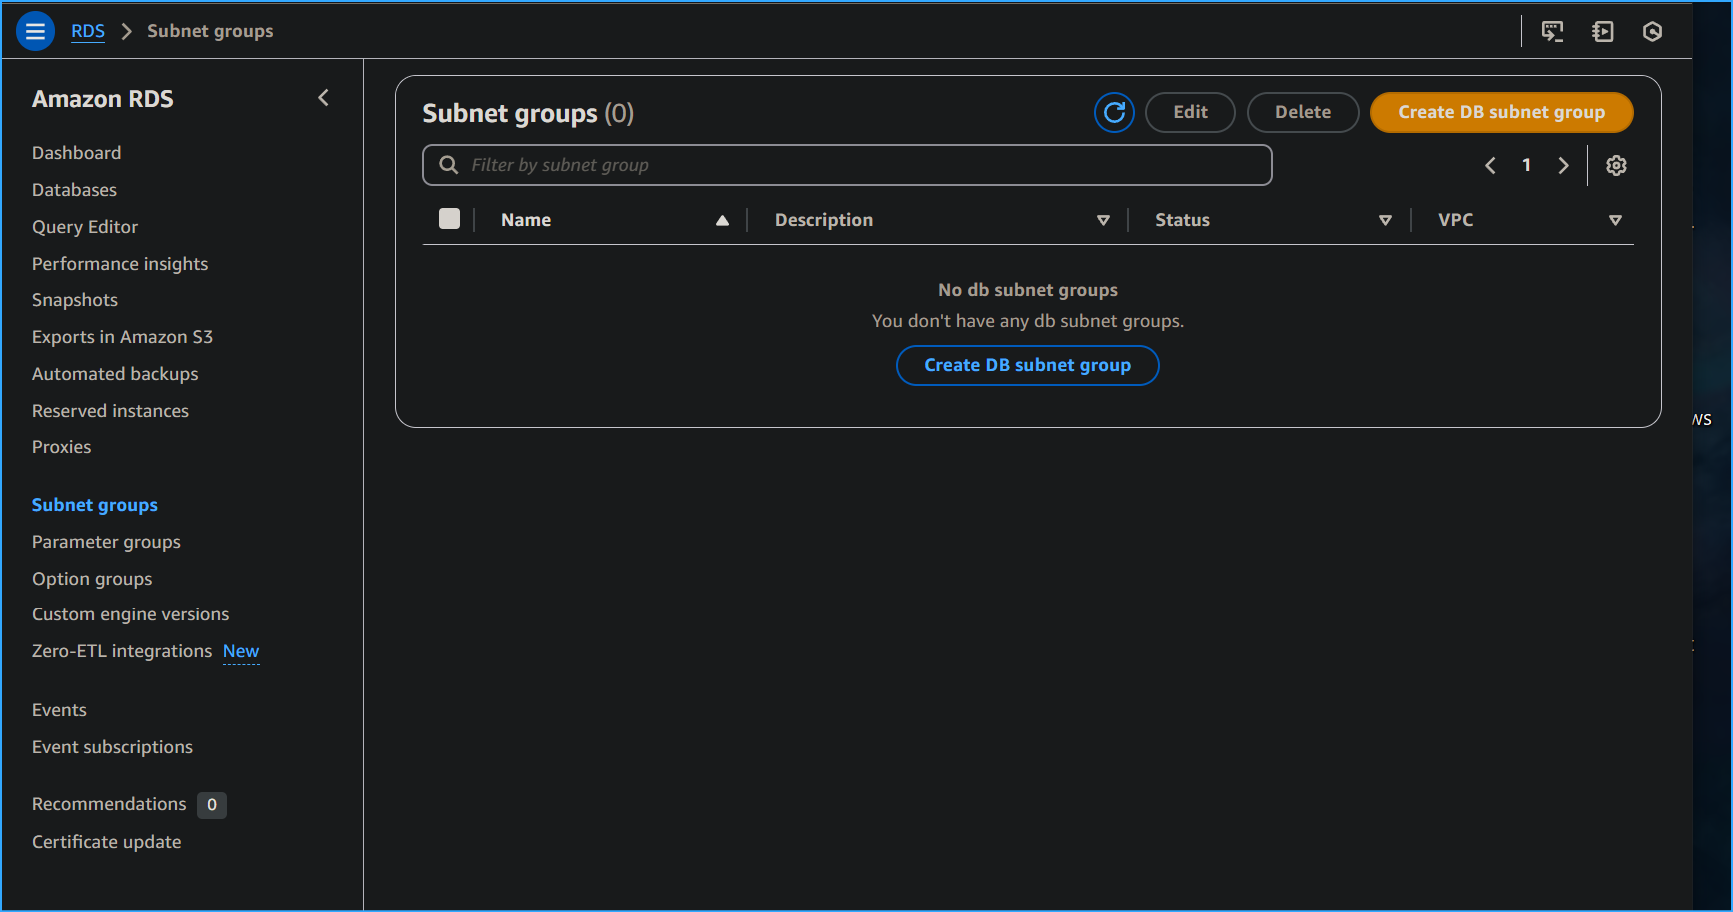
In the AWS Management Console, I selected the Services menu, and then
selected RDS under Database.
- In the left navigation pane, I clicked Subnet groups.
-
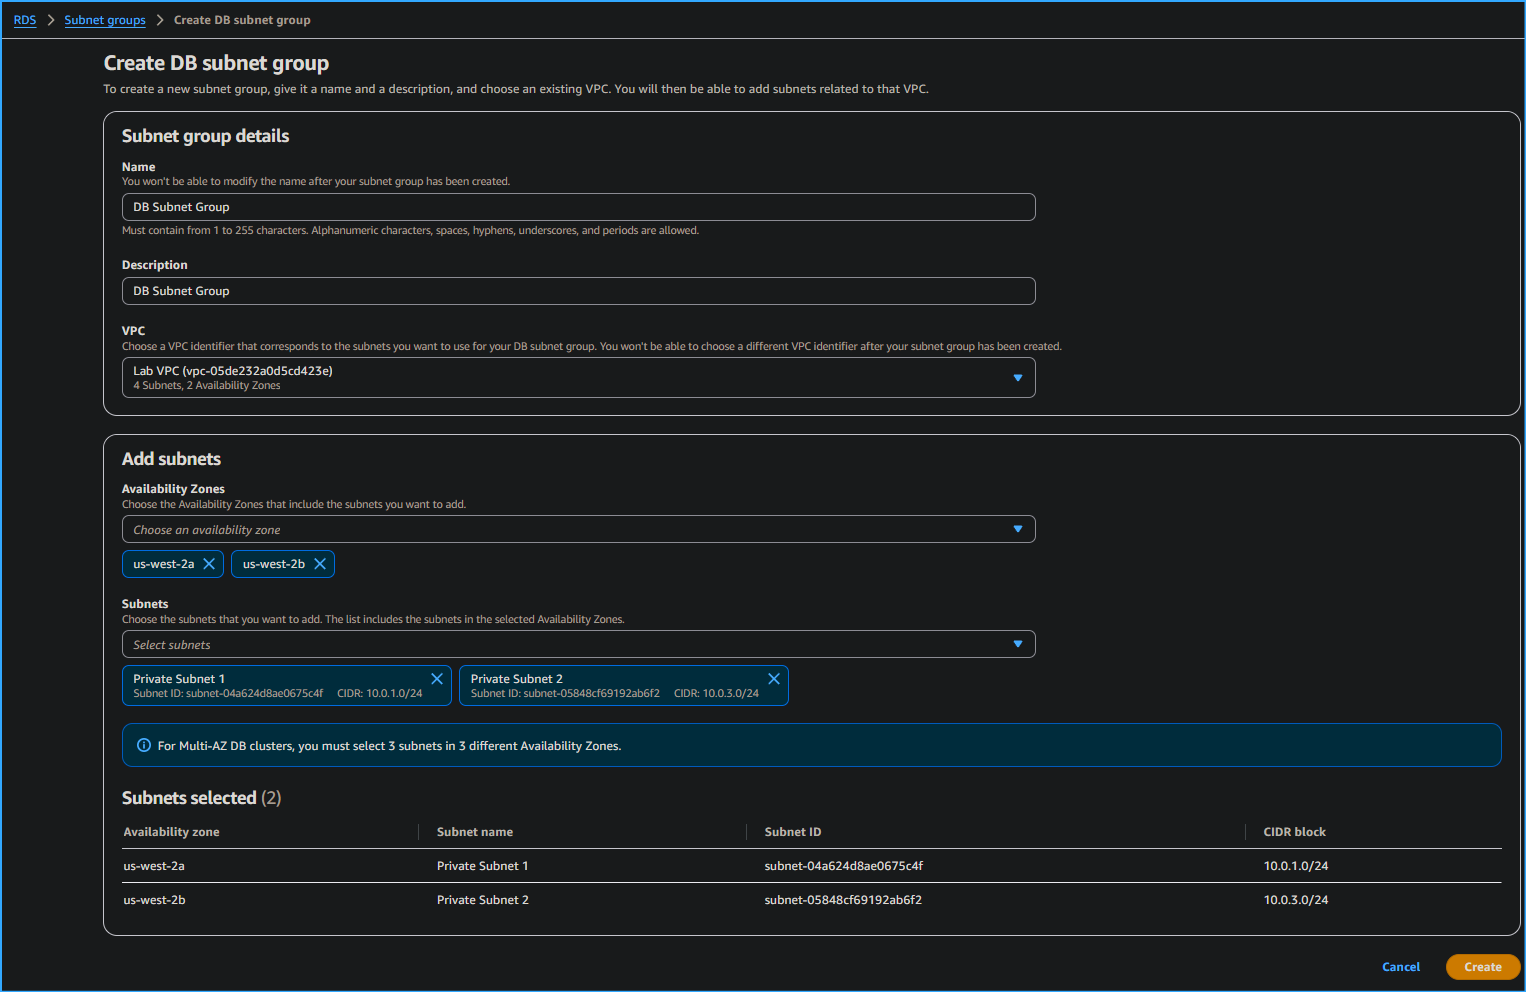
I clicked Create DB Subnet Group and configured:
- Name: DB Subnet Group
- Description: DB Subnet Group
- VPC ID: Lab VPC
-
In the Add subnets section for Availability zones, I clicked the
dropdown, then:
- Selected the first Availability zone
- Selected the second Availability zone
-
For Subnets, I clicked the dropdown, then:
- For the first Availability zone, selected 10.0.1.0/24
- For the second Availability zone, selected 10.0.3.0/24
- Finally, I clicked Create
This added Private Subnet 1 (10.0.1.0/24) and Private Subnet 2
(10.0.3.0/24) to my DB subnet group, which I would use when creating the
database in the next task.
Task 3: Create an Amazon RDS DB Instance
In this task, I configured and launched a Multi-AZ Amazon RDS for MySQL
database instance.
Amazon RDS Multi-AZ deployments provide enhanced availability and
durability for Database (DB) instances, making them a natural fit for
production database workloads. When you provision a Multi-AZ DB
instance, Amazon RDS automatically creates a primary DB instance and
synchronously replicates the data to a standby instance in a different
Availability Zone (AZ).
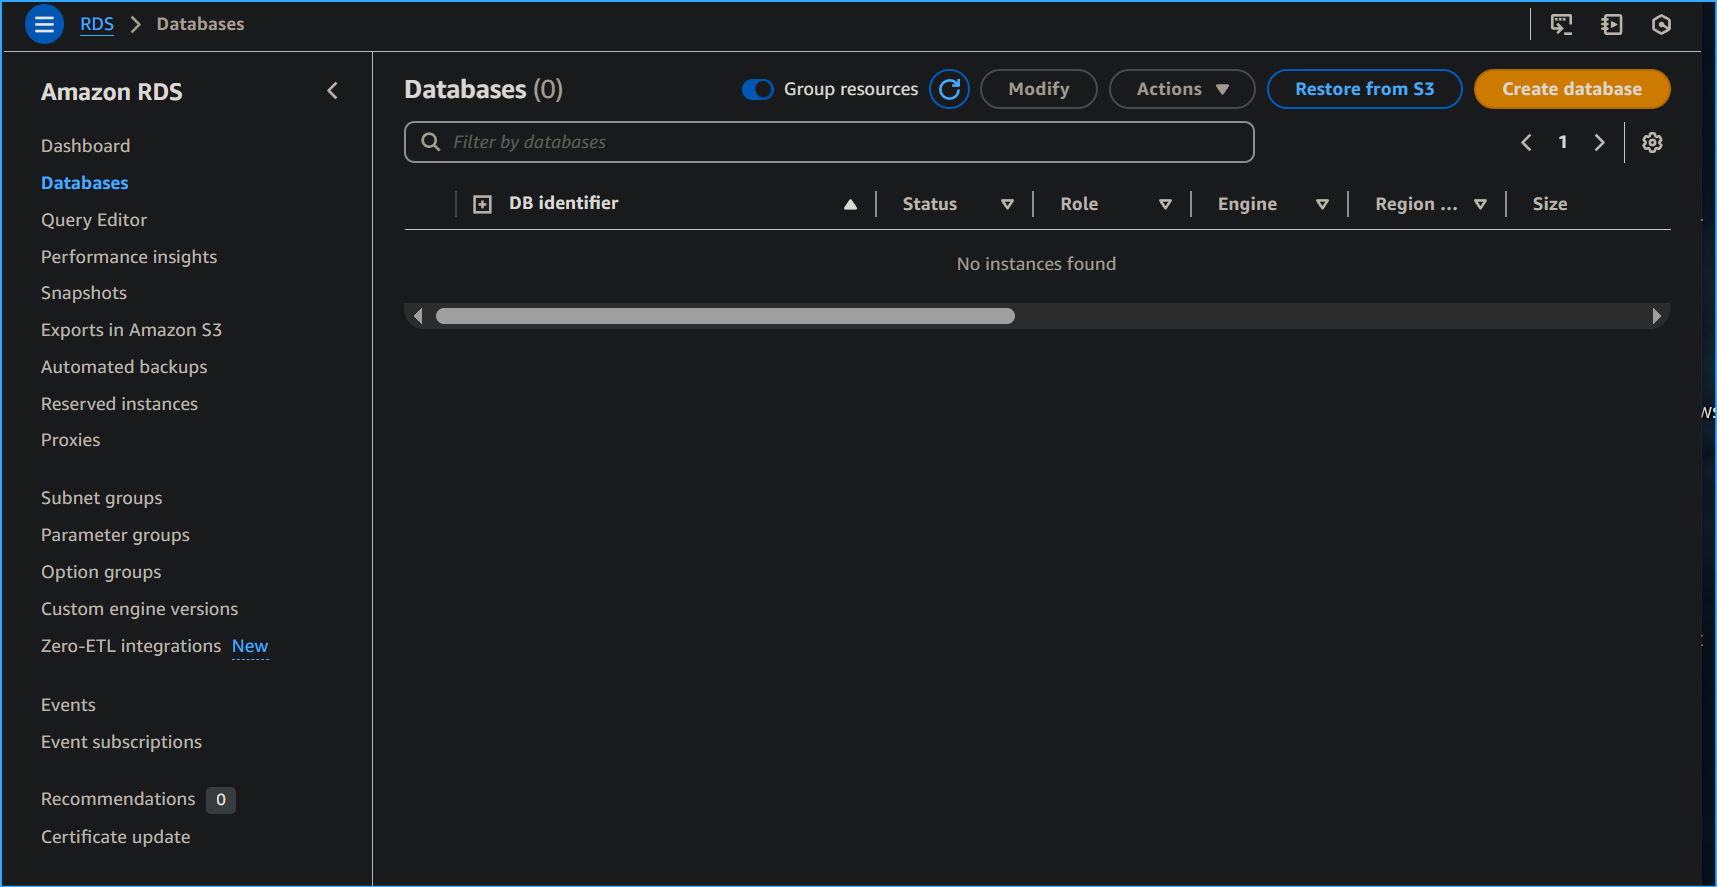
- In the left navigation pane, I clicked Databases.
- I clicked Create database.
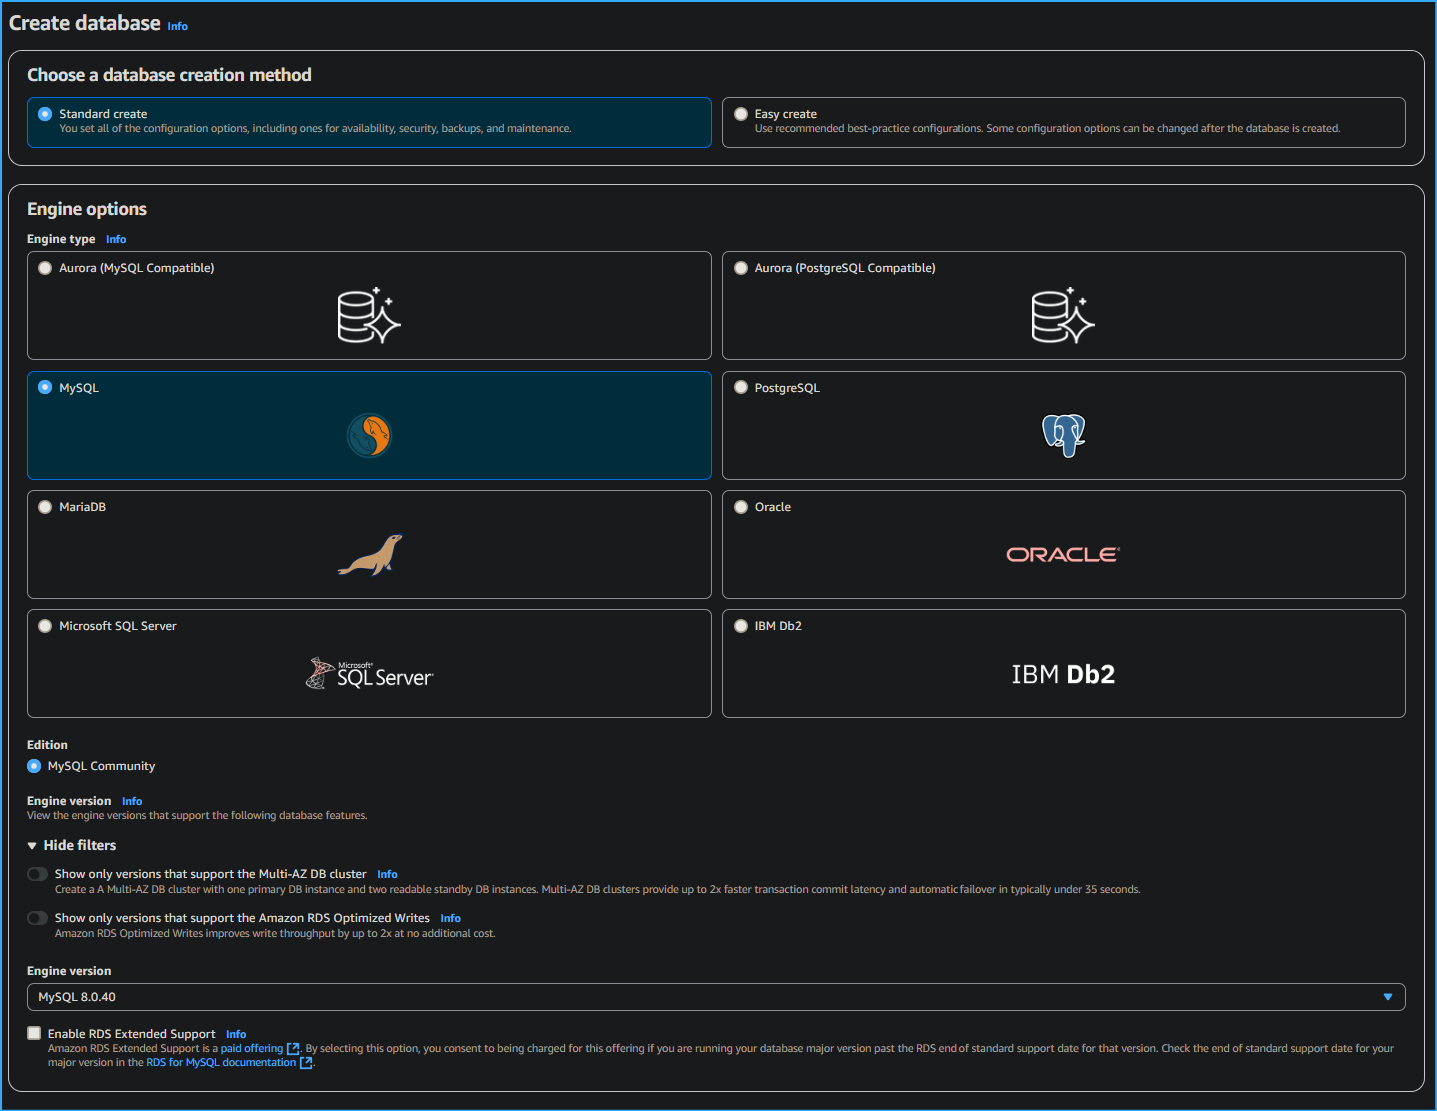
- I chose Create database, then chose Standard create.
-
Under the Engine options section:
- For Engine type, I chose MySQL.
- For Engine version, I chose the latest version.
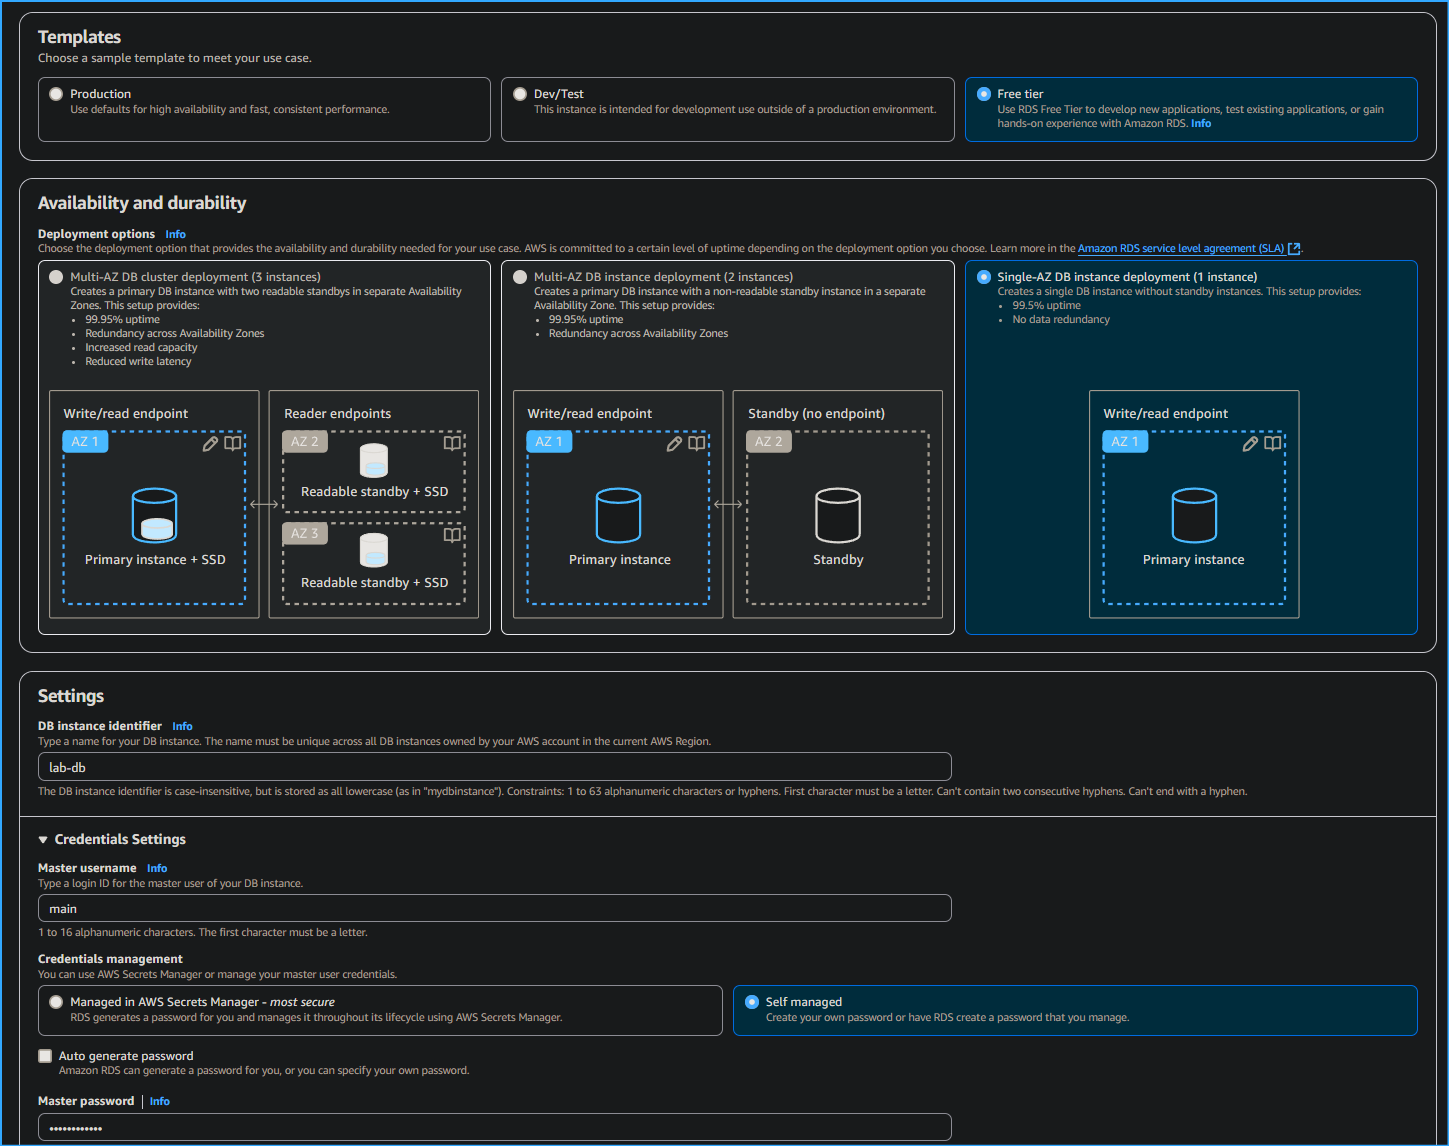
- For Templates, I chose Free Tier.
- For Availability and durability, I chose Single-AZ DB Instance.
-
Under Settings, I configured:
- DB instance identifier: lab-db
- Master username: main
- Master password: lab-password
- Confirm password: lab-password
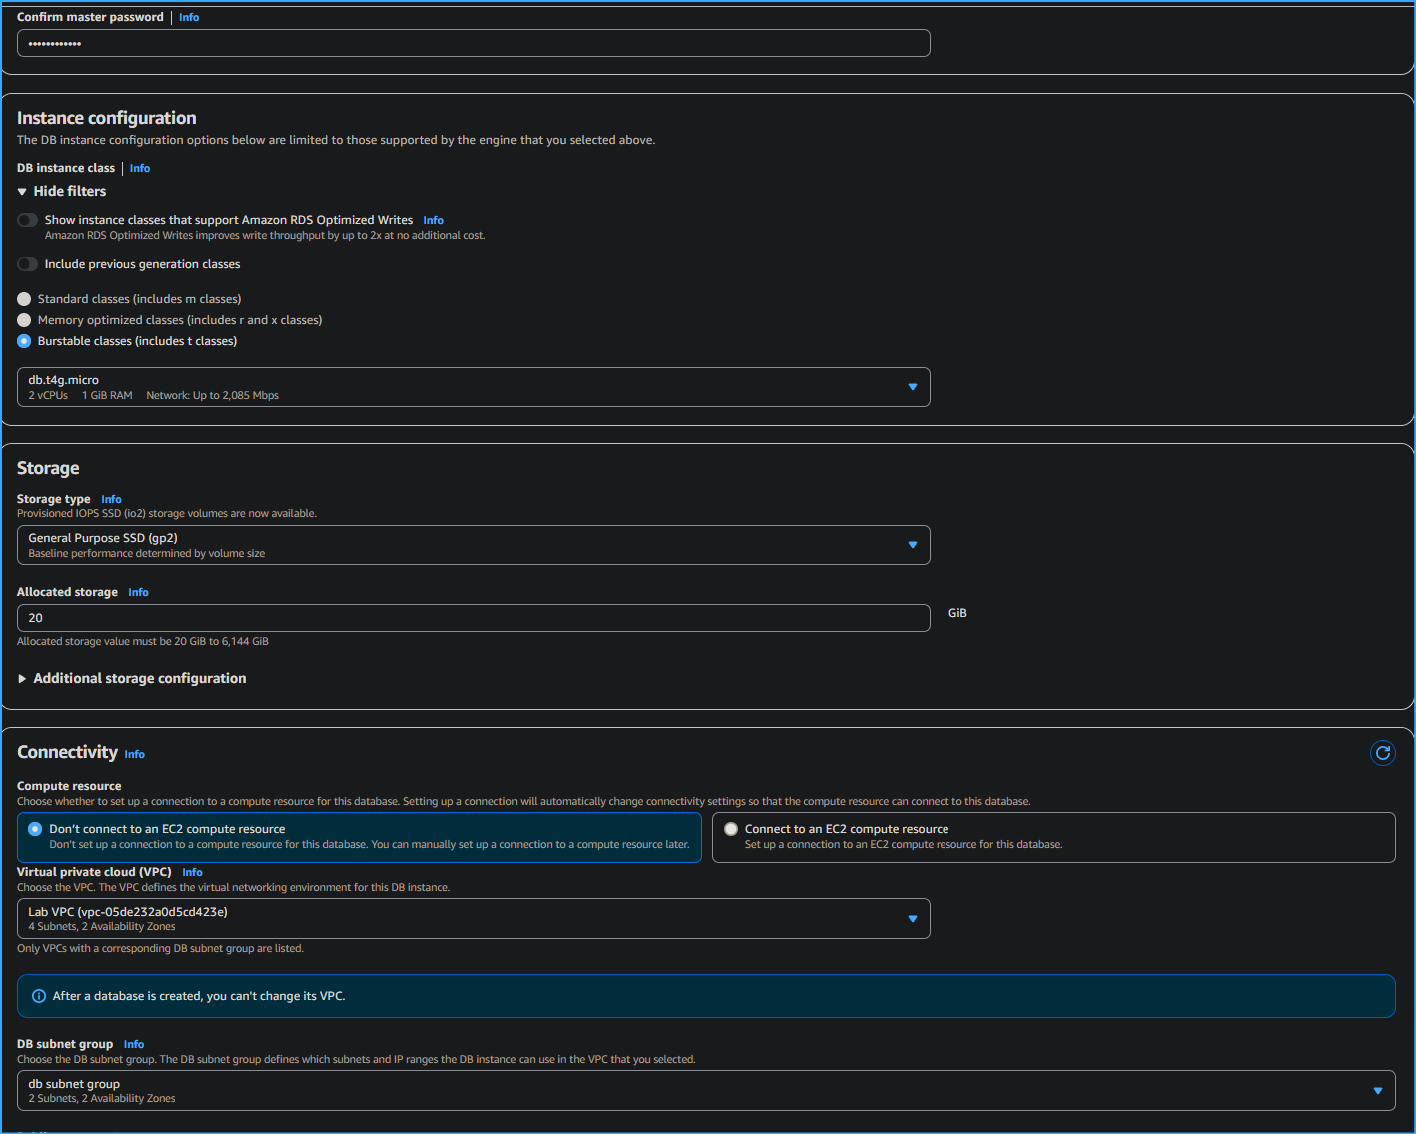
-
Under Instance configuration, I configured:
- Selected Burstable classes (includes t classes)
- Selected db.t4g.micro
-
Under Storage, I selected General Purpose (SSD) under Storage type.
-
Under Connectivity, I configured:
- Virtual Private Cloud (VPC): Lab VPC
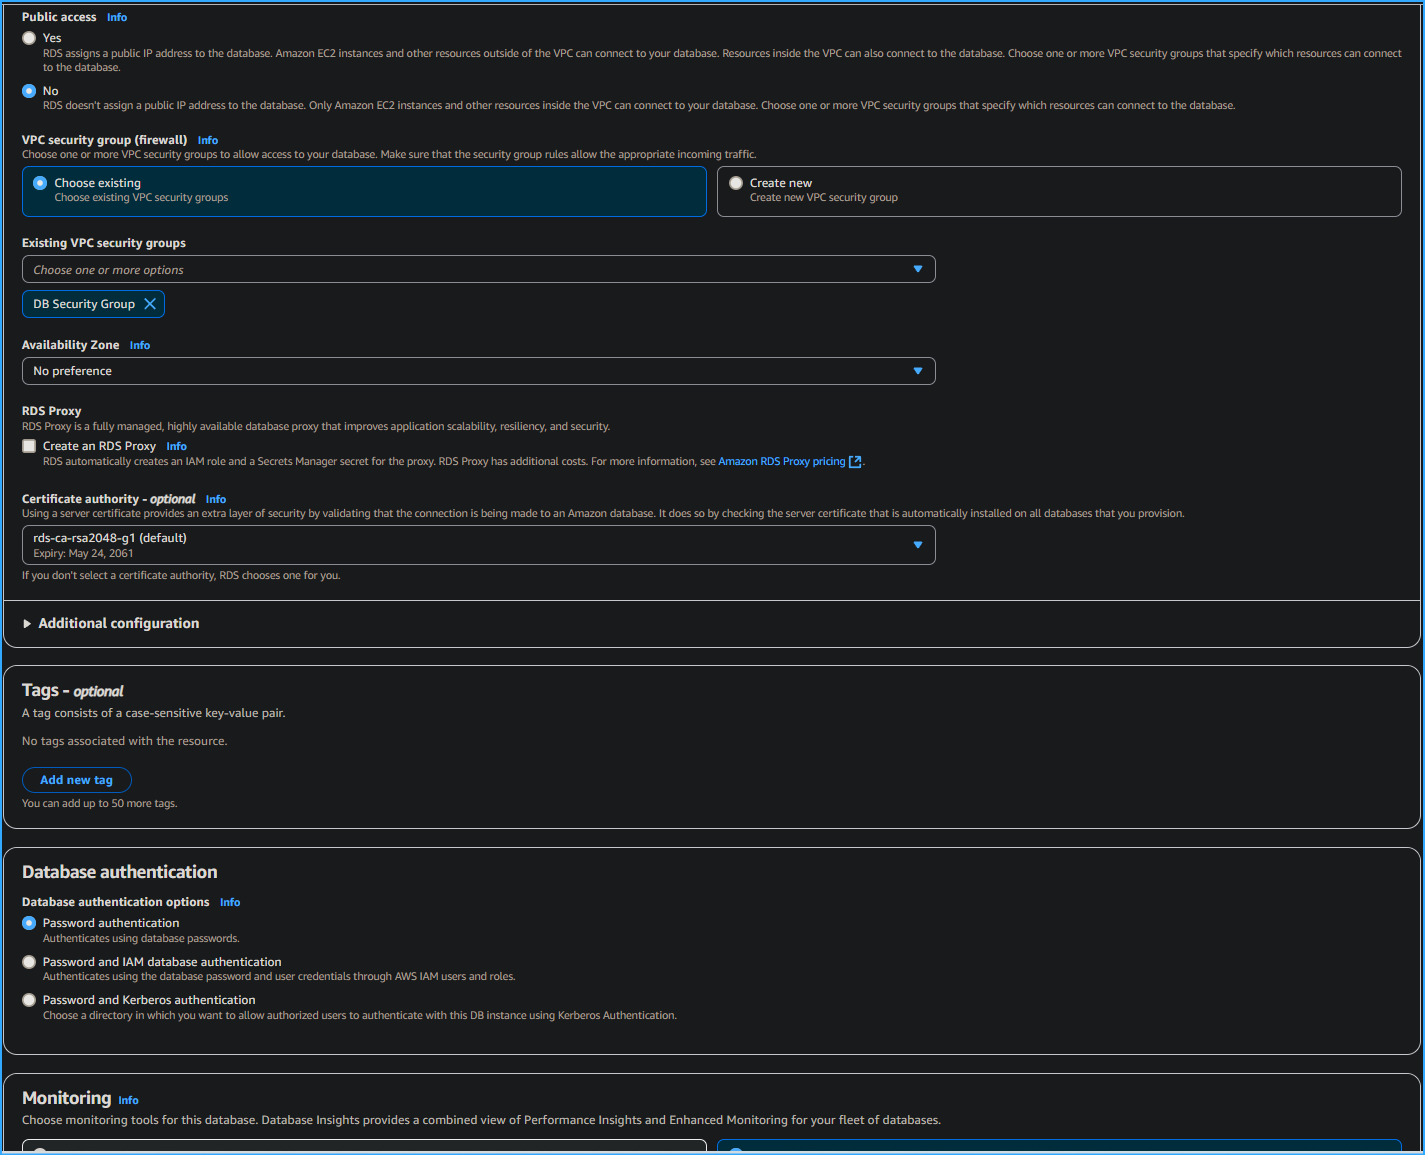
- Under VPC security group, I selected Choose existing
-
Under Existing VPC security groups, I used X to Remove default and
selected DB Security Group to highlight it in blue
-
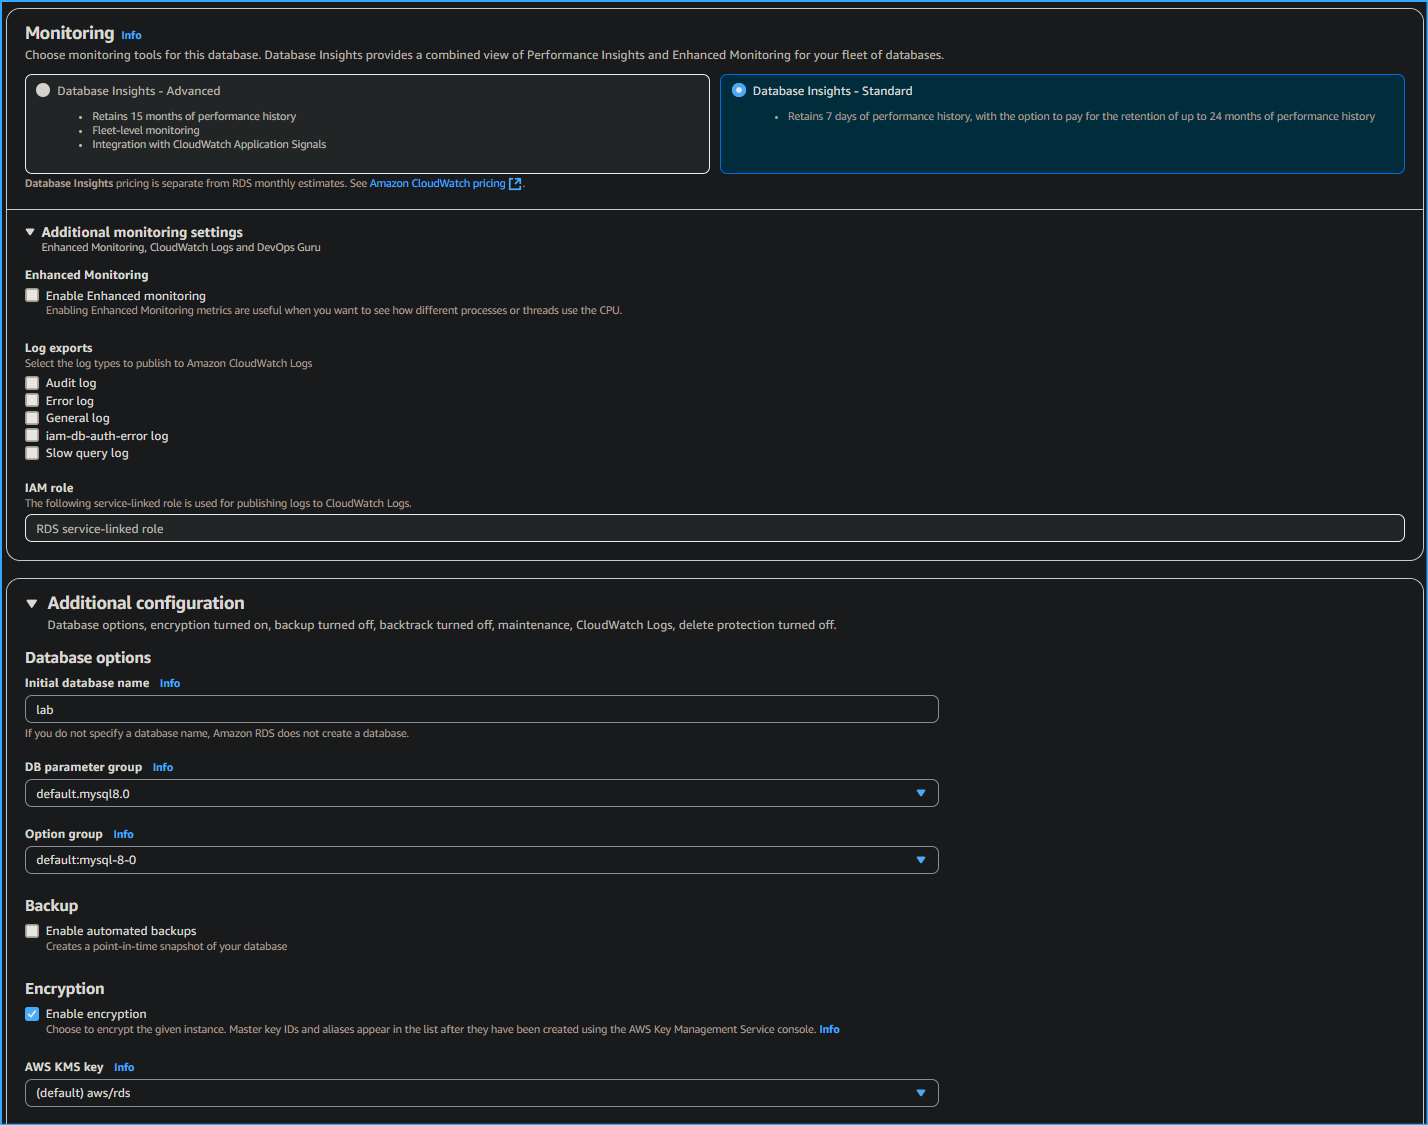
Under Monitoring, I expanded Additional configuration and unchecked
Enable Enhanced monitoring.
-
I scrolled down to the Additional configuration section, expanded this
option, and configured:
- Initial database name: lab
- Under Backup, I unchecked Enable automated backups.
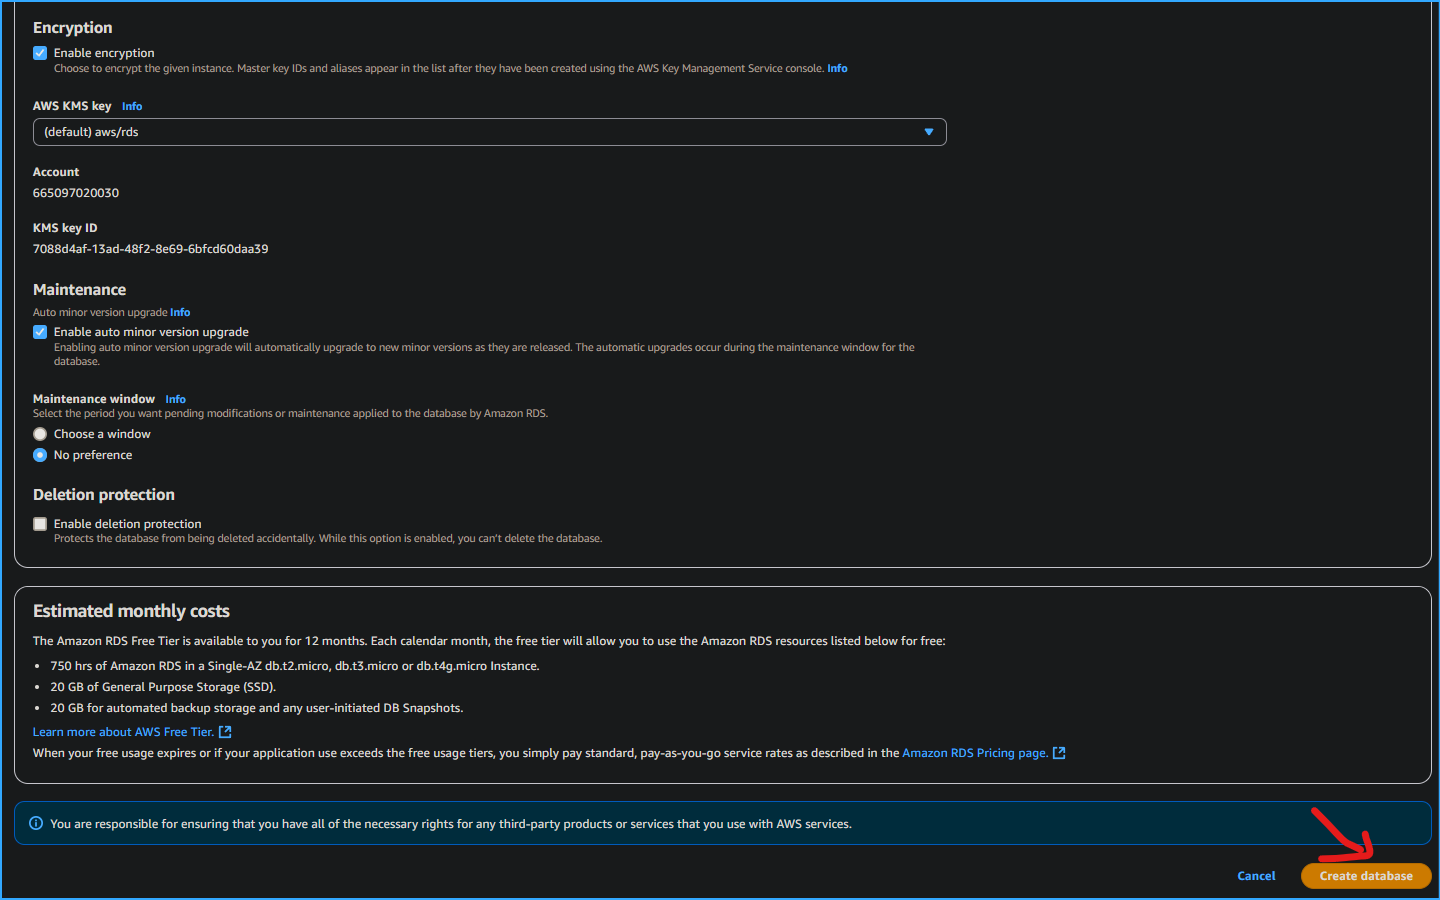
-
Finally, I scrolled to the bottom of the screen and clicked Create
database.
Turning off backups is not normally recommended, but it made the
database deploy faster for this lab.
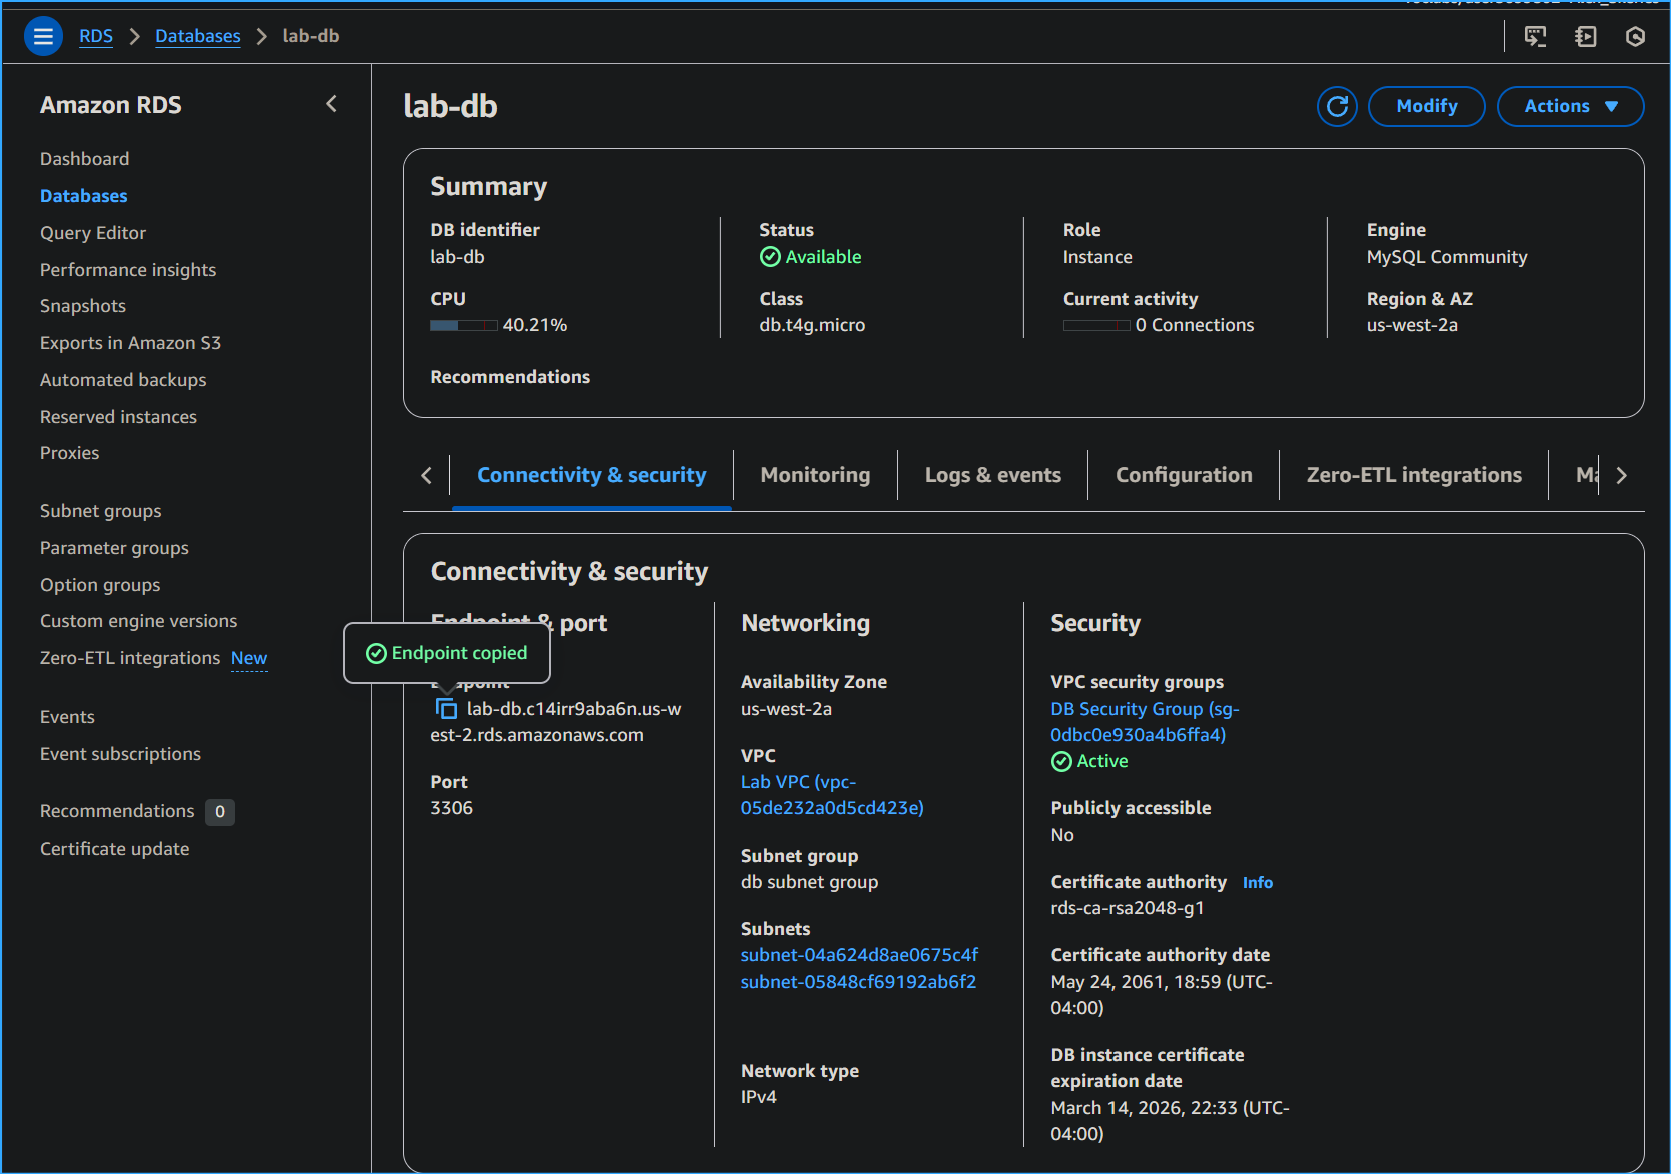
After launching the database, I clicked the lab-db link itself and
waited approximately 4 minutes for the database to be available. The
deployment process was deploying a database in two different
Availability zones.
Once the Status changed to Modifying or Available, I scrolled down to
the Connectivity & Security section and copied the Endpoint field, which
looked similar to: lab-db.cggq8lhnxvnv.us-west-2.rds.amazonaws.com.
Task 4: Interact with Your Database
For the final task, I opened a web application running on my web server
and configured it to use the database.
- I copied the WebServer IP address from the AWS Details.
-
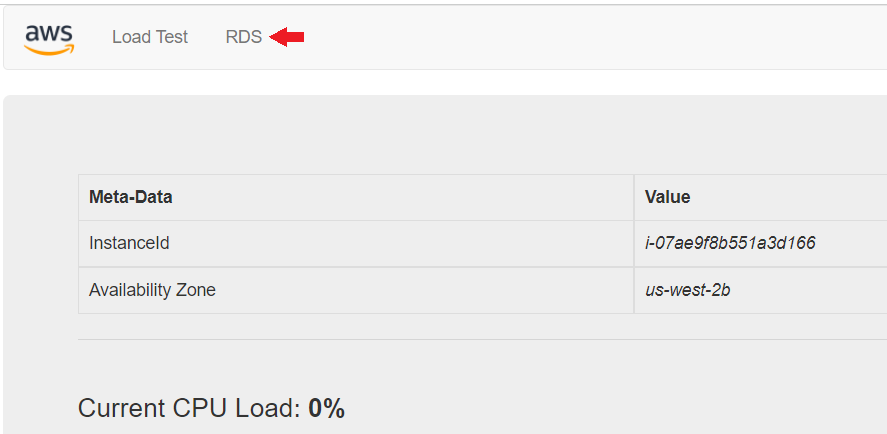
I opened a new web browser tab, pasted the WebServer IP address, and
pressed Enter.
-
The web application displayed information about the EC2 instance.
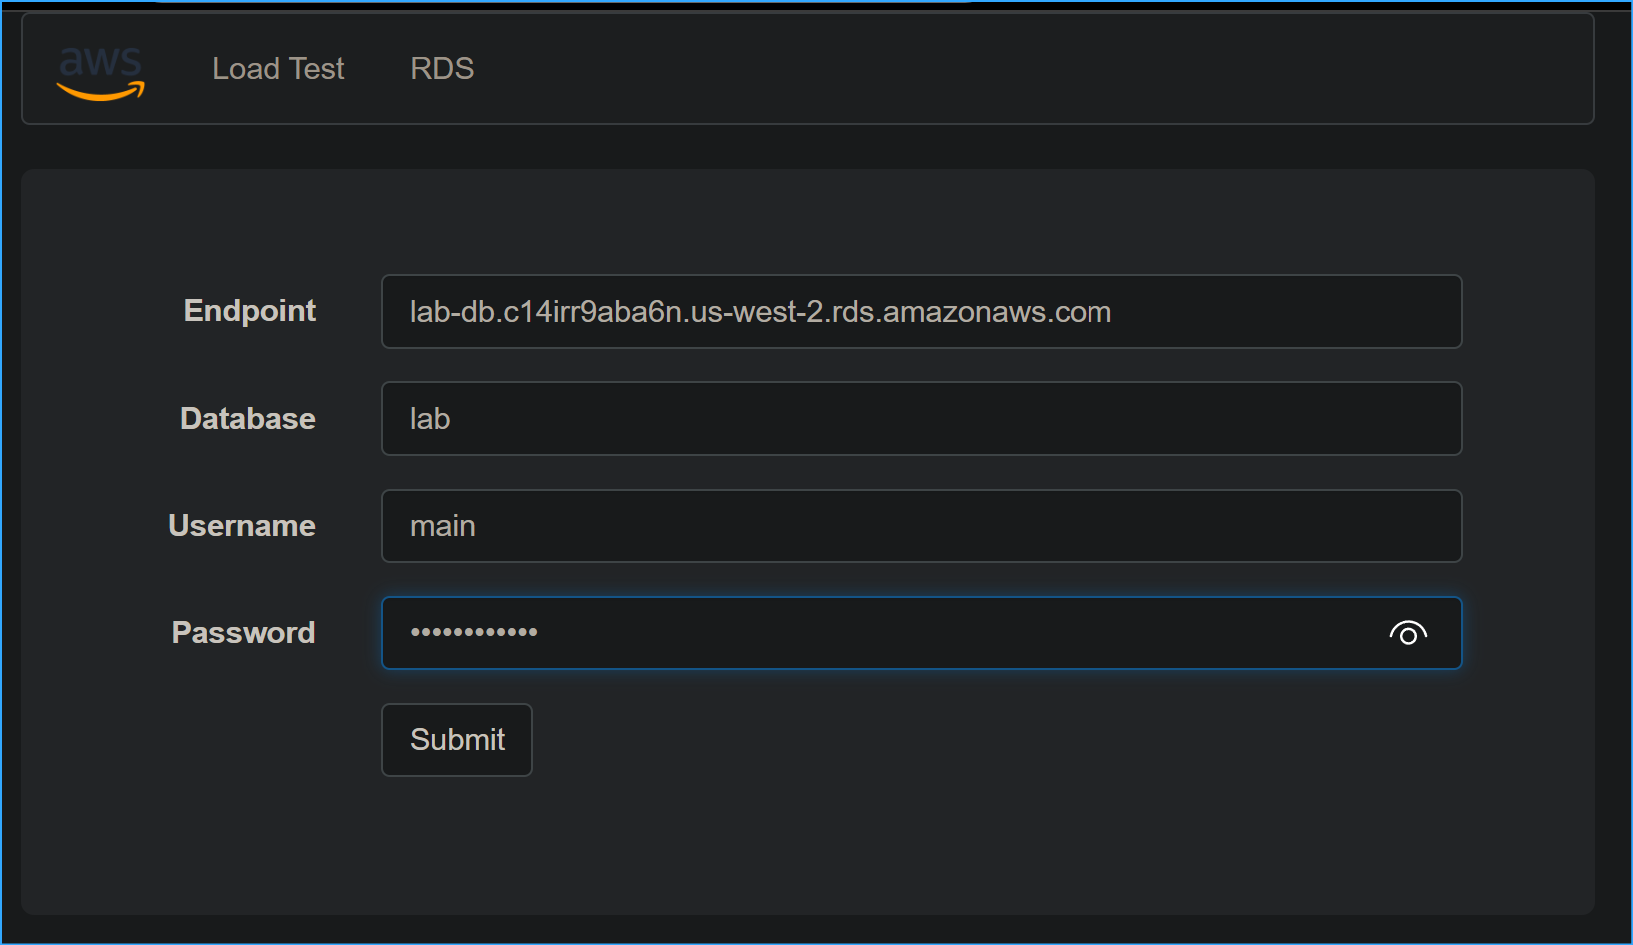
- At the top of the web application page, I clicked the RDS link.
-
I configured the application to connect to my database with the
following settings:
- Endpoint: The endpoint I copied earlier
- Database: lab
- Username: main
- Password: lab-password
- I clicked Submit
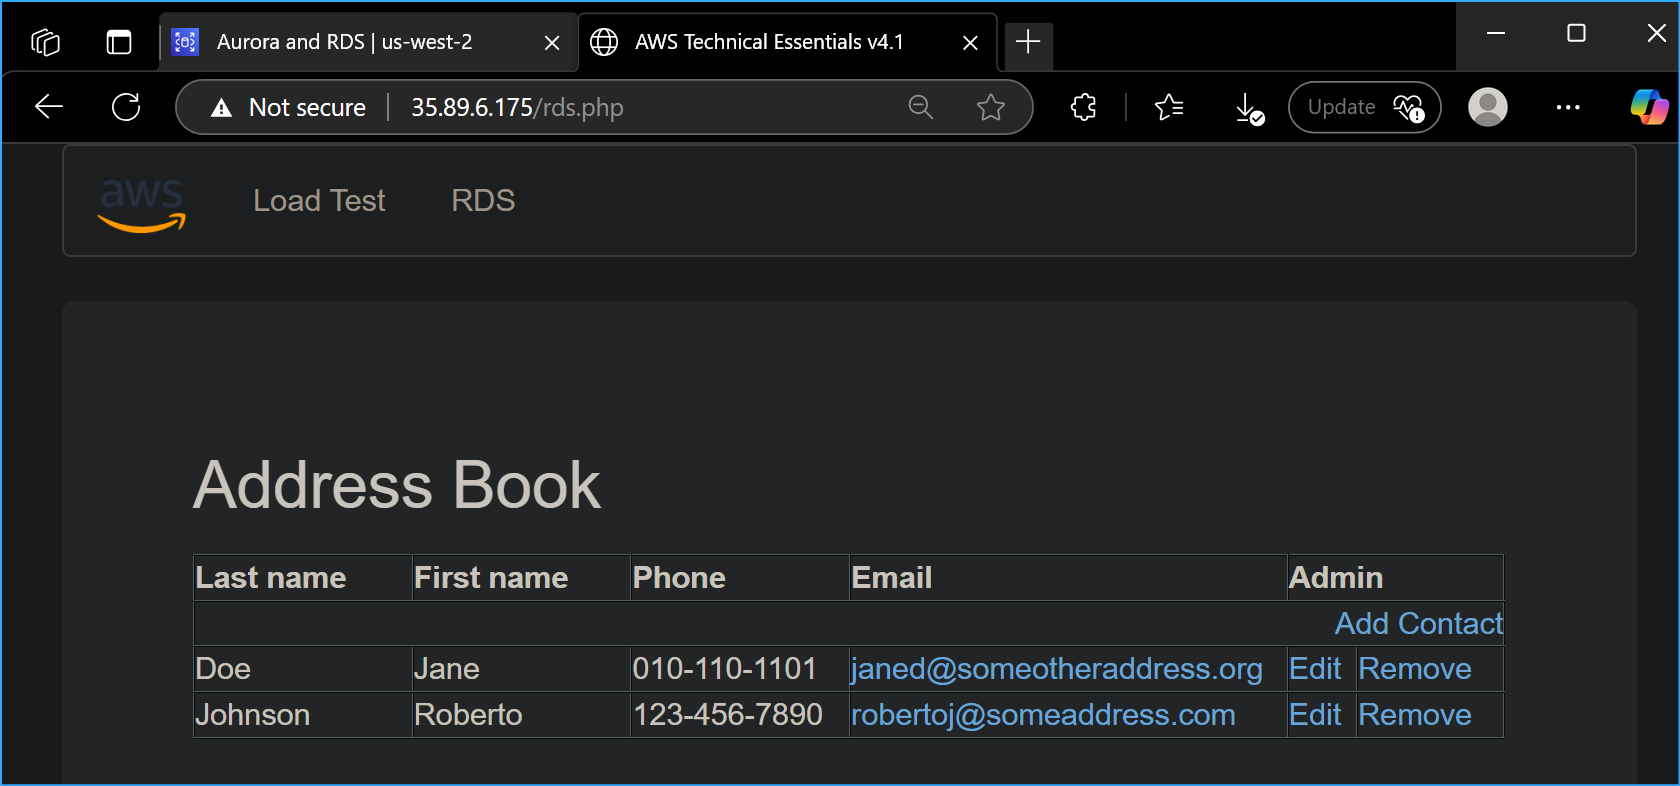
A message appeared explaining that the application was running a command
to copy information to the database. After a few seconds, the
application displayed an Address Book.
To connect to the database manually, I could use the following MySQL
command:
mysql -h lab-db.cggq8lhnxvnv.us-west-2.rds.amazonaws.com -P 3306 -u
main -p
I tested the Address Book application by adding, editing, and removing
contacts. The data was being persisted to the database and automatically
replicating to the second Availability Zone.
Some common SQL commands I used for testing:
SELECT * FROM contacts;
INSERT INTO contacts (name, phone, email) VALUES ('John Doe',
'555-1234', 'john@example.com');
UPDATE contacts SET phone='555-5678' WHERE name='John Doe';
DELETE FROM contacts WHERE name='John Doe';
Project Summary
In this project, I successfully:
-
Created a security group for the RDS instance to allow traffic from
the web server
- Set up a DB subnet group spanning multiple Availability Zones
- Deployed a MySQL database instance using Amazon RDS
- Connected a web application to the database instance
-
Tested the functionality by performing CRUD operations through the web
interface
This project demonstrated how Amazon RDS simplifies database management
by handling routine database tasks such as provisioning, backups,
software patching, monitoring, and scaling, allowing me to focus on
developing the application rather than managing the underlying
infrastructure.
×
![]()
 Creating VPC Security Group
 Navigated Here To Create Database Subnet Group
 Creating DB Subnet Group
 Navigated Here To Create Database
 Configuring DB One
 Configuring DB Two
 Configuring DB Three
 Configuring DB Four
 Configuring DB Five
 Configuring DB Six
 Copied Endpoint From Lab DB Link
 Web App Interface
 Configured Settings
 The Address Book Using RDS Database To Store Information
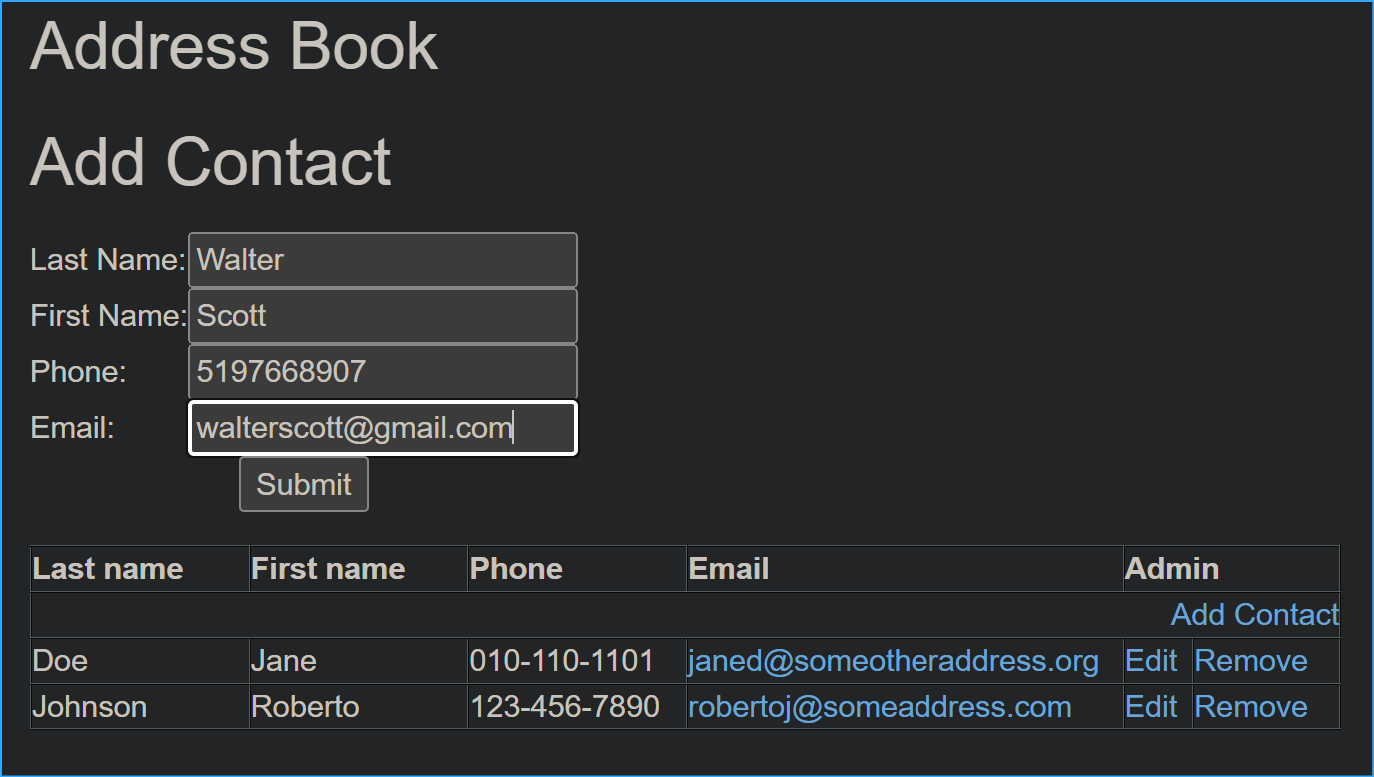 Testing By Adding Contact
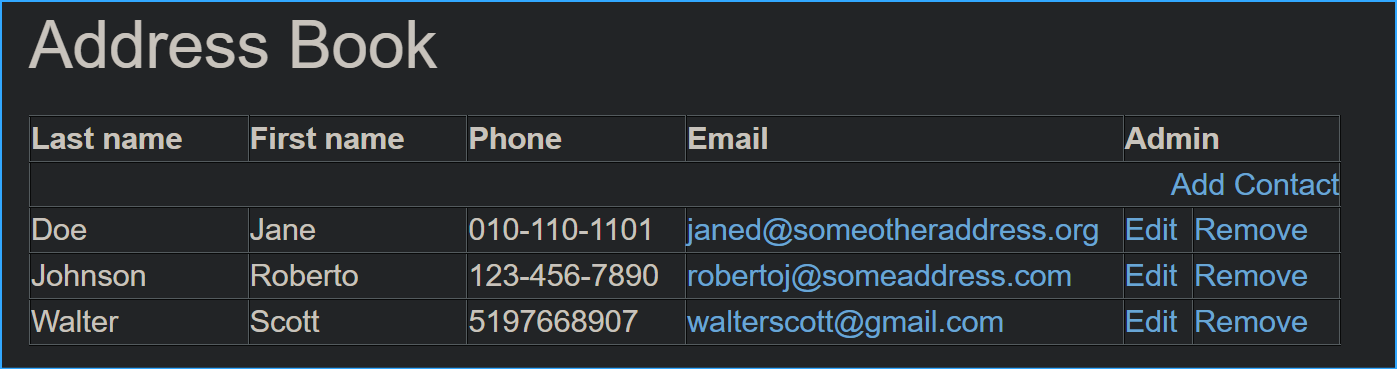 New Contact Added
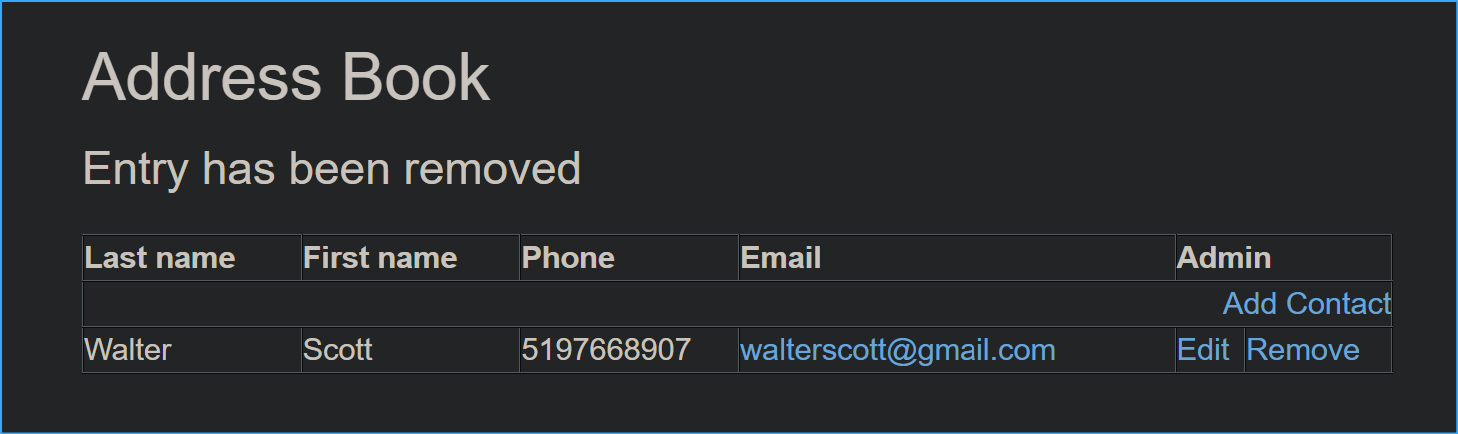 Contacts Removed Verifying Functionality
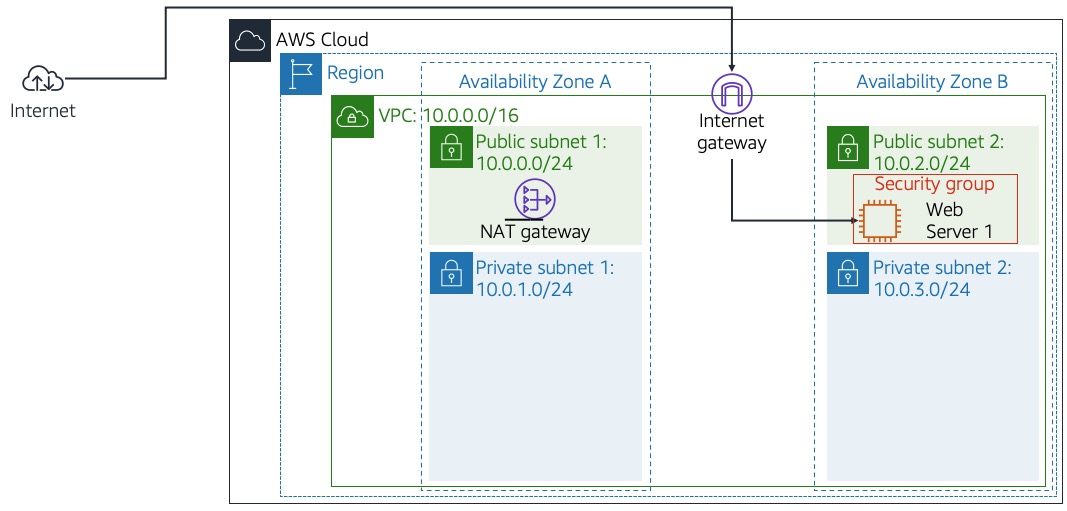 Beginning Infrastructure
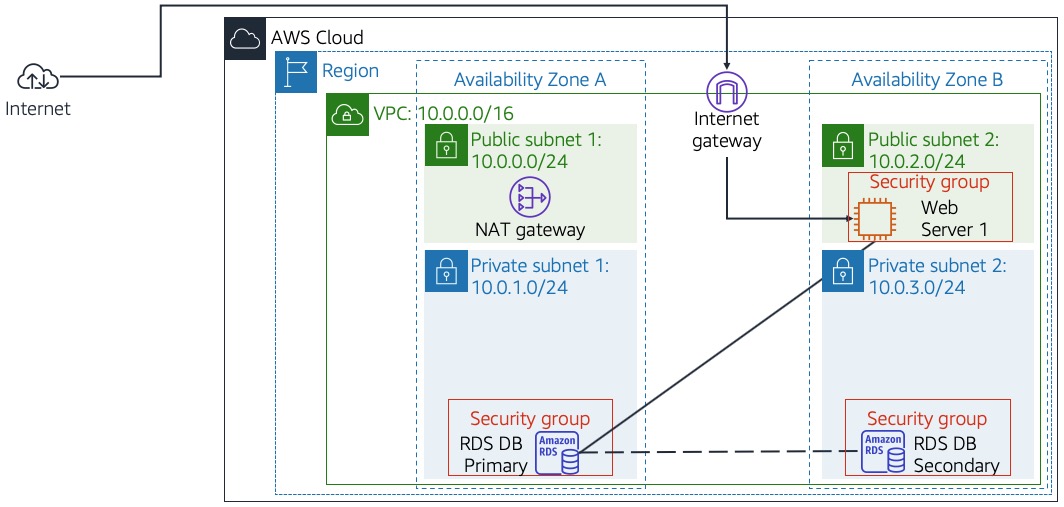 End Infrastructure