Introduction to Amazon Aurora
Overview
I gained a basic understanding of Amazon Aurora and learned how to use
it. I created an Aurora instance and then connected to it from an EC2
instance.
Topics I covered
- Creating an Aurora instance
-
Connecting to a pre-created Amazon Elastic Compute Cloud (Amazon EC2)
instance
- Configuring the Amazon EC2 instance to connect to Aurora
- Querying the Aurora instance
Prerequisites
To successfully complete this, I needed some experience using the Linux
operating system and a basic understanding of structured query language
(SQL) which I had.
Technologies Used
Amazon Aurora
Aurora is a fully managed, MySQL-compatible, relational database engine
that combines the performance and reliability of high-end commercial
databases with the simplicity and cost-effectiveness of open-source
databases. It delivers up to five times the performance of MySQL without
requiring changes to most of existing applications that use MySQL
databases.
Amazon Elastic Compute Cloud (Amazon EC2)
Amazon EC2 is a web service that provides resizable compute capacity in
the cloud. It is designed to make web-scale cloud computing easier for
developers. Amazon EC2 reduces the time required to provision new server
instances to minutes, giving you the ability to quickly scale capacity,
both up and down, as your computing requirements change.
Amazon Relational Database Service (Amazon RDS)
Amazon RDS makes it easy to set up, operate, and scale a relational
database in the cloud. It provides cost-efficient and resizable capacity
while managing time-consuming database administration tasks, freeing you
up to focus on your applications and business. Amazon RDS provides you
with six database engines to choose from, including Aurora, Oracle,
Microsoft SQL Server, PostgreSQL, MySQL, and MariaDB.
Task 1: Create an Aurora instance
In this task, I created an Aurora database (DB) instance.
-
At the top of the AWS Management Console, in the search bar, I
searched for and chose RDS.
- In the left navigation menu, I chose Databases.
-
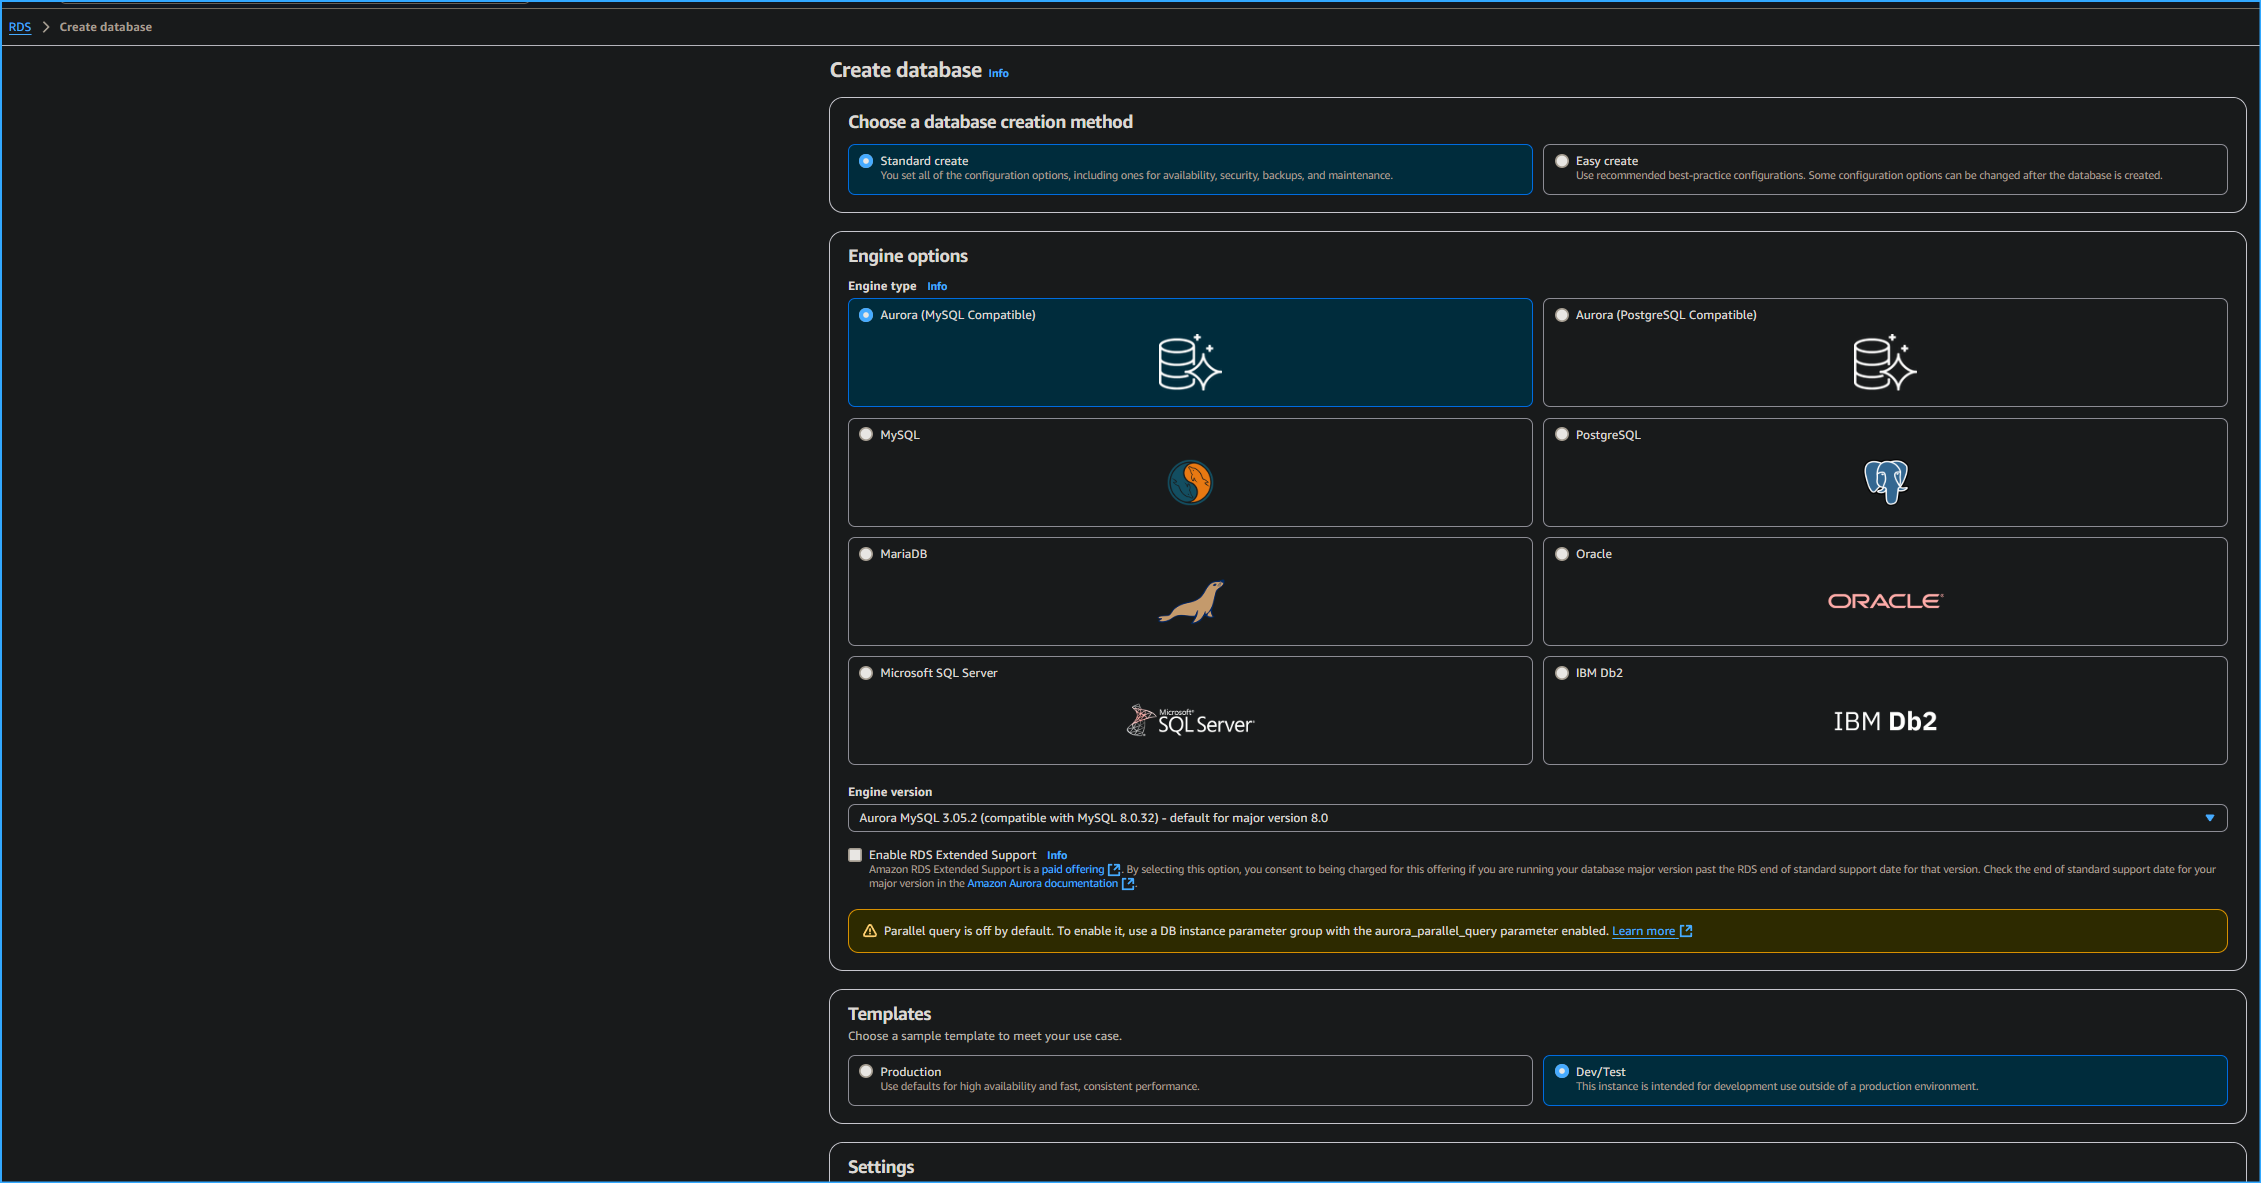
I chose Create database and then configured the following options:
-
For Choose a database creation method, I chose Standard create.
- For Engine type, I chose Aurora (MySQL Compatible).
-
For Engine version, I chose the version specified as the default
for major version 8.0.
- For Templates, I chose Dev/Test.
-
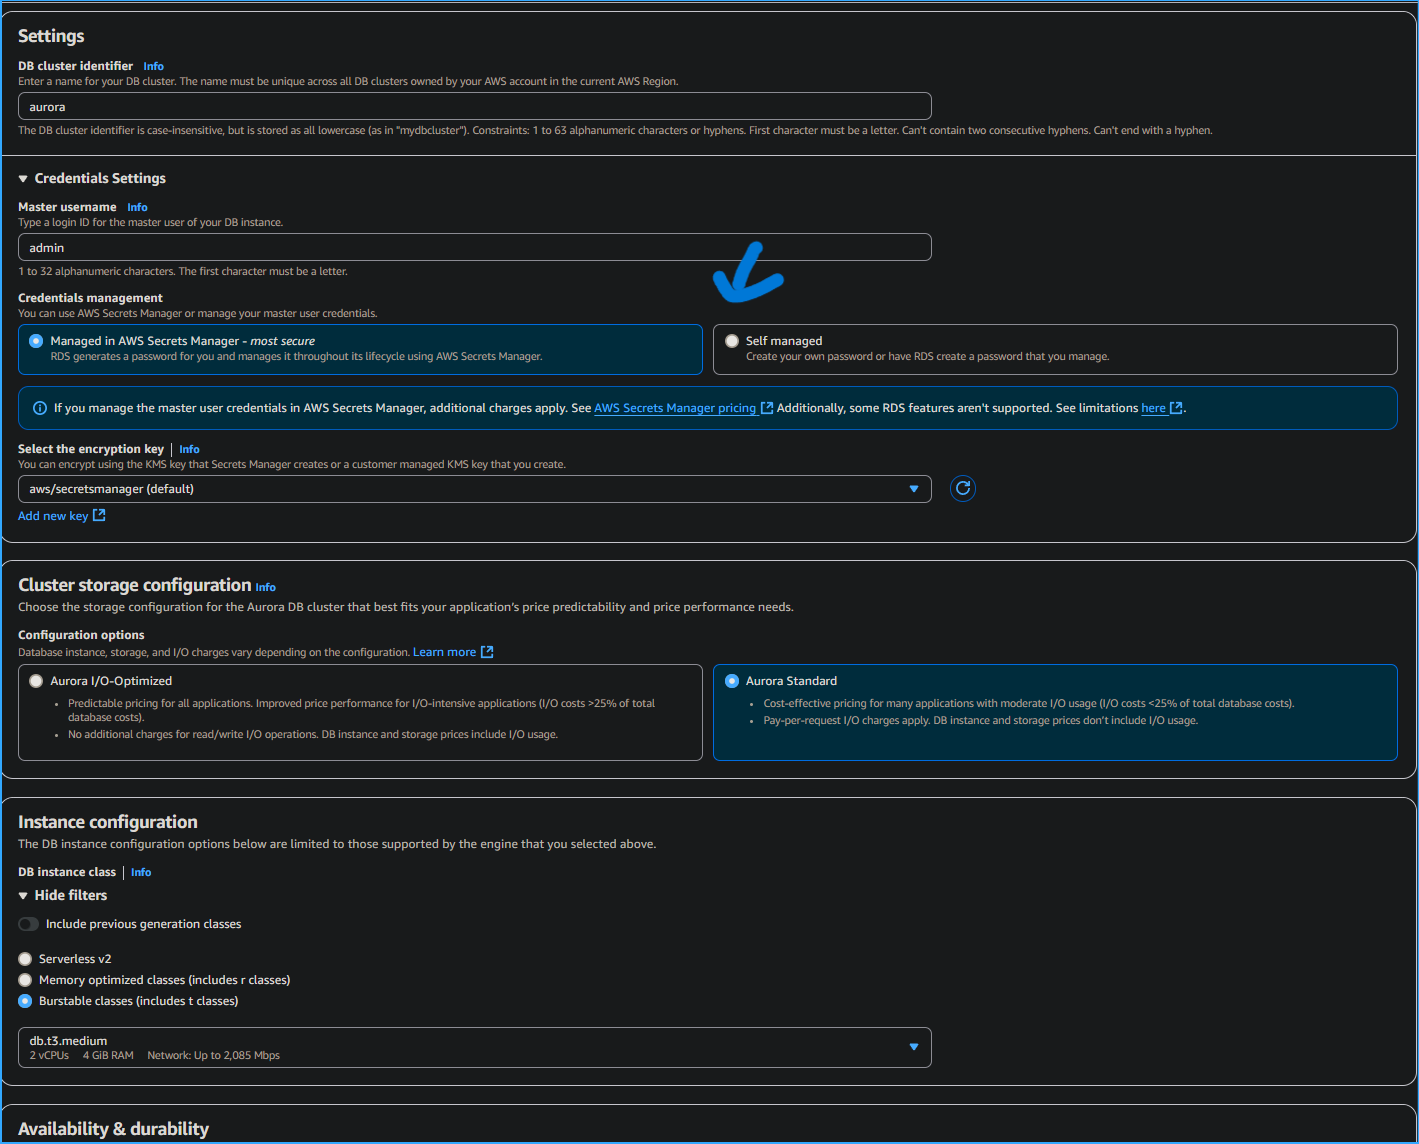
In the Settings section, I configured the following options:
- For DB cluster identifier, I entered aurora.
- For Master username, I entered admin.
- For Master password, I entered admin123.
- For Confirm password, I entered admin123.
-
In the Instance configuration section for the DB instance class
section, I chose Burstable classes (includes t classes), and chose
db.t3.medium from the dropdown list.
-
In the Availability & durability section for Multi-AZ deployment, I
chose Don't create an Aurora Replica.
Amazon RDS Multi-AZ deployments provide enhanced availability and
durability for DB instances, making them a natural fit for production
database workloads. When you provision a Multi-AZ DB instance, Amazon
RDS automatically creates a primary DB instance and synchronously
replicates the data to a standby instance in a different Availability
Zone.
I did not need to perform a multi-AZ deployment.
-
In the Connectivity section, I configured the following options and
left any not mentioned with their default value:
-
For Virtual private cloud (VPC), I chose
LabVPC.
-
For Subnet group, I chose
dbsubnetgroup.
-
For Public access, I selected
No.
-
For VPC security group, I selected
Choose existing.
-
For Existing VPC security groups, I removed the
default security group.
-
From the Existing VPC security groups dropdown
list, I chose DBSecurityGroup.
Subnets are segments of a virtual private cloud (VPC) IP address range
that you designate to group your resources based on security and
operational needs. A DB subnet group is a collection of subnets
(typically private) that you create in a VPC and that you then designate
for your DB instances. With a DB subnet group, you can specify a
particular VPC when creating DB instances using the command line
interface (CLI) or application programming interface (API); if you use
the console, you can select the VPC and subnets that you want to use.
The aurora subnet group was created for me when I launched the
environment using AWS CloudFormation.
I considered that I can use the Amazon Virtual Private Cloud (Amazon
VPC) service to launch AWS resources into a virtual network that I've
defined. This virtual network closely resembles a traditional network
that I'd operate in my own data center, with the benefits of using the
scalable infrastructure of AWS.
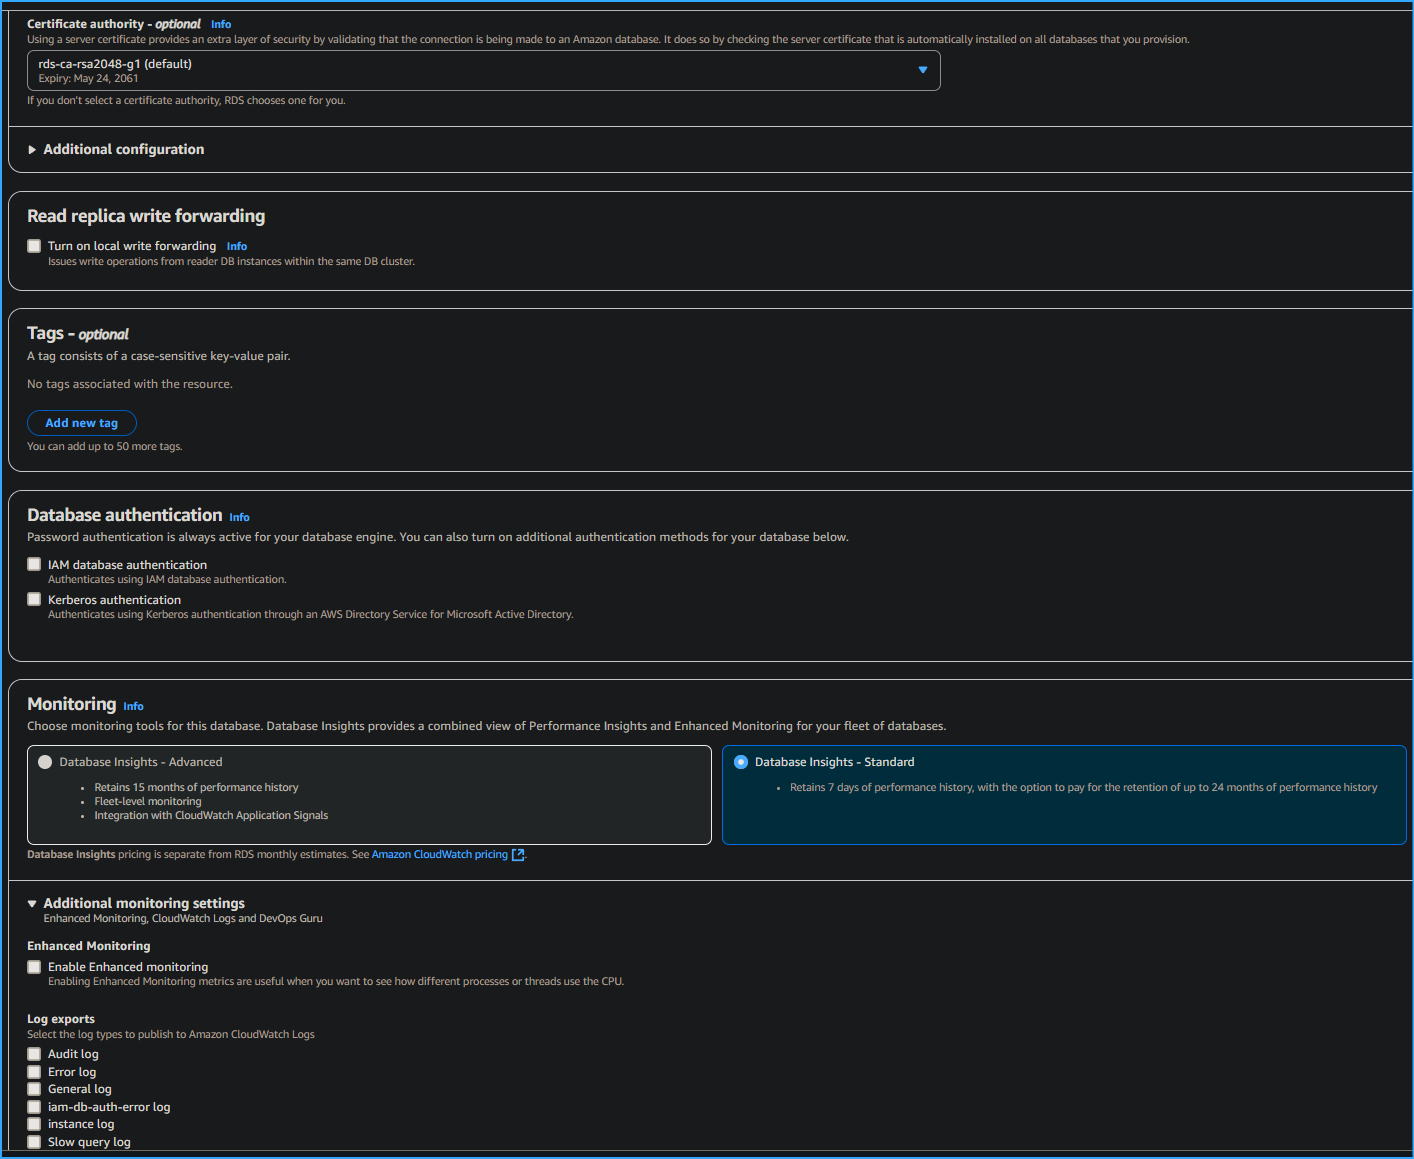
-
In the Monitoring section, I cleared the check box for Enable Enhanced
monitoring.
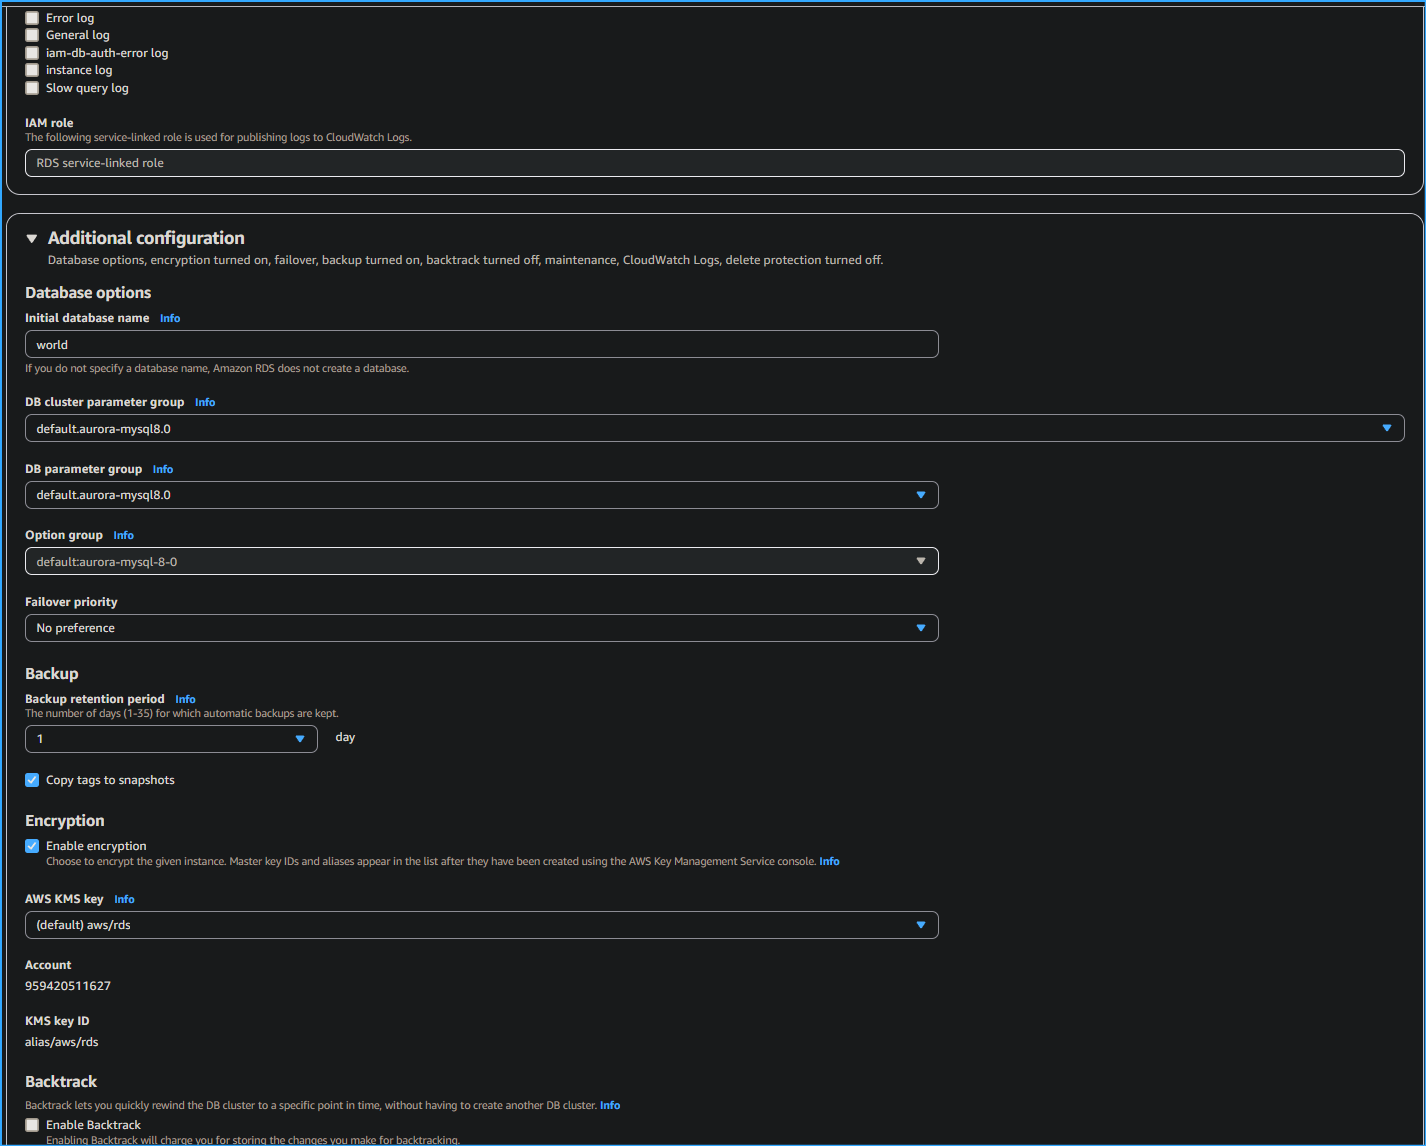
-
I expanded Additional configuration section. For Initial database
name, I entered world
-
In the Encryption section, I cleared the check box for Enable
encryption.
You can encrypt your Amazon RDS instances and snapshots at rest by
enabling the encryption option for your RDS DB instance. Data that is
encrypted at rest includes the underlying storage for a DB instance, its
automated backups, read replicas, and snapshots.
-
In the Maintenance section, I cleared the check box for Enable auto
minor version upgrade.
-
I scrolled to the bottom of the screen, and then chose Create
database.
My Aurora DB instance was in the process of launching and could take up
to 5 minutes to launch. However, I could continue to the next task.
If I encountered the Suggested add-ons for aurora pop-up window, I could
ignore it and choose Close.
Once the database had completed creating, I saw a similar notification
message:
Successfully created database aurora.
Task complete: I successfully created an Aurora instance
Task 2: Connect to an Amazon EC2 Linux instance
In this task, I logged into my Amazon EC2 Linux instance. This instance
was launched for me when I started using CloudFormation.
-
At the top of the AWS Management Console, in the search bar, I
searched for and chose EC2.
- In the left navigation menu, I chose Instances.
-
Next to the instance labelled Command Host, I selected the check box,
and then chose Connect.
- For Connect to instance, I chose Session Manager.
- I chose Connect to open a terminal window.
If the Connect button was not available, I waited for a
few minutes and tried again.
Task complete: I successfully connected to the Amazon EC2 instance named
Command Host.
Task 3: Configure the Amazon EC2 Linux instance to connect to Aurora
In this task, I used the yum package manager to install the MariaDB
client and then configured the Amazon EC2 Linux instance to connect to
the Aurora database.
To install the MariaDB client, I ran the following command. The MariaDB
client is what I would use in later steps to connect to the Aurora
instance that I just created.
sudo yum install mariadb -y
Expected output (truncated):
Install  1 Package

Total download size: 8.8 M
Installed size: 49 M
Downloading packages:
mariadb-5.5.68-1.amzn2.0.1.x86_64.rpm                    |  8.8 MB  00:00:00
Running transaction check
Running transaction test
Transaction test succeeded
Running transaction
    Installing : 1:mariadb-5.5.68-1.amzn2.0.1.86_64       1/1
    Verifying  : 1:mariadb-5.5.68-1.amzn2.0.1.x86_64      1/1

Installed:
mariadb.x86_64 1:5.5.68-1.amzn2.0.1

Complete!
Using a different browser tab, I went back to the AWS Management Console
and in the search bar, searched for and chose RDS.
- In the left navigation menu, I chose Databases.
- I waited for aurora-instance-1 to display Available.
- I chose aurora.
-
I chose the Connectivity & security tab, and in the Endpoints section,
copied the Endpoint name for the Writer instance to my text editor.
The endpoint looked similar to the following:
aurora.cluster-cabcdefghijklm.us-west-2.rds.amazonaws.com.
An endpoint is represented as an Aurora specific URL that contains a
host address and a port. The following types of endpoints are available
from an Aurora DB cluster. Cluster endpoint: A cluster endpoint for an
Aurora DB cluster connects to the current primary DB instance for that
DB cluster. This endpoint is the only one that can perform write
operations such as DDL statements. Because of this, the cluster endpoint
is the one that you connect to when you first set up a cluster or when
your cluster contains only a single DB instance. Each Aurora DB cluster
has one cluster endpoint and one primary DB instance. You use the
cluster endpoint for all write operations on the DB cluster, including
inserts, updates, deletes, and DDL changes. You can also use the cluster
endpoint for read operations, such as queries. The cluster endpoint
provides failover support for read/write connections to the DB cluster.
If the current primary DB instance of a DB cluster fails, Aurora
automatically fails over to a new primary DB instance. During a
failover, the DB cluster continues to serve connection requests to the
cluster endpoint from the new primary DB instance, with minimal
interruption of service. The following example illustrates a cluster
endpoint for an Aurora MySQL DB cluster.
mydbcluster.cluster-123456789012.us-west-2.rds.amazonaws.com:3306 Reader
endpoint: A reader endpoint for an Aurora DB cluster connects to one of
the available Aurora replicas for that DB cluster. Each Aurora DB
cluster has one reader endpoint. If there is more than one Aurora
replica, the reader endpoint directs each connection request to one of
the Aurora replicas. The reader endpoint provides load-balancing support
for read-only connections to the DB cluster. Use the reader endpoint for
read operations, such as queries. You can't use the reader endpoint for
write operations. The DB cluster distributes connection requests to the
reader endpoint among the available Aurora replicas. If the DB cluster
contains only a primary DB instance, the reader endpoint serves
connection requests from the primary DB instance. If one or more Aurora
replicas are created for that DB cluster, subsequent connections to the
reader endpoint are load balanced among the replicas. The following
example represents a reader endpoint for an Aurora MySQL DB cluster.
mydbcluster.cluster-ro-123456789012.us-west-2.rds.amazonaws.com:3306
Next, I logged into the database.
In the following command, I replaced <endpoint_goes_here> with the
endpoint that I copied to my text editor.
mysql -u admin --password='admin123' -h <endpoint_goes_here>
My command looked similar to the following:
mysql -u admin --password='admin123' -h
mydbcluster.cluster-123456789012.us-west-2.rds.amazonaws.com
The MySQL Command-Line Client is a SQL shell which enables interaction
with database engines. More information is available here.
| Switch |
Description |
| -u or --user |
The MySQL username used to connect to a database instance. |
| -p or --password |
The MySQL password used to connect to a database instance. |
| -h or --host |
The host address of the database engine. |
Once the command was updated, I copied the command to my clipboard.
I returned to the Session Manager browser tab that was used to connect
to the Command Host. To connect to the Aurora instance, I ran the
command I had copied in the previous step.
Expected output:
******************************
**** This is OUTPUT ONLY. ****
******************************
Welcome to the MariaDB monitor.  Commands end with ;or \g.
Your MySQL connection id is 173
Server version: 8.0.28 Source distribution
Copyright (c) 2000, 2018, Oracle, MariaDB CorporationAb and others.
Type 'help;' or '\h' for help. Type '\c' to clear thecurrent input statement.
MySQL [(none)]>
Task complete: I successfully configured the Amazon EC2 Linux instance
to connect to Aurora.
Task 4: Create a table and insert and query records
In this task, I learned how to create a table in a database, load data,
and run a query.
To list the available databases, I ran the following command:
SHOW DATABASES;
Expected output:
+--------------------+
| Database           |
+--------------------+
| information_schema |
| mysql              |
| performance_schema |
| sys                |
| world              |
+--------------------+
5 rows in set (0.02 sec)
MySQL [(none)]>
To switch to the world database that I created in Task 1 when I
provisioned the Aurora instance, I ran the following command:
USE world;
Expected output:
Database changed
MySQL [world]>
To create a new table in the world database, I ran the following
command:
CREATE TABLE `country` ( `Code` CHAR(3) NOT NULL DEFAULT '', `Name`
CHAR(52) NOT NULL DEFAULT '', `Continent` enum('Asia','Europe','North
America','Africa','Oceania','Antarctica','South America') NOT NULL
DEFAULT 'Asia', `Region` CHAR(26) NOT NULL DEFAULT '', `SurfaceArea`
FLOAT(10,2) NOT NULL DEFAULT '0.00', `IndepYear` SMALLINT(6) DEFAULT
NULL, `Population` INT(11) NOT NULL DEFAULT '0', `LifeExpectancy`
FLOAT(3,1) DEFAULT NULL, `GNP` FLOAT(10,2) DEFAULT NULL, `GNPOld`
FLOAT(10,2) DEFAULT NULL, `LocalName` CHAR(45) NOT NULL DEFAULT '',
`GovernmentForm` CHAR(45) NOT NULL DEFAULT '', `Capital` INT(11) DEFAULT
NULL, `Code2` CHAR(2) NOT NULL DEFAULT '', PRIMARY KEY (`Code`) );
Expected output:
Query OK, 0 rows affected, 7 warnings (0.02 sec)

MySQL [world]>
To insert new records into the country table that I just created, I ran
the following commands:
INSERT INTO `country` VALUES ('GAB','Gabon','Africa','Central
Africa',267668.00,1960,1226000,50.1,5493.00,5279.00,'Le
Gabon','Republic',902,'GA'); INSERT INTO `country` VALUES
('IRL','Ireland','Europe','British
Islands',70273.00,1921,3775100,76.8,75921.00,73132.00,'Ireland/Éire','Republic',1447,'IE');
INSERT INTO `country` VALUES ('THA','Thailand','Asia','Southeast
Asia',513115.00,1350,61399000,68.6,116416.00,153907.00,'Prathet
Thai','Constitutional Monarchy',3320,'TH'); INSERT INTO `country` VALUES
('CRI','Costa Rica','North America','Central
America',51100.00,1821,4023000,75.8,10226.00,9757.00,'Costa
Rica','Republic',584,'CR'); INSERT INTO `country` VALUES
('AUS','Australia','Oceania','Australia and New
Zealand',7741220.00,1901,18886000,79.8,351182.00,392911.00,'Australia','Constitutional
Monarchy, Federation',135,'AU');
Expected output:
Query OK, 1 row affected (0.00 sec)
MySQL [world]>
To query the table, I ran the following SELECT statement:
SELECT * FROM country WHERE GNP > 35000 and Population > 10000000;
Expected output:
------+-----------+-----------+---------------------------+-------------+-----------+------------+----------------+-----------  +-----------+--------------+------------------------------------+---------+-------+
    | Code | Name      | Continent | Region                    | SurfaceArea | IndepYear | Population | LifeExpectancy | GNP       | GNPOld    | LocalName    | GovernmentForm                      |Capital | Code2 |
    +------+-----------+-----------+---------------------------+-------------+-----------+------------+----------------+-----------+-----------+--------------+------------------------------------+---------+-------+
    | AUS  | Australia | Oceania   | Australia and New Zealand |  7741220.00 |      1901 |   18886000 |           79.8 | 351182.00 | 392911.00 | Australia    | Constitutional Monarchy,Federation |     135 | AU    |
    | THA  | Thailand  | Asia      | Southeast Asia            |   513115.00 |      1350 |   61399000 |           68.6 | 116416.00 | 153907.00 | Prathet Thai | ConstitutionalMonarchy             |    3320 | TH    |
    +------+-----------+-----------+---------------------------+-------------+-----------+------------+----------------+-----------+-----------+--------------+------------------------------------+---------+-------+
    2 rows in set (0.00 sec)
    MySQL [world]>
The query returned two records for Australia and Thailand.
Task complete: I successfully created a table named country, inserted
data into the table, and queried records returning two results.
Conclusion
I have now successfully:
- Created an Aurora instance.
- Connected to a pre-created Amazon EC2 instance.
- Configured the Amazon EC2 instance to connect to Aurora.
- Queried the Aurora instance.
×
![]()
 Configuring Aurora Database One
 Configuring Aurora Database Two
 Configuring Aurora Database Three
 Configuring Aurora Database Four
 Configuring Aurora Database Five
 Configuring Aurora Database Six
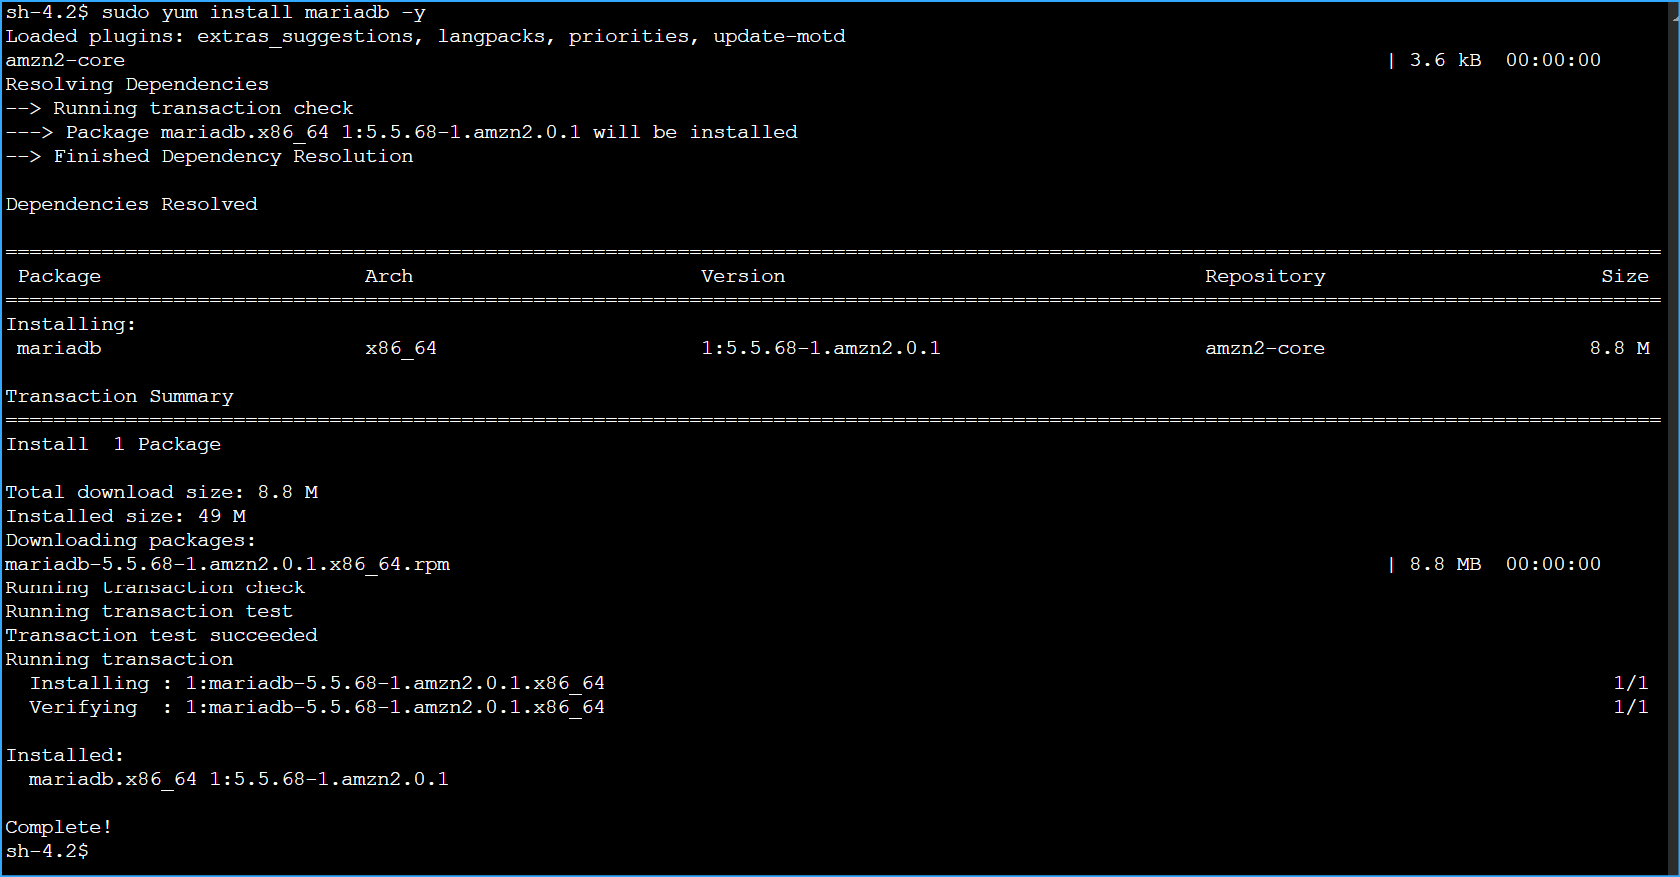 Installed Maria DB Client in Session Manager on Command Host
Instance
Installed Maria DB Client in Session Manager on Command Host
Instance
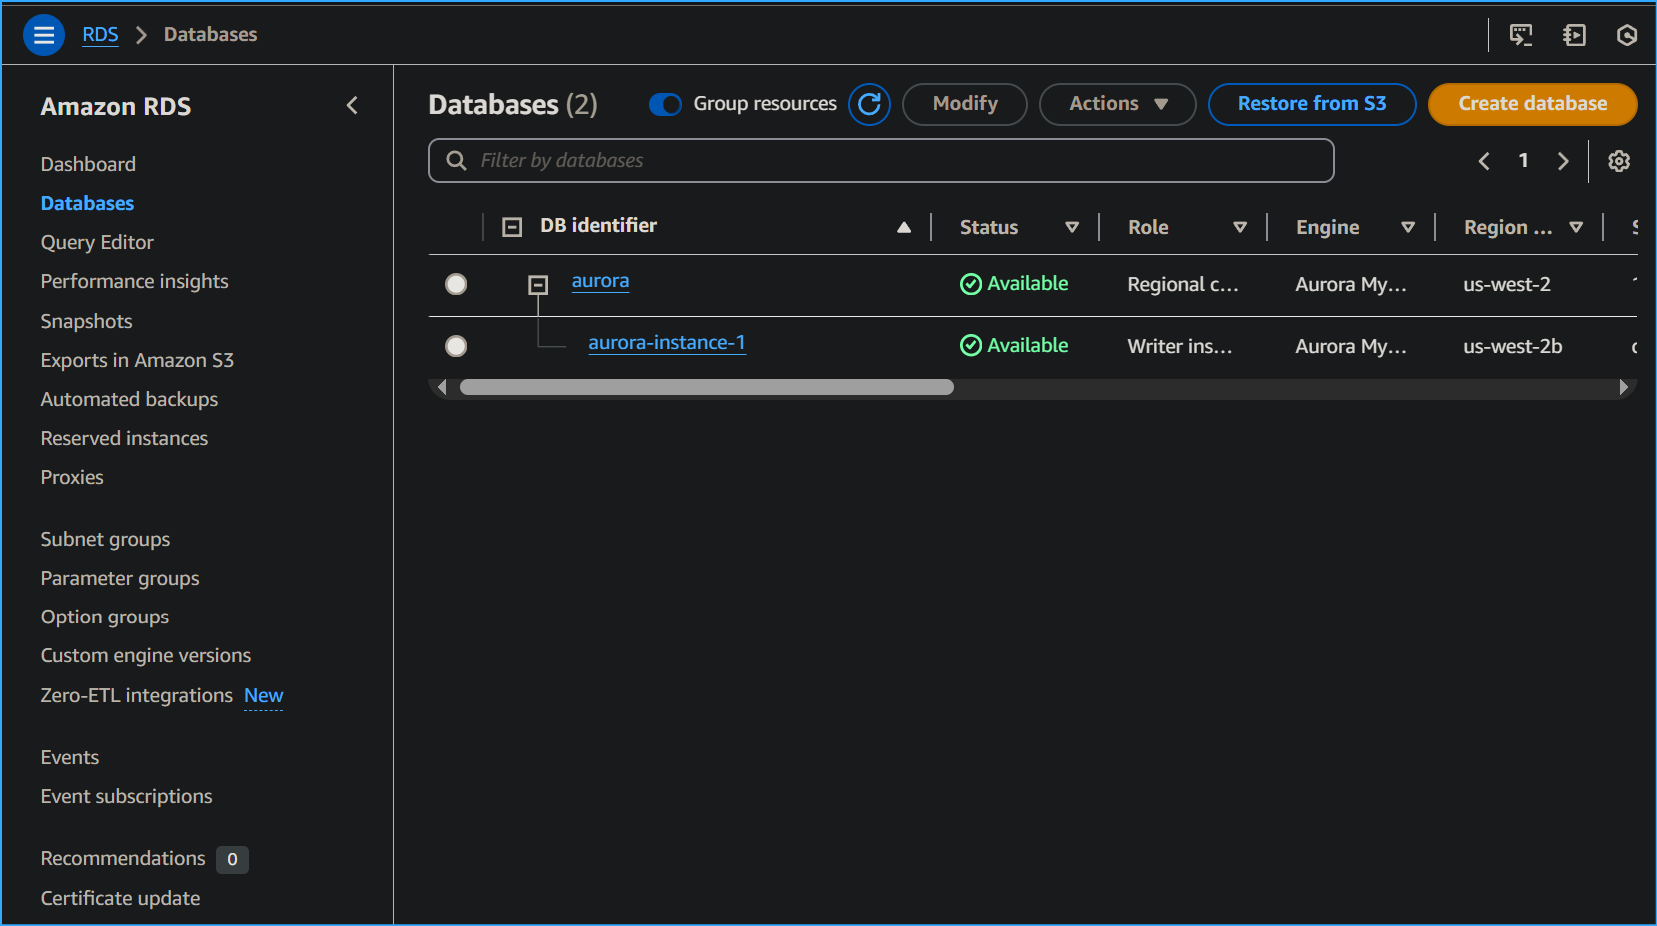 Available
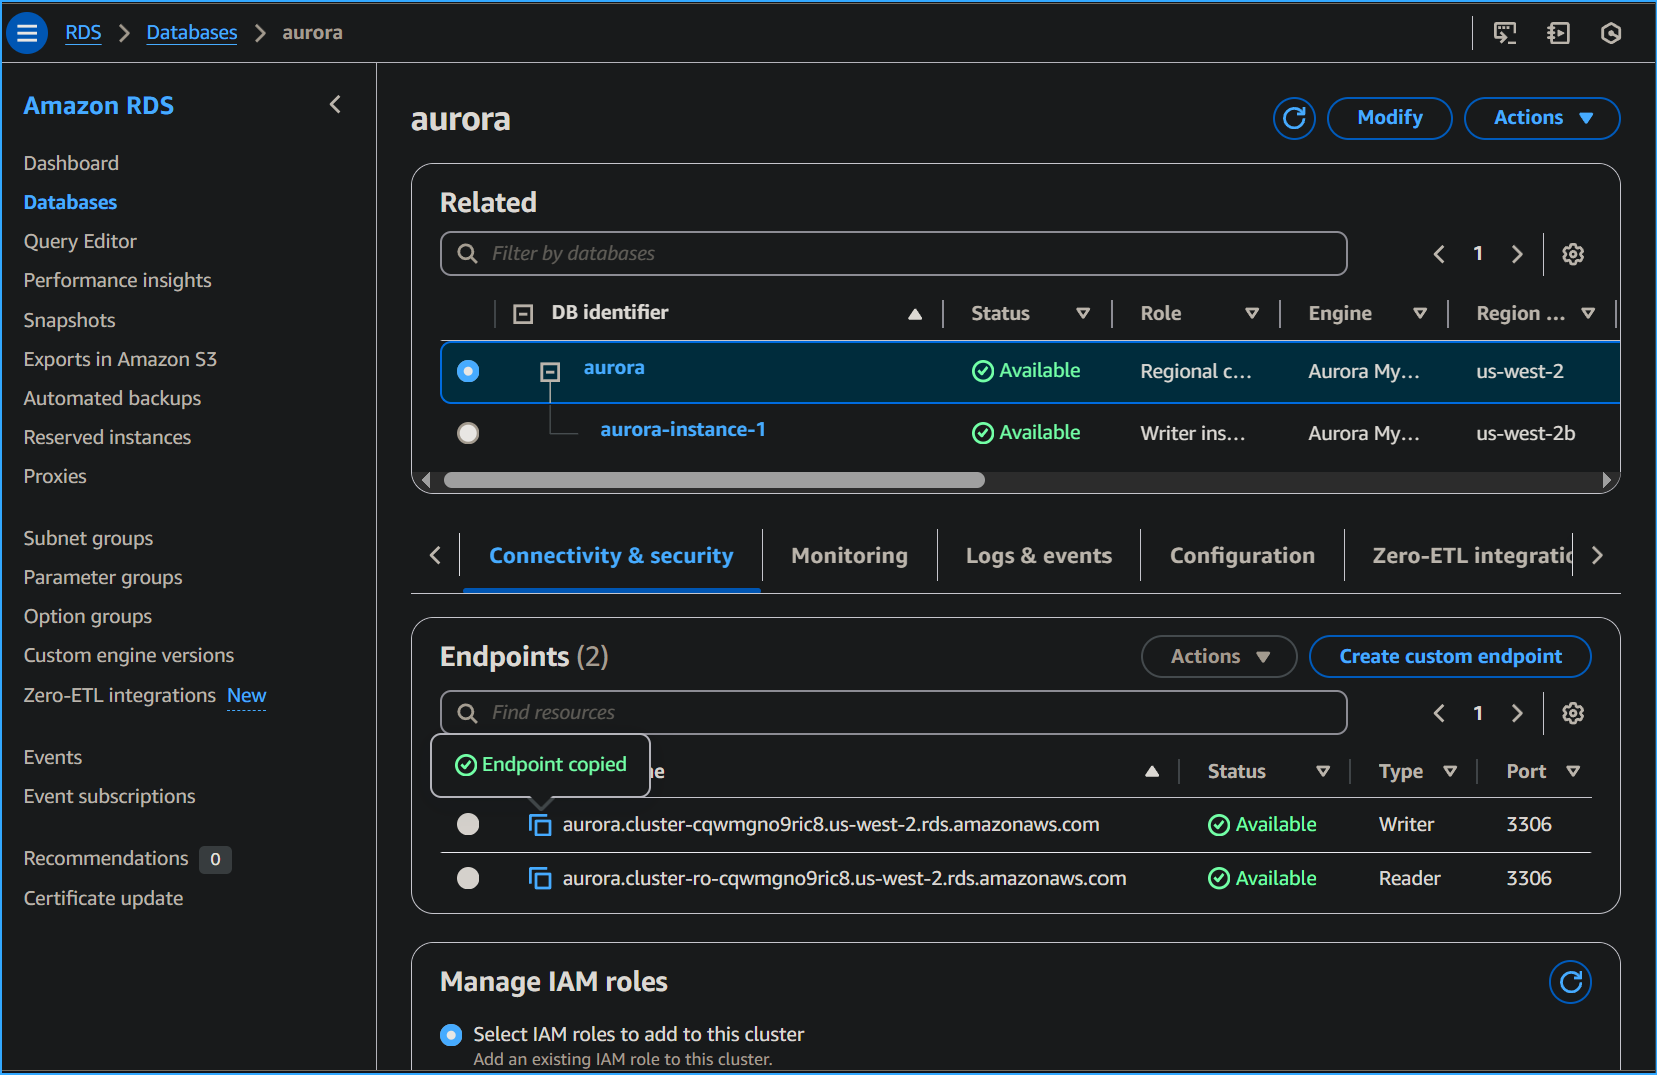 Copied Writer Endpoint in Connectivity and Security Tab in Aurora
Link
Copied Writer Endpoint in Connectivity and Security Tab in Aurora
Link
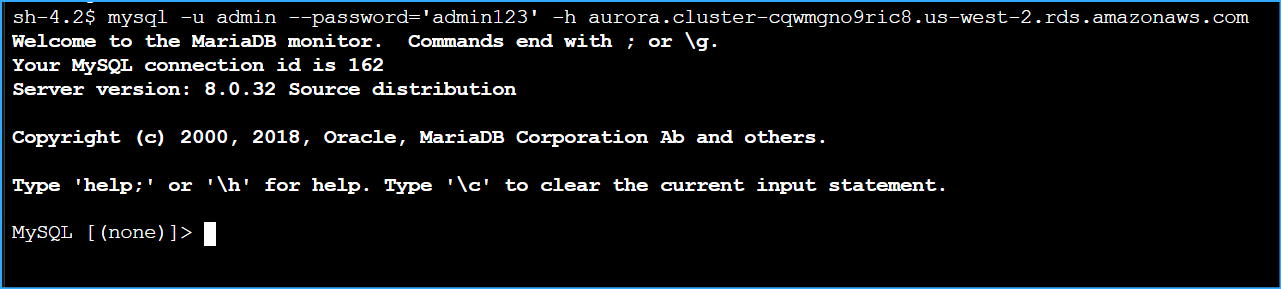 Connected to Aurora Database
 Showed DB Used World Created a New Table
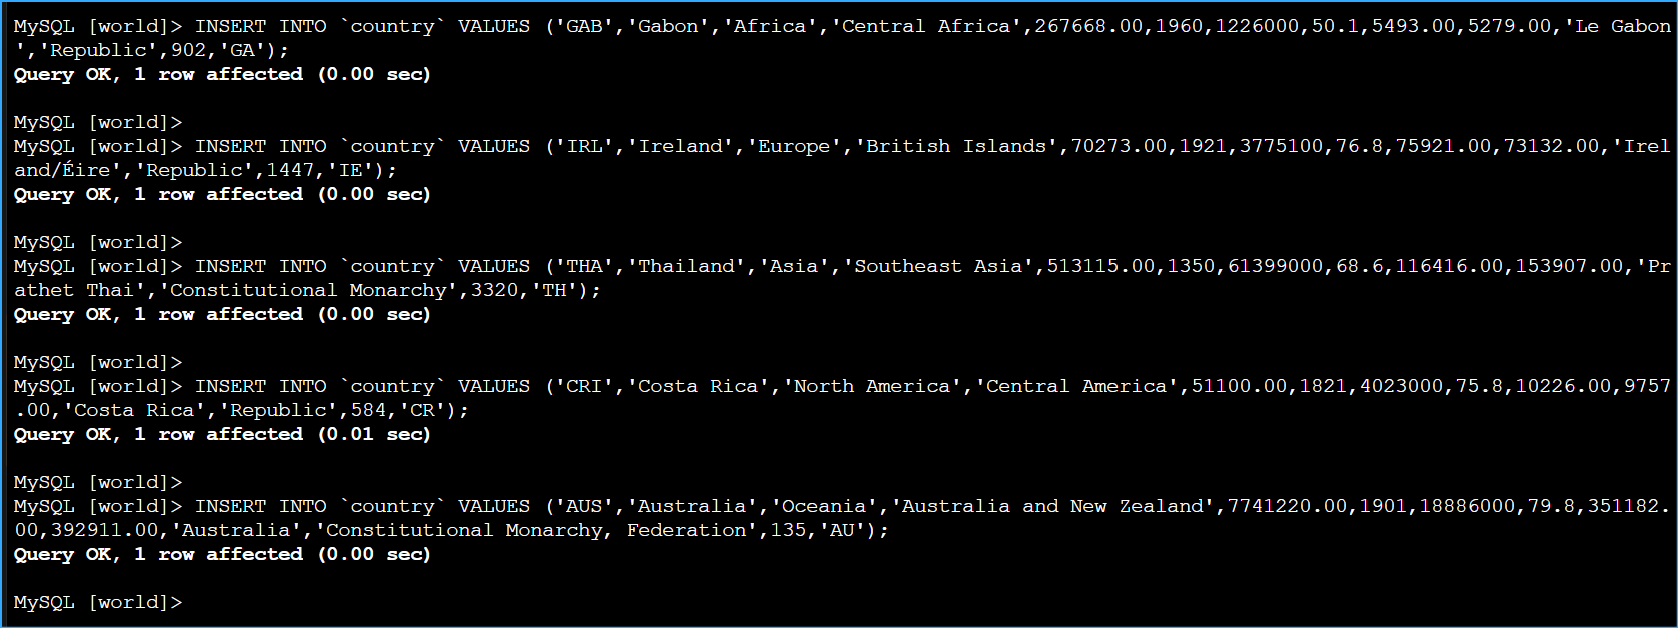 Inserted New Records into Country Table
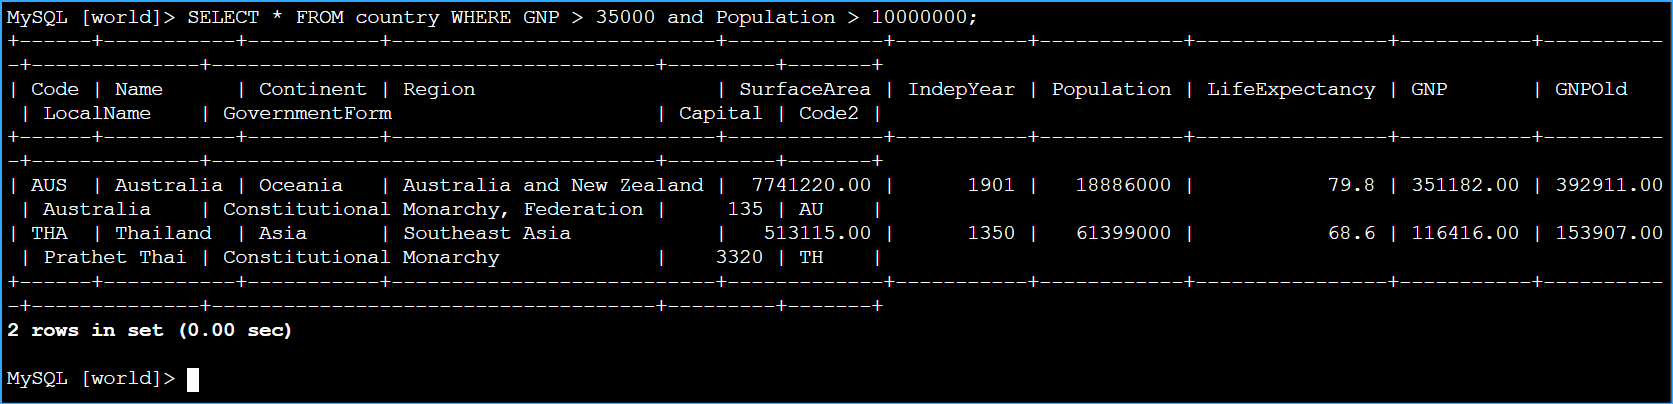 Queried Records Returning Two Results