 History Undo
 Install HTTPD
I worked on the following objectives:
In this task, I used the yum package manager to update and upgrade the machine, including relevant security packages.
First, I validated that I was in the companyA home folder by entering:
Since I wasn't in the correct folder, I entered:
To query repositories for available updates, I entered:
To apply security-related updates, I entered:
To update packages, I entered:
Figure: Once the sudo yum -y upgrade command is ran, the packages are updated and the system will let you know that you are running the current updated version.
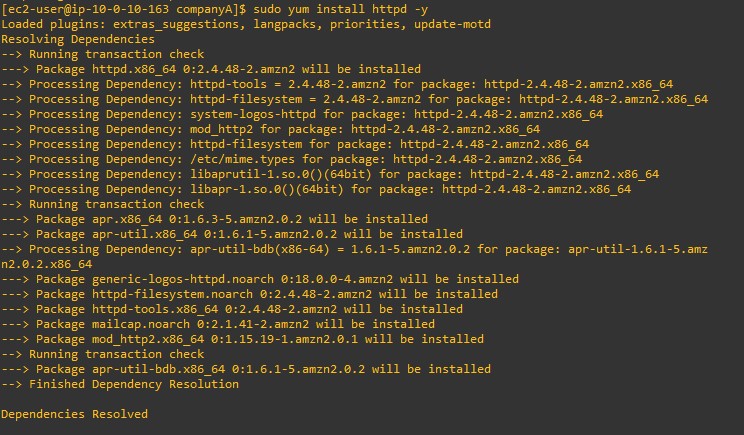
To view the install of httpd and view the history of updates, I entered:
This command installed httpd and also showed a list of all previous updates and current packages on the instance.
In this task, I downgraded a package that had been updated through the yum package manager by doing the following:
First, I validated that I was in the companyA home folder by entering:
To view the history of updates, I entered:
In the output, under the ID column, I made a note of the number for EC2 ... to use in the following steps in this task.
Figure: Once the sudo yum history-list command is finished running, two users will appear (ec2-user and System) with the date, time, and actions that they did. It also shows how many files that were altered.
To view the most recent set of updates, I entered:
I replaced <#> with the history list number from the previous step.
Figure: Information from the sudo yum history info <#> command shows the following information: begin time, begin rpmdb, end time, end rpmdb, user, return-code, and command line.
Then I entered:
I replaced <#> with the history list number from the previous steps.
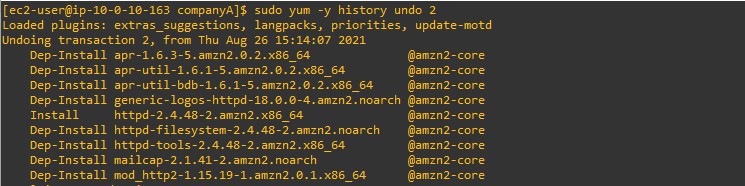
Once the sudo yum -y history undo 2 command is ran, it now shows many packages as dep-install.
In this task, I installed the AWS CLI on Amazon Elastic Compute Cloud (Amazon EC2) Linux by:
To verify that Python was installed, I entered the following command:
The output indicated the version of Python that was installed.
To see if the pip package manager was already installed, I entered:
"bash: pip: command not found" indicated this Red Hat instance did not have pip installed.
In order to install the AWS CLI, I downloaded the installation file using the curl command.
The -o option specifies the file name that the downloaded package is written to. The options on the following example command write the downloaded file to the current directory with the local name awscliv2.zip.
I unzipped the installer.
The following example command unzips the package and creates a directory named aws under the current directory.
Then I ran the install program.
The installation command uses a file named install in the newly unzipped aws directory. By default, the files are all installed to /usr/local/aws-cli, and a symbolic link is created in /usr/local/bin. The command includes sudo to grant write permissions to those directories.
To verify that the AWS CLI was now working, I entered:
The help command displayed the help information for the AWS CLI.
At the : prompt, I entered q to exit.
At the top of the page above these instructions, I chose the Details dropdown menu, and then chose Show. A Credentials window opened.
In the Credentials window next to AWS CLI, I chose Show. This option displayed AWS CLI credentials, including the aws_access_key_id and aws_secret_access_key. I copied and pasted these two keys into a text editor to use in the next task.
I returned to my terminal window and entered the following configuration command for the AWS CLI:
At the prompts, I entered the following information:
After the information was entered, the appropriate credential files were created automatically.
To open the credential file, I entered the command:
Then I pasted the entire section copied from the Details window from task 4 into the file.
For example:
I pressed ctrl + O to save and pressed enter to save the file as the original file name.
I pressed ctrl + X to exit the file.
Next, I needed to find my instance ID. At the top of my screen above these instructions, I chose AWS to open the AWS Management Console in a new tab.
At the top of the console page in the Search for service search box, I entered EC2 and chose EC2.
In the Resources section, I chose Instances (running).
There was one instance called Command Host. I copied and pasted the Instance ID for the Command Host into a text editor to use in the following step.
I returned to my terminal, and entered the following command, replacing <i-1234567890abcdefg> with the instance ID that I copied from the previous step. This command describes the instance attributes.
The output looked like the following (with my instance ID instead of <i-1234567890abcdefg>):
History Undo
Install HTTPD