Working with Files
Overview
I worked on:
- Creating a backup file of an entire folder structure using tar
-
Logging the creation of the backup in a file with the date, time, and
file name of the backup file
- Transferring the backup file to another folder
Task 2: Create a backup
In this task, I created a backup of an entire file structure.
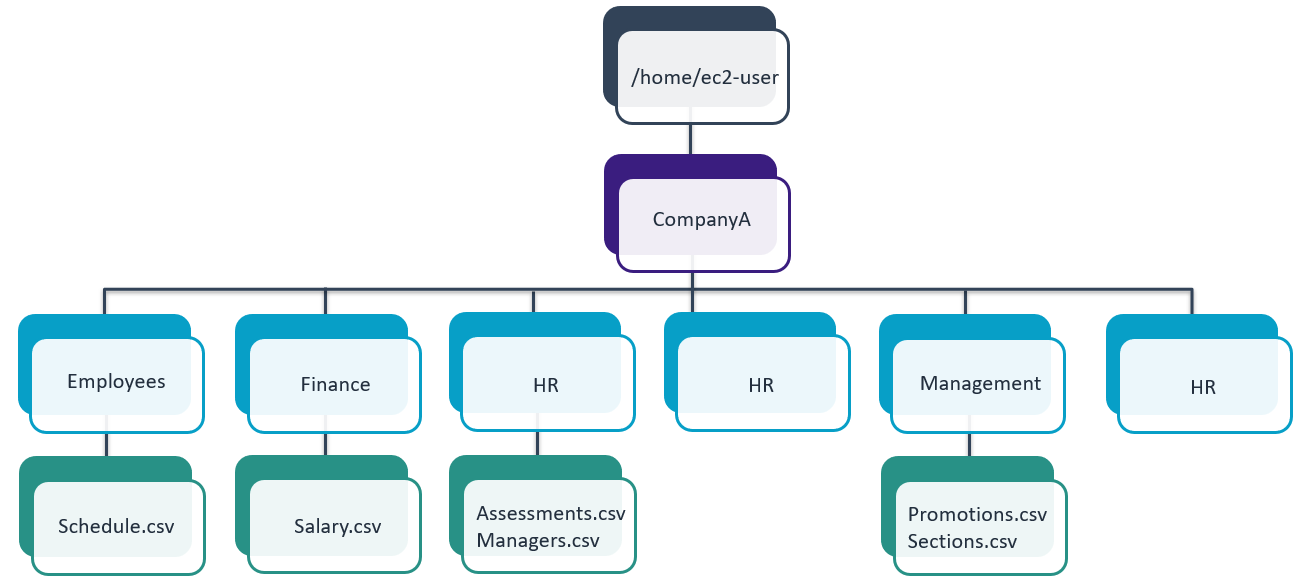
My work environment had the following folder structure:
- /home/ec2-user/CompanyA/
- /home/ec2-user/CompanyA/Employees/
- /home/ec2-user/CompanyA/Employees/Schedules.csv
- /home/ec2-user/CompanyA/Finance/
- /home/ec2-user/CompanyA/Finance/Salary.csv
- /home/ec2-user/CompanyA/HR/
- /home/ec2-user/CompanyA/HR/Assessments.csvv
- /home/ec2-user/CompanyA/HR/Managers.csv
- /home/ec2-user/CompanyA/IA/
- /home/ec2-user/CompanyA/Management/
- /home/ec2-user/CompanyA/Management/Promotions.csv
- /home/ec2-user/CompanyA/Management/Sections.csv
- /home/ec2-user/CompanyA/SharedFolders.csv
I used tar to create a backup.
To ensure that I was in the /home/ec2-user/ folder, I entered the
following command into the terminal and pressed Enter.
pwd
Output:
/home/ec2-user
To validate that the CompanyA folder exists, I entered the following
command into the terminal and pressed Enter.
ls -R CompanyA
Output:
/home/ec2-user/CompanyA CompanyA/: Employees Finance HR IA Management
SharedFolders CompanyA/Employees: Schedules.csv CompanyA/Finance:
Salary.csv CompanyA/HR: Assessments.csv Managers.csv CompanyA/IA:
CompanyA/Management: Promotions.csv Sections.csv
To back up the entire CompanyA folder structure recursively, I entered
the following command and pressed Enter.
tar -csvpzf backup.CompanyA.tar.gz CompanyA
Output:
CompanyA/ CompanyA/Management/ CompanyA/Management/Sections.csv
CompanyA/Management/Promotions.csv CompanyA/Employees/
CompanyA/Employees/Schedules.csv CompanyA/Finance/
CompanyA/Finance/Salary.csv CompanyA/HR/ CompanyA/HR/Managers.csv
CompanyA/HR/Assessments.csv CompanyA/IA/ CompanyA/SharedFolders/ ls
backup.CompanyA.tar.gz CompanyA
To verify that the archive was created, I entered the following command
and pressed Enter.
ls
Output:
CompanyA backup.CompanyA.tar.gz
The backup.CompanyA.tar.gz folder contains all the folders and files in
the CompanyA folder. I can copy it and unzip it to get the entire
structure on another location or host.
Task 3: Log the backup
In this task, I created a file for logging the date, time, and file name
of the backup tar file that I created. This file indicates when I
created backups and could be useful to avoid creating unnecessary
backups in the future.
To navigate to the CompanyA folder, I entered the following command into
the terminal and pressed Enter.
cd /home/ec2-user/CompanyA
Output:
/home/ec2-user/CompanyA
To create an empty backup file named backups.csv, I entered the
following command and pressed Enter.
touch SharedFolders/backups.csv
To add the date, time, and file name to the backups.csv file, I entered
the following command and pressed Enter.
echo "25 Aug 25 2021, 16:59, backup.CompanyA.tar.gz" | sudo tee
SharedFolders/backups
Output:
"25 Aug 25 2019, 16:59, backup.CompanyA.tar gz" | sudo tee
SharedFolders/backups 25 Aug 25 2019, 16:59, backup.CompanyA.tar.gz
The tee command and | redirector, were learned about later. You can use
the tee command to write information both in the terminal and in a file.
The | redirector redirects the output of the echo command to the second
command, tee, which writes it to both the terminal and the
SharedFolders/backups file.
To display the content of the file, I entered the following command and
pressed Enter.
cat SharedFolders/backups.csv
Output:
SharedFolders/backups.csv 25 Aug 25 2021, 16:59, backup.CompanyA.tar.gz
Task 4: Move the backup file
In this task, I transferred the backup file to the IA folder.I could
follow these steps to make the file accessible to another user or team
that does not have access to the folder where I created the backup file.
To validate that I was in the CompanyA folder in the terminal, I entered
the following command and pressed Enter.
pwd
Output:
/home/ec2-user/CompanyA
To transfer the backup file to the IA team computer, I entered the
following command and pressed Enter.
mv ../backup.CompanyA.tar.gz IA/
To verify that the backup file was moved, I entered the following
command and pressed Enter.
ls . IA
Output:
. IA .: Employees Finance HR IA Management SharedFolders IA:
backup.CompanyA.tar.gz
This command lists the content of both the current folder, CompanyA, and
the IA folder. The backup file is not in the current folder anymore and
was moved to the IA folder.
×
![]()
 Folder Structure