Build a VPC and Launch a Web Server
Objectives
After completion, I was able to:
- Create a virtual private cloud (VPC)
- Create subnets
- Configure a security group
-
Launch an Amazon Elastic Compute Cloud (Amazon EC2) instance into a
VPC
Scenario
I used Amazon Virtual Private Cloud (VPC) to create my own VPC and added
additional components to produce a customized network for a Fortune 100
customer. I also created security groups for my EC2 instance. I then
configured and customized an EC2 instance to run a web server and
launched it into the VPC.
Task 1: Create your VPC
In this task, I used the VPC Wizard to create a VPC, an internet
gateway, and two subnets in a single Availability Zone. An internet
gateway is a VPC component that allows communication between instances
in your VPC and the internet.
After creating a VPC, I added subnets. Each subnet resides entirely
within one Availability Zone and cannot span zones. If a subnet's
traffic is routed to an internet gateway, the subnet is known as a
public subnet. If a subnet does not have a route to the internet
gateway, the subnet is known as a private subnet.
The wizard also created a NAT gateway, which is used to provide internet
connectivity to EC2 instances in private subnets.
Here's what I did:
-
At the upper-right of these instructions, I chose AWS. The AWS
Management Console opened in a new tab.
-
Once I was in the AWS console, I typed and searched for VPC in the
search bar at the top. Selected VPC from the list.
-
I was now in the Amazon VPC dashboard. I used the Amazon Virtual
Private Cloud (Amazon VPC) service to build my VPC.
-
I chose Create VPC and configured the following options:
- Resources to create: Chose VPC and more
- Name tag auto-generation: UnChecked the box Auto-generate
-
IPv4 CIDR: Entered 10.0.0.0/16
- IPv6 CIDR block: Chose No IPv6 CIDR block
- Tenancy: Chose Default
- Number of Availability Zones (AZs): 1
- Number of public subnets: 1
- Number of private subnets: 1
-
I expanded Customize subnets CIDR blocks and configured:
-
Public subnet CIDR block in us-west-2a:
10.0.0.0/24
-
Private subnet CIDR block in us-west-2a:
10.0.1.0/24
- NAT gateways: Chose In 1 AZ
- VPC endpoints: Chose None
-
On the Preview pane, I named the resources as follows:
- VPC: Lab VPC
-
Subnets (2):
-
First box, Public subnet one without name tag:
Public Subnet 1
-
Second box, Private subnet one without name tag:
Private Subnet 1
-
Route tables (2):
-
First box, Public route table without name tag:
Public Route Table
-
Second box, Private route table without name tag:
Private Route Table
- I chose Create VPC.
-
On the next screen, I saw a Success message displayed with VPC
details.
- I chose View VPC.
- Lab VPC details were displayed as per my configuration.
Task 2: Create additional subnets
In this task, I created two additional subnets in a second Availability
Zone. This option is useful for creating resources in multiple
Availability Zones to provide high availability.
- In the left navigation pane, I chose Subnets.
-
To configure the second public subnet, I chose Create subnet and
configured the following options:
-
VPC ID: From the dropdown list, I chose Lab VPC
- Subnet name: Entered Public Subnet 2
- Availability Zone: No preference
-
IPv4 CIDR block: Entered
10.0.2.0/24
- I chose Create subnet.
The subnet now has all IP addresses starting with 10.0.2.x.
-
To configure the second private subnet, I chose Create subnet and
configured the following options:
-
VPC ID: From the dropdown list, I chose Lab VPC
- Subnet name: Entered Private Subnet 2
- Availability Zone: No preference
-
IPv4 CIDR block: Entered
10.0.3.0/24
- I chose Create subnet.
The subnet now has all IP addresses starting with 10.0.3.x.
Task 3: Associate the subnets and add routes
- In the left navigation pane, I chose Route Tables.
- I chose Public Route Table.
- In the lower pane, I chose the Subnet associations tab.
-
Under Subnets without explicit associations, I chose Edit subnet
associations.
- I selected the check box for Public Subnet 2.
- I chose Save associations.
-
I then configured the route table that is used by the private subnets
by choosing Private Route Table.
- In the lower pane, I chose the Subnet associations tab.
-
Under Subnets without explicit associations, I chose Edit subnet
associations.
- I selected the check box for Private Subnet 2.
- I chose Save associations.
My VPC now had public and private subnets configured in two Availability
Zones. I had completed the creation of the networking resources and
routing components and attachment of these resources that make the VPC
functional as a network.
Task 4: Create a VPC security group
In this task, I created a VPC security group, which acts as a virtual
firewall for my instance. When you launch an instance, you associate one
or more security groups with the instance. You can add rules to each
security group that allow traffic to or from its associated instances.
- In the left navigation pane, I chose Security Groups.
- I chose Create security group.
-
I configured the security group with the following options:
-
Security group name: Entered Web Security Group
- Description: Entered Enable HTTP access
- VPC: Chose Lab VPC
- Under Inbound rules, I chose Add rule.
-
I configured the following options:
- Type: Chose HTTP
- Source: Chose Anywhere IPv4
- Description: Entered Permit web requests
- I chose Create security group.
I planned to use this security group in the next task when launching an
EC2 instance.
Task 5: Launch a web server instance
In this task, I launched an EC2 instance into the new VPC. I configured
the instance to act as a web server.
-
On the AWS Management Console, in the Search bar, I entered and chose
EC2 to go to the EC2 Management Console.
- In the left navigation pane, I chose Instances.
- I chose Launch instances and configured the following options:
-
In the Name and tags section, I entered Name:
Web Server 1.
-
In the Application and OS Images (Amazon Machine Image) section, I
configured the following options:
- Quick Start: Chose Amazon Linux
-
Amazon Machine Image (AMI): From dropdown, Chose
Amazon Linux 2 AMI (HVM)
-
In the Instance type section, I chose t3.micro.
-
In the Key pair (login) section, I chose vockey.
-
In the Network settings section, I chose Edit and configured the
following options:
- VPC - required: Chose Lab VPC
- Subnet: Chose Public Subnet 2
- Auto-assign public IP: Chose Enable
-
Firewall (security groups): Chose
Select existing security group
- I chose Web Security Group
- I expanded Advanced details.
- Under User data, I copied and pasted the following code:
        #!/bin/bash
        #Install Apache Web Server and PHP
        yum install -y httpd mysql php
        #Download Lab files
        wget https://aws-tc-largeobjects.s3.us-west-2.amazonaws.com/CUR-TF-100-RESTRT-1/267-lab-NF-build-vpc-web-server/s3/lab-app.zip
        unzip lab-app.zip -d /var/www/html/
        #Turn on web server
        chkconfig httpd on
        service httpd start
- I chose Launch instance.
- To display the launched instance, I chose View all instances.
-
I waited until the Web Server 1 showed 2/2 checks passed in the Status
check column.
This took a few minutes. To update the page, I chose refresh at the top
of the page.
-
I then connected to the web server running on the EC2 instance:
-
I selected the check box for the instance, and chose the Details
tab
- I copied the Public IPv4 DNS value
-
I opened a new web browser tab, pasted the Public IPv4 DNS value,
and pressed Enter
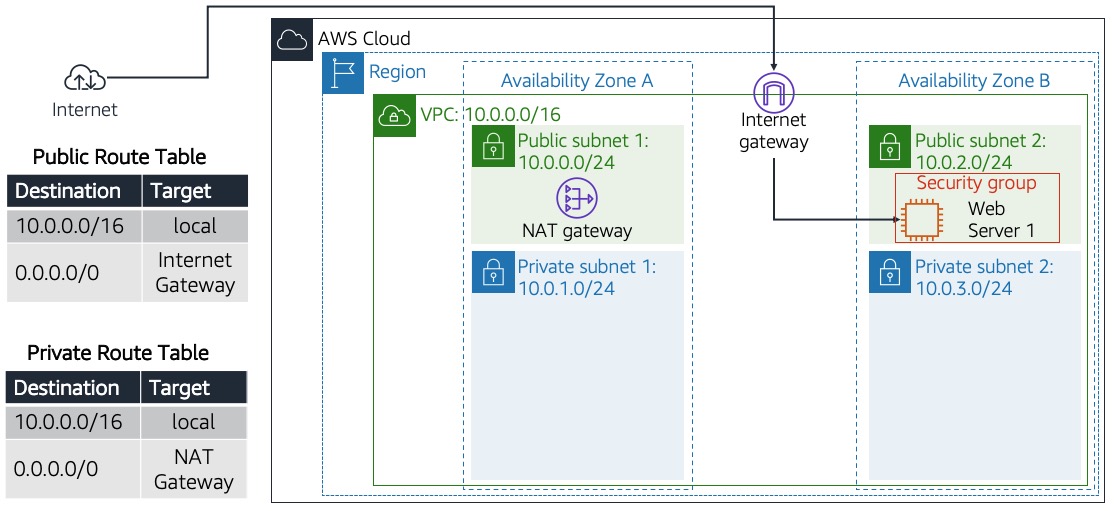
The end product was the delivery of the exact customer request: a fully
functional VPC with its resources (network and security) and a web
server.
Recap
I created a VPC and its resources and made it successfully connect to a
web server.
×
![]()
 Customer requesting this architecture build to launch web
server
Customer requesting this architecture build to launch web
server
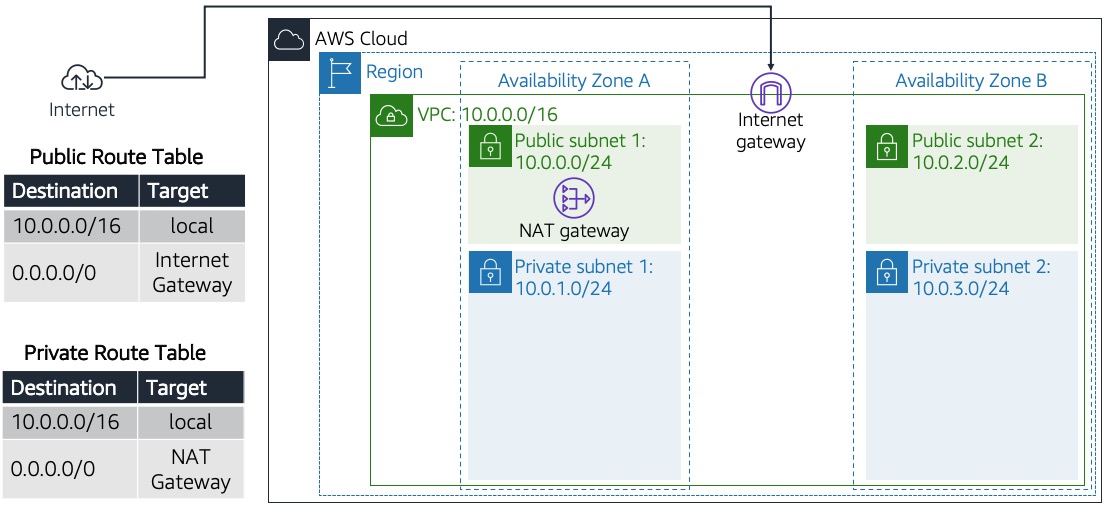 Creation of networking resources and routing components and
attachments that make VPC functional
Creation of networking resources and routing components and
attachments that make VPC functional
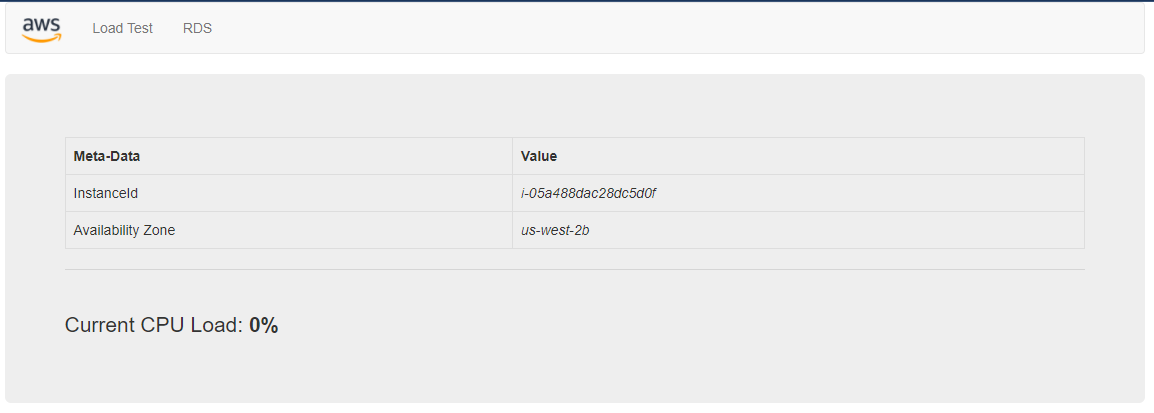 Success page when web server launched
 Completed deployed architecture end product