EC2 Auto Scaling
Overview
I worked with several AWS services to create a scalable web application infrastructure. I:
- Used the AWS Command Line Interface (AWS CLI) to create an Amazon Elastic Compute Cloud (EC2) instance that hosted a web server
- Created an Amazon Machine Image (AMI) from that instance to serve as a template for future instances
- Used that AMI as the foundation for launching a system that scales automatically under variable load using Amazon EC2 Auto Scaling
- Created an Elastic Load Balancer to distribute traffic across multiple EC2 instances
- Configured the infrastructure to span multiple Availability Zones for improved reliability
This project gave me practical experience with:
- AWS CLI operations for EC2 instance management
- AMI creation and management
- Auto Scaling configuration and policies
- Load balancer setup and configuration
- Multi-AZ deployment strategies
By the end, I had created a fully functional, automatically scaling web application infrastructure that can handle variable loads efficiently while maintaining high availability.
Task 1: Creating a new AMI for Amazon EC2 Auto Scaling
In this task, I launched a new EC2 instance and then created a new AMI
based on that running instance. I used the AWS CLI on the Command Host
EC2 instance to perform all of these operations.
Task 1.1: Connecting to the Command Host instance
In this task, I used EC2 Instance Connect to connect to the Command
Host EC2 instance that was created when the environment was provisioned. I used
this instance to run AWS CLI commands.
- On the AWS Management Console, in the Search bar, I entered and chose EC2 to open the EC2 Management Console.
- In the navigation pane, I chose Instances.
- From the list of instances, I selected the Command Host instance.
- I chose Connect.
- On the EC2 Instance Connect tab, I chose Connect.
Note: If I preferred to use an SSH client to connect to the EC2 instance,
I could see the guidance to Connect to Your Linux Instance.
Now that I was connected to the Command Host instance, I could
configure and use the AWS CLI to call AWS services.
Task 1.2: Configuring the AWS CLI
The AWS CLI was preconfigured on the Command Host instance.
- To confirm that the Region in which the Command Host instance was running is the same as the environment (the us-west-2 Region), I ran the following command:
curl http://169.254.169.254/latest/dynamic/instance-identity/document |
grep region
I used this Region information in the next steps.
- To update the AWS CLI software with the correct credentials, I ran the following command:
aws configure
- At the prompts, I entered the following information:
- AWS Access Key ID: Pressed Enter.
- AWS Secret Access Key: Pressed Enter.
- Default region name: Entered the name of the Region from the previous steps in this task (for example, us-west-2). If the Region was already displayed, I pressed Enter.
- Default output format: Entered json
Now I was ready to access and run the scripts detailed in the
following steps.
- To access these scripts, I entered the following command to navigate to their directory:
cd /home/ec2-user/
Task 1.3: Creating a new EC2 Instance
In this task, I used the AWS CLI to create a new instance that hosts a
web server.
- To inspect the UserData.txt script that was installed for me as part of the Command Host creation, I ran the following command:
more UserData.txt
This script performed a number of initialization tasks, including
updating all installed software on the box and installing a small PHP
web application that I could use to simulate a high CPU load on the
instance. The following lines appeared near the end of the script:
find -wholename /root/.*history -wholename /home/*/.*history -exec rm -f
{} \; find / -name 'authorized_keys' -exec rm -f {} \; rm -rf
/var/lib/cloud/data/scripts/*
These lines erase any history or security information that might have
accidentally been left on the instance when the image was taken...
- I copied the KEYNAME, AMIID, HTTPACCESS, and SUBNETID values into a text editor document, and then chose X to close the Credentials panel.
- In the following script, I replaced the corresponding text with the values from the previous step.
aws ec2 run-instances --key-name KEYNAME --instance-type t3.micro
--image-id AMIID --user-data file:///home/ec2-user/UserData.txt
--security-group-ids HTTPACCESS --subnet-id SUBNETID
--associate-public-ip-address --tag-specifications
'ResourceType=instance,Tags=[{Key=Name,Value=WebServer}]' --output text
--query 'Instances[*].InstanceId'
- I entered my modified script into the terminal window, and ran the script.
The output of this command provided me with an InstanceId. Subsequent
steps refer to this value as NEW-INSTANCE-ID. I replaced this
value as needed throughout.
- I copied and pasted the InstanceId value into a text editor to use later.
- To use the aws ec2 wait instance-running command to monitor this instance's status, I replaced NEW-INSTANCE-ID in the following command with the InstanceID value that I copied in the previous step. I ran my modified command.
aws ec2 wait instance-running --instance-ids NEW-INSTANCE-ID
I waited for the command to return to a prompt before proceeding.
My instance started a new web server. To test that the web server was
installed properly, I had to obtain the public DNS name.
- To obtain the public DNS name, in the following command, I replaced NEW-INSTANCE-ID with the value that I copied previously, and ran my modified command:
aws ec2 describe-instances --instance-id NEW-INSTANCE-ID --query
'Reservations[0].Instances[0].NetworkInterfaces[0].Association.PublicDnsName'
- I copied the output of this command without the quotation marks.
The value of this output is referred to as PUBLIC-DNS-ADDRESS in the
next steps.
- In a new browser tab, I entered the output that I copied from the previous step.
It could take a few minutes for the web server to be installed. I waited 5
minutes before continuing to the next steps.
I did not choose Start Stress at this stage.
- In the following command, I replaced PUBLIC-DNS-ADDRESS with the value that I copied in the previous steps, and then ran my modified command.
http://PUBLIC-DNS-ADDRESS/index.php
If my web server did not appear to be running, I would check with my
instructor.
Task 1.4: Creating a Custom AMI
In this task, I created a new AMI based on that instance that I just
created.
- To create a new AMI based on this instance, in the following aws ec2 create-image command, I replaced NEW-INSTANCE-ID with the value that I copied previously, and ran my adjusted command:
aws ec2 create-image --name WebServerAMI --instance-id NEW-INSTANCE-ID
By default, the aws ec2 create-image command restarts the current
instance before creating the AMI to ensure the integrity of the image on
the file system. While my AMI was being created, I proceeded to the next
task.
Task 2: Creating an auto scaling environment
In this section, I created a load balancer that pools a group of EC2
instances under a single Domain Name System (DNS) address. I used auto
scaling to create a dynamically scalable pool of EC2 instances based on
the image that I created in the previous task. Finally, I created a
set of alarms that scale out or scale in the number of instances in my
load balancer group whenever the CPU performance of any machine within
the group exceeds or falls below a set of specified thresholds.
I could perform the following task by using either the AWS CLI or the
AWS Management Console. For this project, I used the AWS Management
Console.
Task 2.1: Creating an Application Load Balancer
In this task, I created a load balancer that can balance traffic across
multiple EC2 instances and Availability Zones.
- On the EC2 Management Console, in the left navigation pane, I located the Load Balancing section, and chose Load Balancers.
- I chose Create load balancer.
- In the Load balancer types section, for Application Load Balancer, I chose Create.
- On the Create Application Load Balancer page, in the Basic configuration section, I configured the following option:
- For Load balancer name, I entered WebServerELB
- In the Network mapping section, I configured the following options:
- For VPC, I chose Lab VPC.
- For Mappings, I chose both Availability Zones listed.
- For the first Availability Zone, I chose Public Subnet 1.
- For the second Availability Zone, I chose Public Subnet 2.
These options configured the load balancer to operate across multiple
Availability Zones.
- In the Security groups section, I chose the X for the default security group to remove it.
- From the Security groups dropdown list, I chose HTTPAccess.
The HTTPAccess security group had already been created for me, which
permits HTTP access.
- In the Listeners and routing section, I chose the Create target group link.
Note: This link opened a new browser tab with the Create target group
configuration options.
- On the Specify group details page, in the Basic configuration section, I configured the following options:
- For Choose a target type, I chose Instances.
- For Target group name, I entered webserver-app
- In the Health checks section, for Health check path, I entered /index.php
- At the bottom of the page, I chose Next.
- On the Register targets page, I chose Create target group.
- Once the target group had been created successfully, I closed the Target groups browser tab.
- I returned to the Load balancers browser tab, and located the Listeners and routing section. For Default action, I chose Refresh to the right of the Forward to dropdown list.
- From the Forward to dropdown list, I chose webserver-app.
- At the bottom of the page, I chose Create load balancer.
I received a message similar to the following:
Successfully created load balancer: WebServerELB
- To view the WebServerELB load balancer that I created, I chose View load balancer.
- To copy the DNS name of the load balancer, I used the copy option, and pasted the DNS name into a text editor.
I needed this information later.
Task 2.2: Creating a launch template
In this task, I created a launch template for my Auto Scaling group.
A launch template is a template that an Auto Scaling group uses to
launch EC2 instances. When I created a launch template, I specified
information for the instances, such as the AMI, instance type, key pair,
security group, and disks.
- On the EC2 Management Console, in the left navigation pane, I located the Instances section, and chose Launch Templates.
- I chose Create launch template.
- On the Create launch template page, in the Launch template name and description section, I configured the following options:
- For Launch template name - required, I entered web-app-launch-template
- For Template version description, I entered A web server for the load test app
- For Auto Scaling guidance, I selected Provide guidance to help me set up a template that I can use with EC2 Auto Scaling.
- In the Application and OS Images (Amazon Machine Image) - required section, I chose the My AMIs tab.
- I noticed that WebServerAMI was already chosen.
- In the Instance type section, I chose the Instance type dropdown list, and chose t3.micro.
- In the Key pair (login) section, I confirmed that the Key pair name dropdown list was set to Don't include in launch template.
Amazon EC2 uses public key cryptography to encrypt and decrypt login
information. To log in to your instance, you must create a key pair,
specify the name of the key pair when you launch the instance, and
provide the private key when you connect to the instance.
Note: I did not need to connect to the instance.
- In the Network settings section, I chose the Security groups dropdown list, and chose HTTPAccess.
When you launch an instance, you can pass user data to the instance. The
data can be used to run configuration tasks and scripts.
- I chose Create launch template.
I received a message similar to the following:
Successfully created web-app-launch-template.
- I chose View launch templates.
Task 2.3: Creating an Auto Scaling group
In this task, I used my launch template to create an Auto Scaling
group.
- I chose web-app-launch-template, and then from the Actions dropdown list, I chose Create Auto Scaling group.
- On the Choose launch template or configuration page, in the Name section, for Auto Scaling group name, I entered Web App Auto Scaling Group
- I chose Next.
- On the Choose instance launch options page, in the Network section, I configured the following options:
- From the VPC dropdown list, I chose Lab VPC.
- From the Availability Zones and subnets dropdown list, I chose Private Subnet 1 (10.0.2.0/24) and Private Subnet 2 (10.0.4.0/24).
- I chose Next.
- On the Configure advanced options – optional page, I configured the following options:
- In the Load balancing – optional section, I chose Attach to an existing load balancer.
- In the Attach to an existing load balancer section, I configured the following options:
- I chose Choose from your load balancer target groups.
- From the Existing load balancer target groups dropdown list, I chose webserver-app | HTTP.
- In the Health checks section, under Additional health check types, I selected Turn on Elastic Load Balancing health checks.
- I chose Next.
- On the Configure group size and scaling policies – optional page, I configured the following options:
- In the Group size – optional section, I entered the following values:
- Desired capacity: 2
- Minimum capacity: 2
- Maximum capacity: 4
- In the Scaling policies – optional section, I configured the following options:
- I chose Target tracking scaling policy.
- For Metric type, I chose Average CPU utilization.
- For Target value, I entered 50
This change told auto scaling to maintain an average CPU utilization
across all instances of 50 percent. Auto scaling automatically adds or
removes capacity as required to keep the metric at or close to the
specified target value. It adjusts to fluctuations in the metric due to
a fluctuating load pattern.
- I chose Next.
- On the Add notifications – optional page, I chose Next.
- On the Add tags – optional page, I chose Add tag and configured the following options:
- For Key, I entered Name
- For Value - optional, I entered WebApp
- I chose Next.
- On the Review page, I chose Create Auto Scaling group.
These options launched EC2 instances in private subnets across both
Availability Zones.
My Auto Scaling group initially showed an Instances count of zero, but
new instances were launched to reach the desired count of two
instances.
Note: If I experienced an error related to the t3.micro instance type
not being available, then I would rerun this task by choosing the t2.micro
instance type instead.
Task 3: Verifying the auto scaling configuration
In this task, I verified that both the auto scaling configuration and
the load balancer were working by accessing a pre-installed script on one
of my servers that would consume CPU cycles, which invokes the scale
out alarm.
- In the left navigation pane, I chose Instances.
Two new instances named WebApp were being created as part of my Auto
Scaling group. While these instances were being created, the Status check
for these two instances was Initializing.
- I observed the Status check field for the instances until the status was 2/2 checks passed. I waited for the two new instances to complete initialization before I proceeded to the next step.
I might need to choose Refresh to see the updated status.
- Once the instances had completed initialization, in the left navigation pane in the Load Balancing section, I chose Target Groups, and then selected my target group, webserver-app.
- On the Targets tab, I verified that two instances were being created. I refreshed this list until the Health status of these instances changed to healthy.
I could now test the web application by accessing it through the load
balancer.
Task 4: Testing auto scaling configuration
- I opened a new web browser tab, and pasted the DNS name of the load balancer that I copied earlier into the address bar, and pressed Enter.
- On the web page, I chose Start Stress.
This step called the application stress in the background, which caused
the CPU utilization on the instance that serviced this request to spike
to 100 percent.
- On the EC2 Management console, in the left navigation pane in the Auto Scaling section, I chose Auto Scaling Groups.
- I selected Web App Auto Scaling Group.
- I chose the Activity tab.
After a few minutes, I saw my Auto Scaling group add a new
instance. This occurred because Amazon CloudWatch detected that the
average CPU utilization of my Auto Scaling group exceeded 50 percent,
and my scale-up policy was invoked in response.
I could also check the new instances being launched on the EC2
Dashboard.
Troubleshooting Guide
Initial Setup Values
For reference, here are the key values I used:
- AMIID: ami-065212a60f30e3798
- HTTPACCESS: sg-057dcebd96cea112f
- COMMANDHOSTIP: 34.222.52.227
- KEYNAME: vockey
- SUBNETID: subnet-0ef50778146e4321c
Common Issues and Solutions
Authentication Failure
If I encountered the error "AWS was not able to validate the provided access credentials", I would follow these steps:
- Verify AWS CLI configuration using aws configure
- Edit credentials file with sudo permissions:
sudo su
nano /home/ec2-user/.aws/credentials
- Add the following structure to the credentials file:
[default]
aws_access_key_id=
aws_secret_access_key=
aws_session_token=
- Verify the credentials:
aws sts get-caller-identity
- Exit superuser mode:
exit
Instance Verification
After launching my instance, I would verify its status using:
aws ec2 wait instance-running --instance-ids
Web Server Verification
To verify the web server installation:
- Get the public DNS name:
aws ec2 describe-instances --instance-ids --query 'Reservations[*].Instances[*].PublicDnsName' --output text
- Access the web server using the format:
http:///index.php
- Wait 5 minutes after instance launch before attempting to access the web server
Note: If the web server doesn't respond after 5 minutes, verify that:
- The security group (HTTPACCESS) allows inbound HTTP traffic
- The instance is in a running state
- The UserData script completed successfully
Summary
- Created an EC2 instance by using an AWS CLI command
- Created a new AMI by using the AWS CLI
- Created an Amazon EC2 launch template
- Created an Amazon EC2 Auto Scaling launch configuration
-
Configured scaling policies and created an Auto Scaling group to scale
in and scale out the number of servers based on variable load
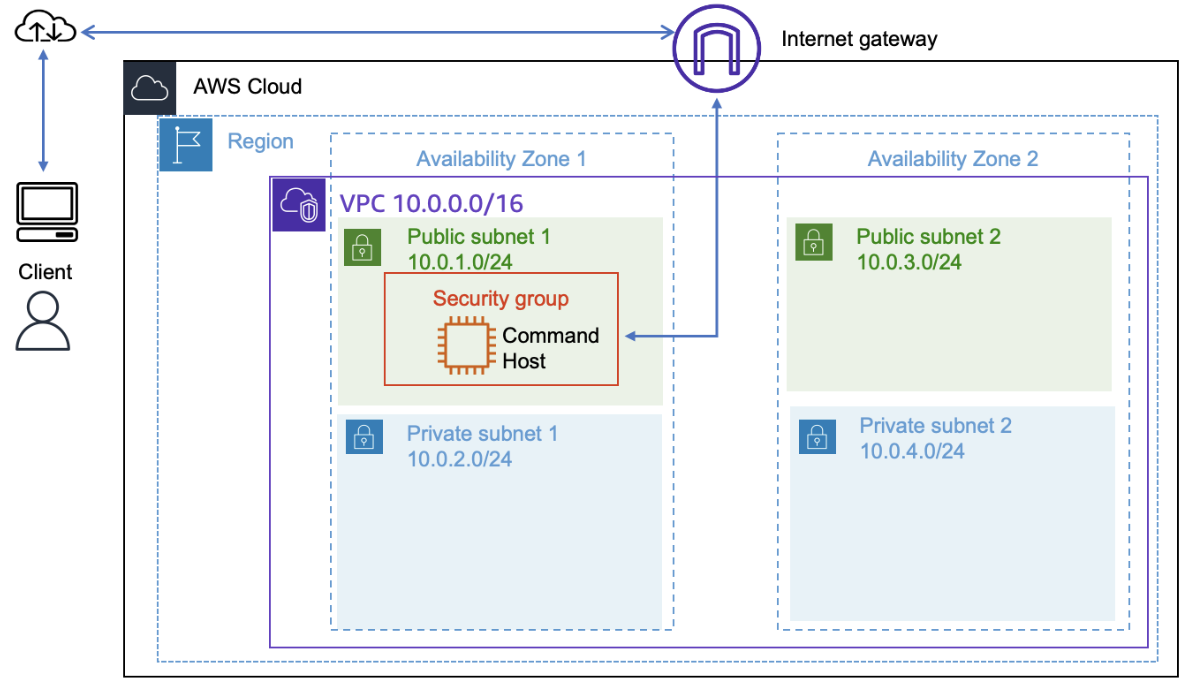 Starting Architecture
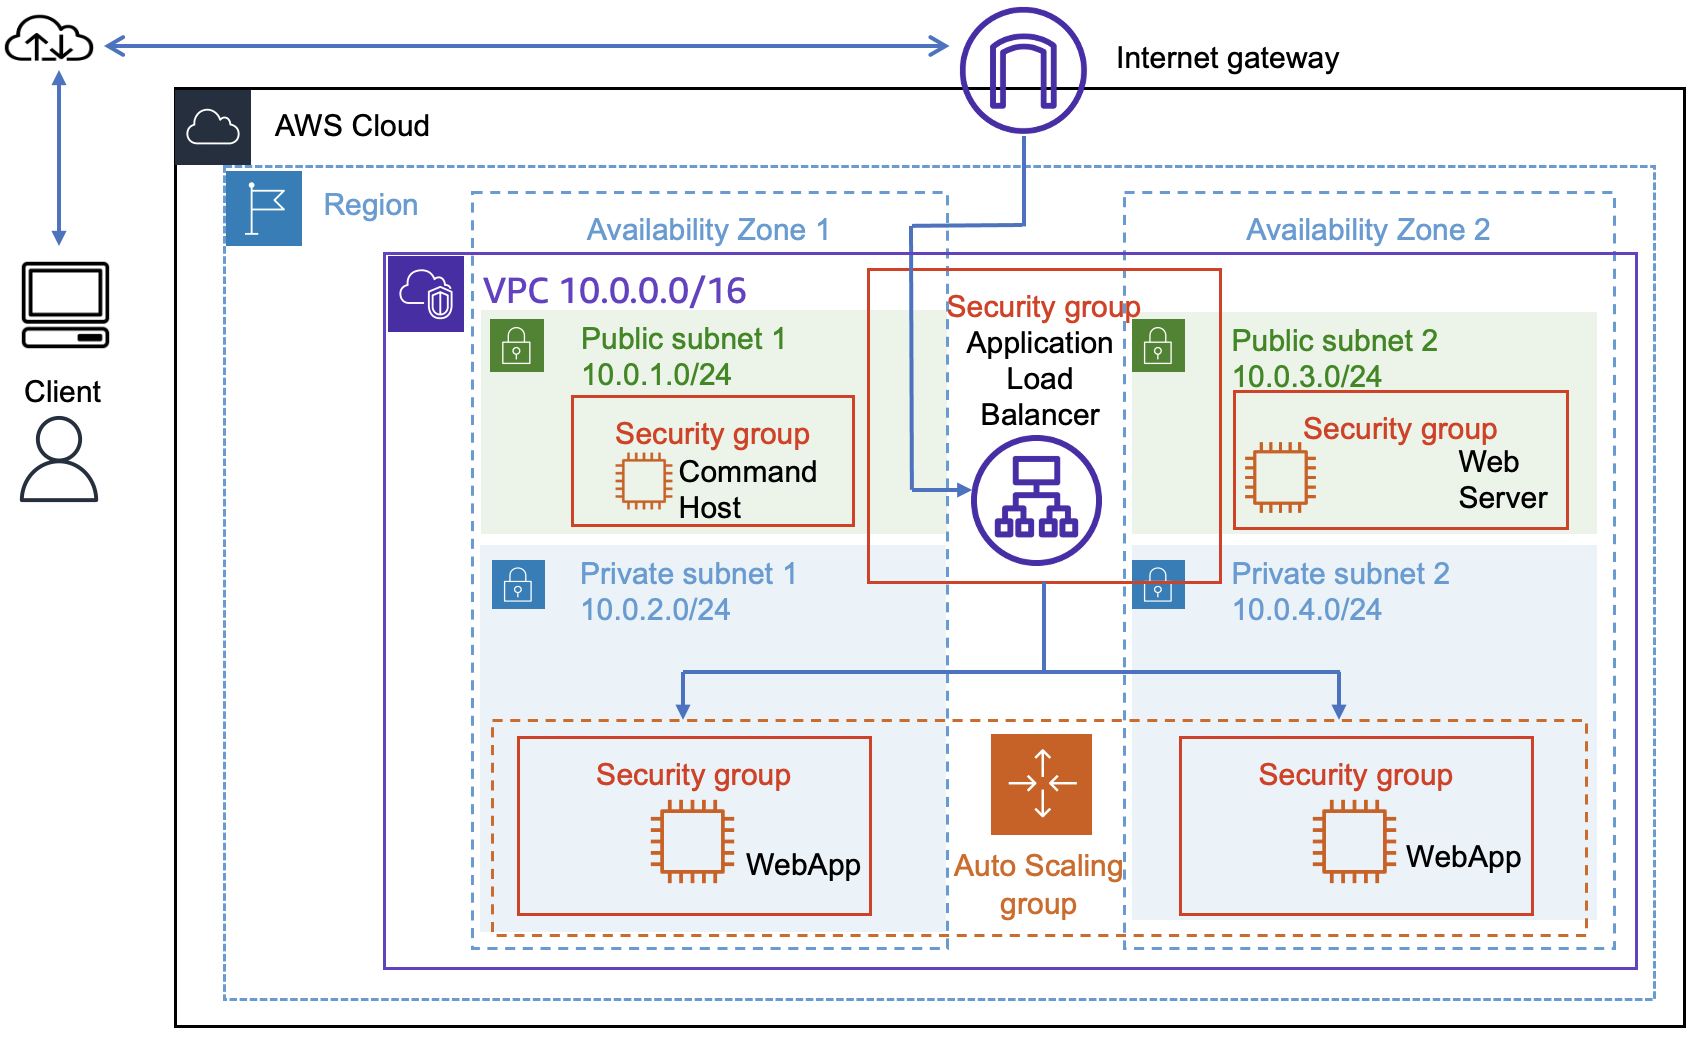 Final Architecture