Malware Protection Using AWS Network Firewall
Overview
I learned that malware, short for malicious software, refers to any
intrusive software developed by cybercriminals (often called hackers) to
steal data and damage or destroy computers and computer systems.
Examples of common malware include viruses, worms, Trojan horses,
spyware, adware, and ransomware.
Firewalls are like physical security walls situated between an
organization's internal network and any external public networks such as
the internet. The firewall protects an internal network from access by
unauthorized users on an external network.
Users need access to the internet for business reasons, but they can
inadvertently download malware, which can impact network and data
security.
Malware threats can be present, and organizations can use various
techniques and services to mitigate these threats (for example,
firewalls, antivirus software, and user control best practice). This
work focused on countermeasure techniques using a firewall.
Scenario
I was hired by AnyCompany as a new security engineer, and the company
tasked me with hardening the company's security perimeter. There had
been reports of users accidentally downloading malware after accessing
specific websites. The IT team for AnyCompany provided me with the URLs
of the sites hosting the malware. It was my job to find a solution to
mitigate access to these malicious actor files.
Objectives
After completion, I was able to:
- Update a network firewall
- Create a firewall rules group
- Verify and test that access to malicious sites is blocked
Task 1: Confirm Access to Malware URLs
First, I needed to confirm that the malware sites were accessible
through the current network and network firewall that AnyCompany was
using. I used an isolated TestInstance EC2 instance to run commands and
download the same malicious files that users had downloaded.
I used the ls command to confirm that the
malware files were downloaded. The output showed the
java_jre17_exec.html and js_crypto_miner.html files that were
downloaded.
To confirm that the malware files were downloaded, the ls command was
used. The output shows the java_jre17_exec.html and js_crypto_miner.html
files that were downloaded.
In this task, I confirmed that the URL hosting the malware files was
accessible through the current network and network firewall that
AnyCompany was using. I used an isolated TestInstance EC2 instance to
run commands and download the same malicious files that users
downloaded. I now needed to fix the AnyCompany network firewall to stop
access to this site.
Task 2: Inspect the Network Firewall
In this task, I inspected the AWS Network Firewall firewall that was
pre-configured during setup. Updating this firewall was the top priority
that AnyCompany had issued to me as the new security engineer.
I followed these steps:
-
In the AWS Management Console, I entered VPC in the search bar, and
then chose VPC.
-
In the left navigation pane under NETWORK FIREWALL, I chose Firewalls.
-
I chose LabFirewall, and read through the three steps in the Overview
section.
-
In Step 2: Configure the firewall policy, I chose the
LabFirewallPolicy link to open the associated policy.
A firewall policy defines the behavior of the firewall in a collection
of stateless and stateful rule groups and other settings.
- In the Stateless default actions section, I chose Edit.
-
For Stateless default actions, I configured the following options:
-
Choose how to treat fragmented packets: I chose Use the same
actions for all packets.
- Action: I chose Forward to stateful rule groups.
- I chose Save.
These settings now forward all packets to a stateful rule group for
further inspection.
A stateful rules engine inspects packets in the context of their traffic
flow, gives you the ability to use more complex rules, and gives you the
ability to log network traffic and AWS Network Firewall firewall alerts
on traffic. Stateful rules consider traffic direction. The stateful
rules engine might delay packet delivery to group packets for
inspection.
A stateless rules engine inspects each packet in isolation without
regard to factors such as the direction of traffic or whether the packet
is part of an existing, approved connection. This engine prioritizes the
speed of evaluation.
In this task, I inspected the network firewall and updated the firewall
policy. I then updated the firewall policy to forward all packets for
stateful rule inspection.
Task 3: Create a Firewall Rule Group
In this task, I created a network firewall rule group with rules that
block access to the malicious URLs. I later attached this rule group to
my firewall policy.
A network firewall rule group is a reusable set of criteria for
inspecting and handling network traffic. You add one or more rule groups
to a firewall policy as part of policy configuration. This rule group
blocks access to the malicious actor URLs.
-
In the left navigation pane under NETWORK FIREWALL, I chose Network
Firewall Rule Groups.
- I chose Create Network Firewall rule group.
-
In the Create rule group section, I configured the following options:
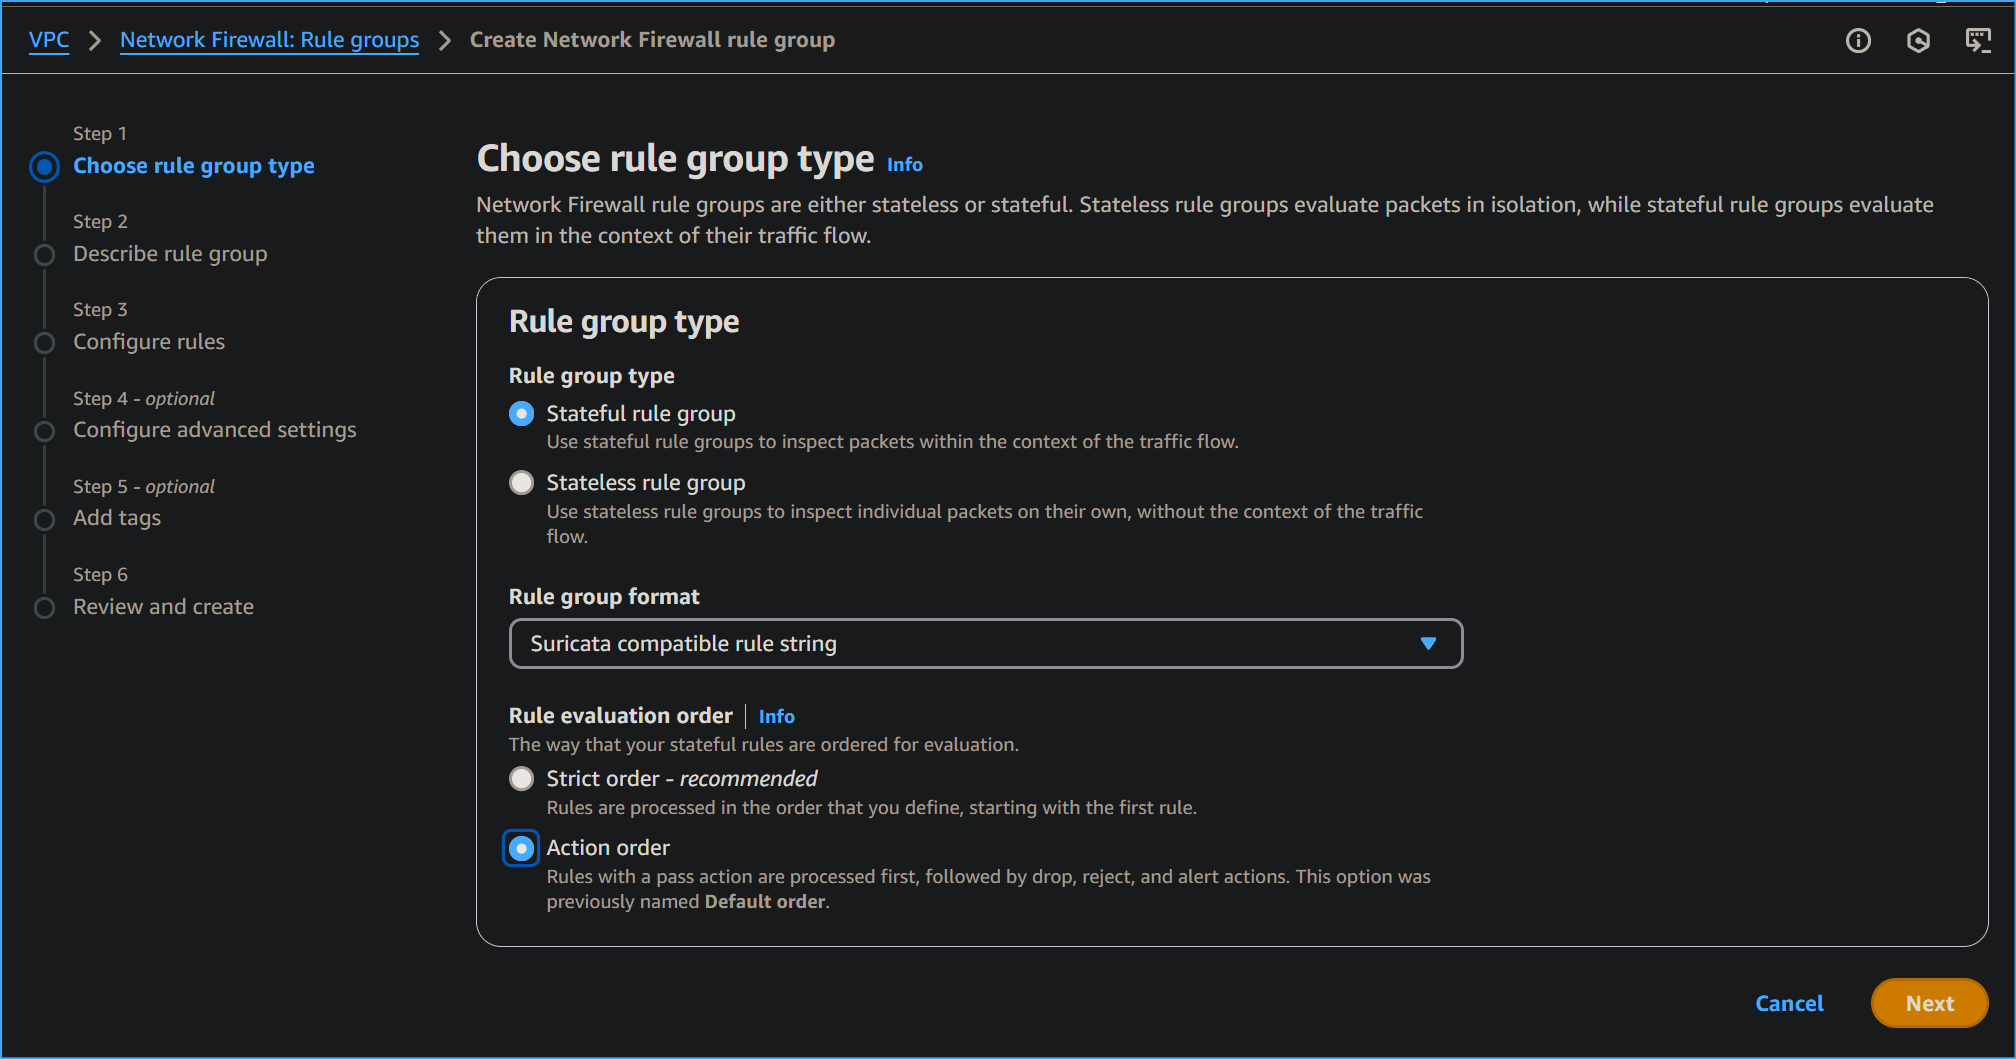
- For Rule group type, I chose Stateful rule group.
-
For Rule group format I chose Suricata compatible rule string.
-
For Rule evaluation order I chose Action order. Then I chose Next.
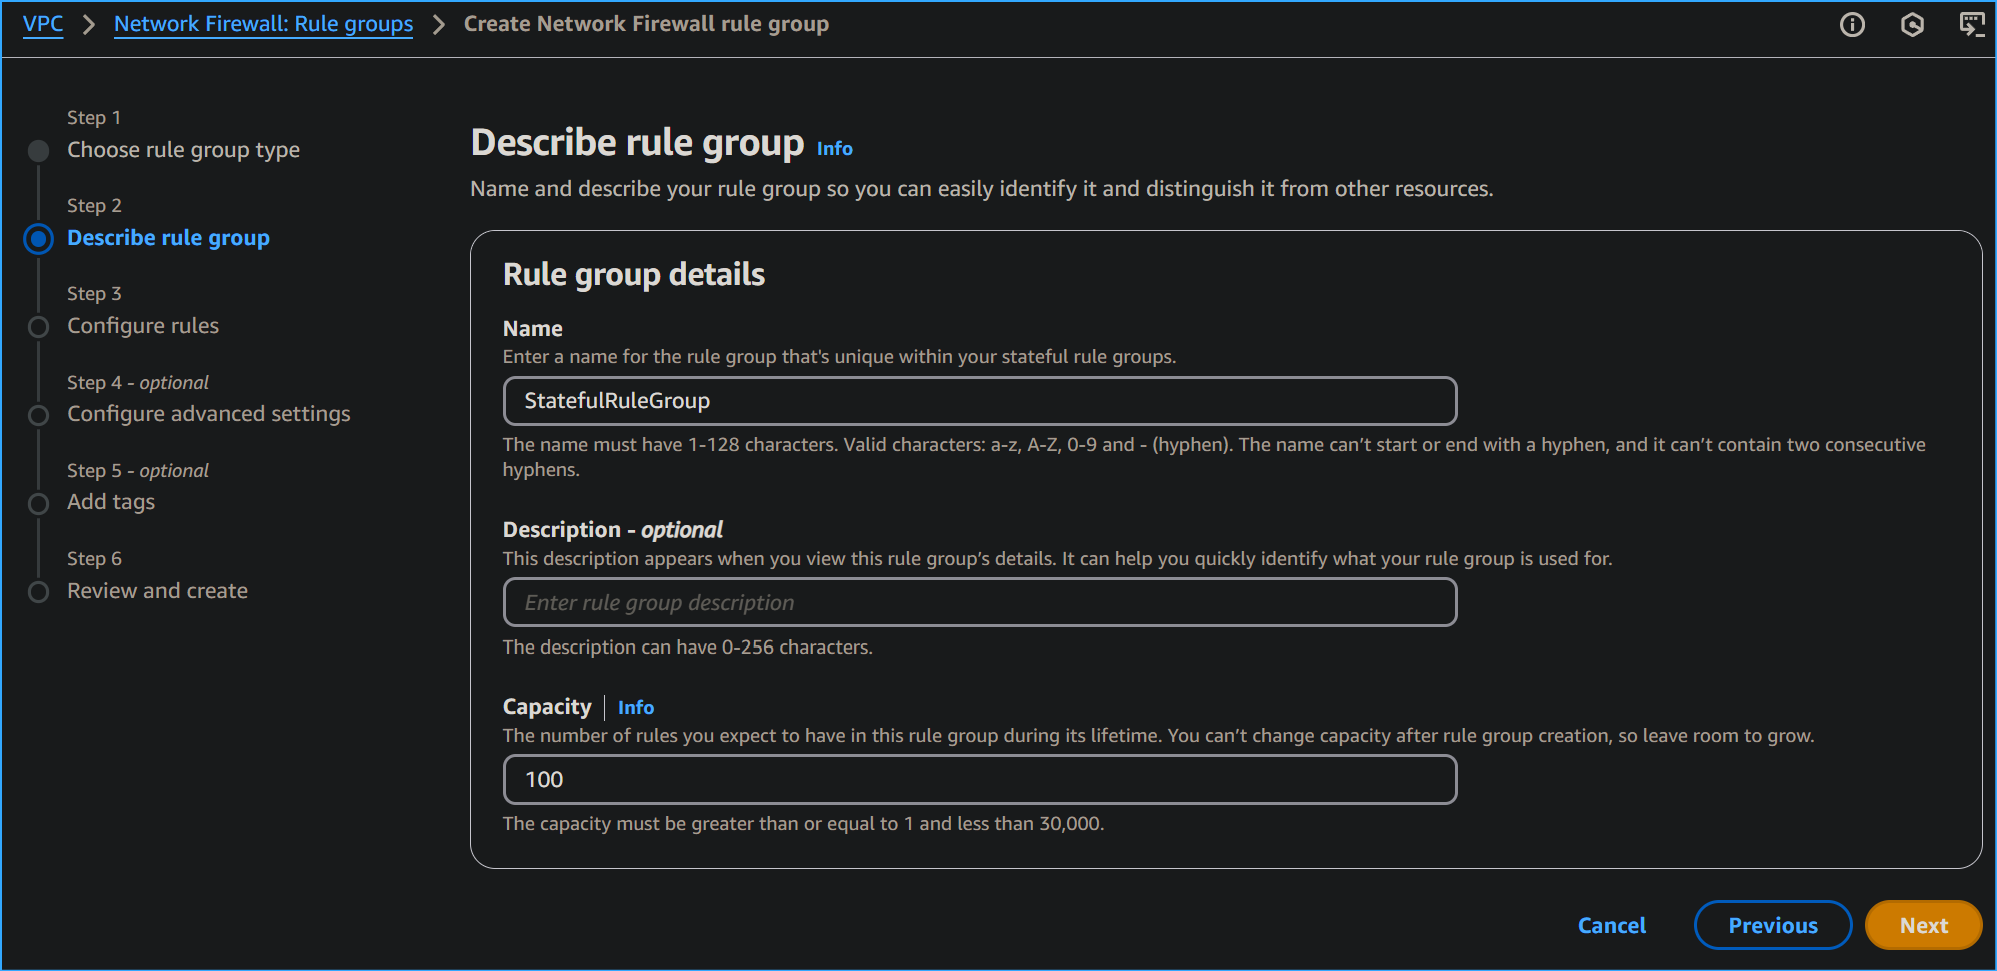
-
In the Rule group details section, I configured the following options:
- Name: I entered StatefulRuleGroup
- Capacity: I entered 100
- I chose Next.
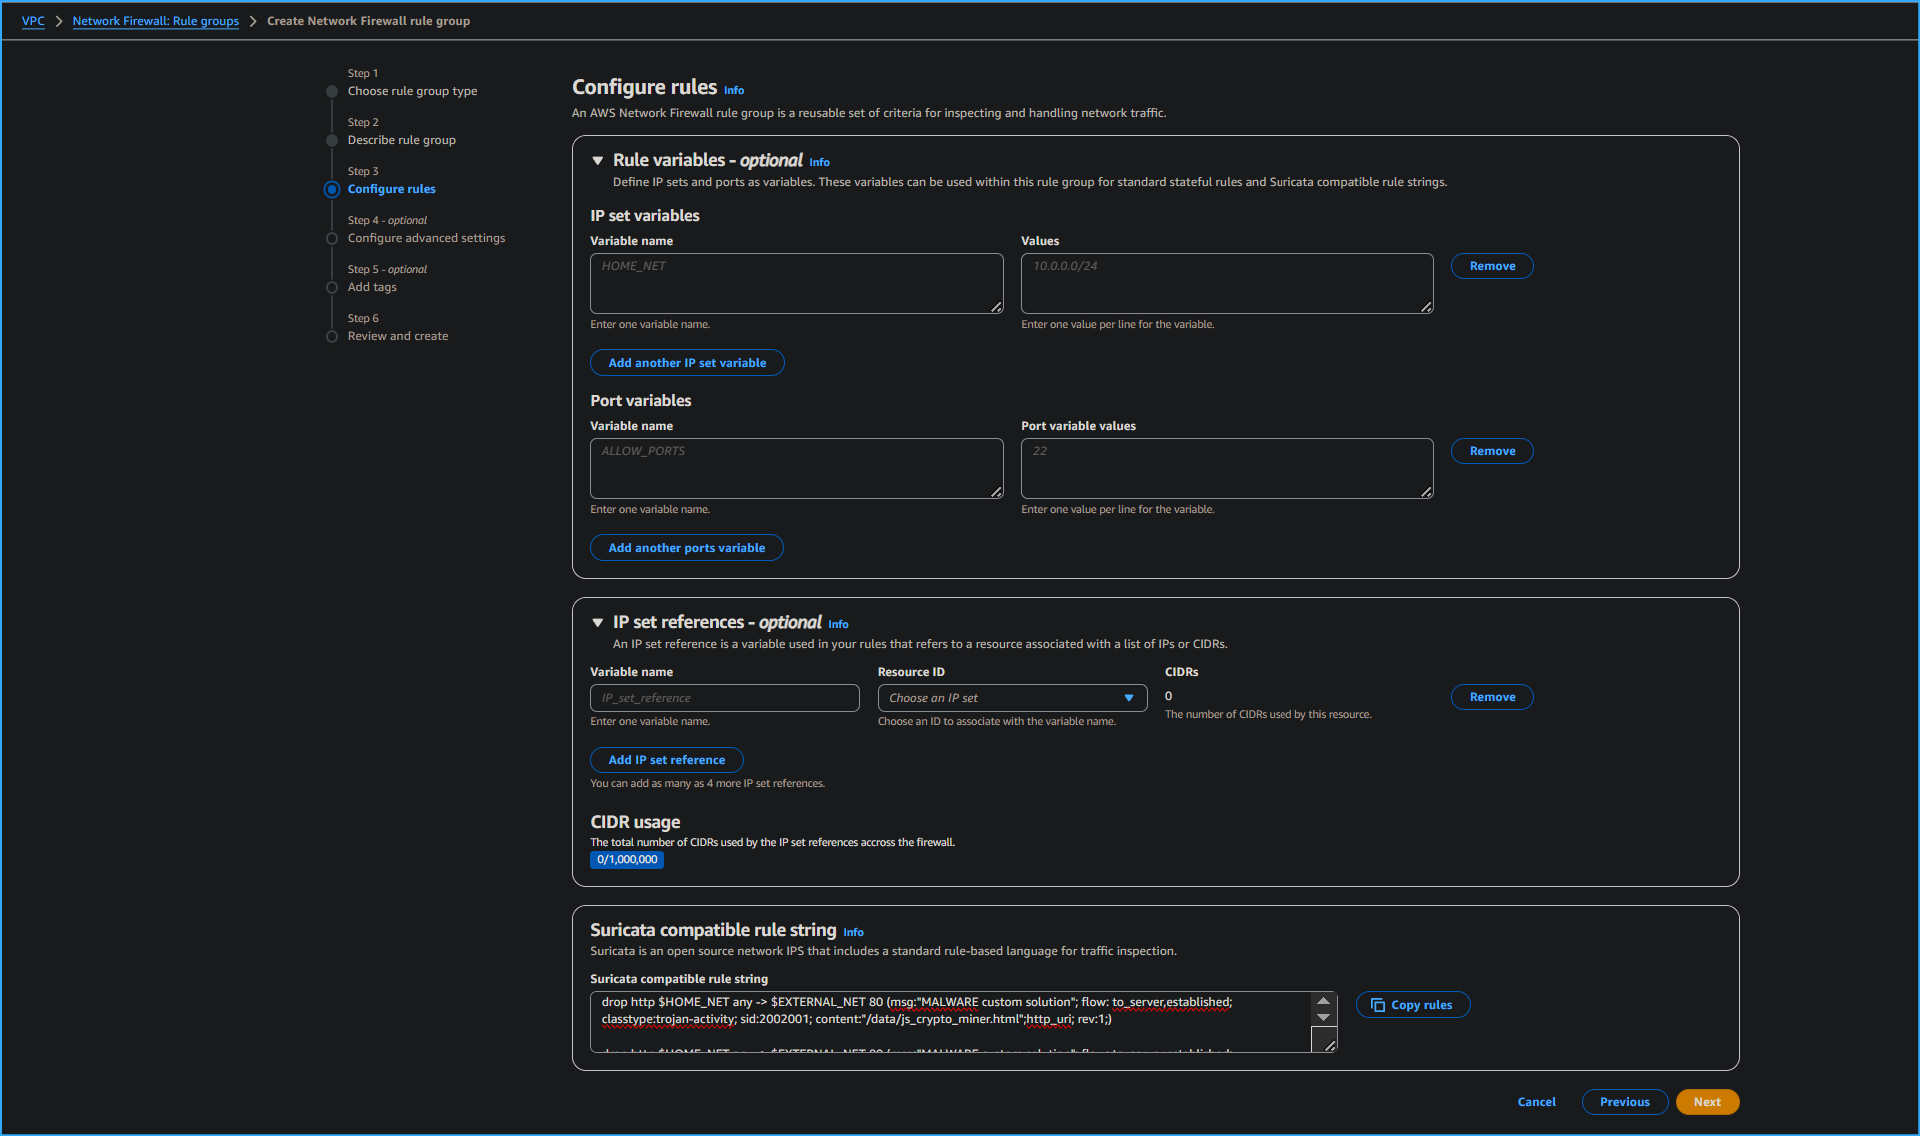
Intrusion prevention system (IPS) rules provide advanced firewall rules
using Suricata rule syntax. Suricata is an open-source network IPS that
includes a standard rule-based language for traffic inspection.
-
In the Suricata compatible IPS rules section, I entered the following
code into the text box:
drop http $HOME_NET any -> $EXTERNAL_NET 80 (msg:"MALWARE custom
solution"; flow: to_server,established; classtype:trojan-activity;
sid:2002001; content:"/data/js_crypto_miner.html";http_uri; rev:1;) drop
http $HOME_NET any -> $EXTERNAL_NET 80 (msg:"MALWARE custom solution";
flow: to_server,established; classtype:trojan-activity; sid:2002002;
content:"/data/java_jre17_exec.html";http_uri; rev:1;)
The two Suricata rules that I added now block traffic that matches the
http_uri contents /data/js_crypto_miner.html and http_uri contents
/data/js_crypto_miner.html URLs when the traffic is initiated from the
LabVPC to the public network.
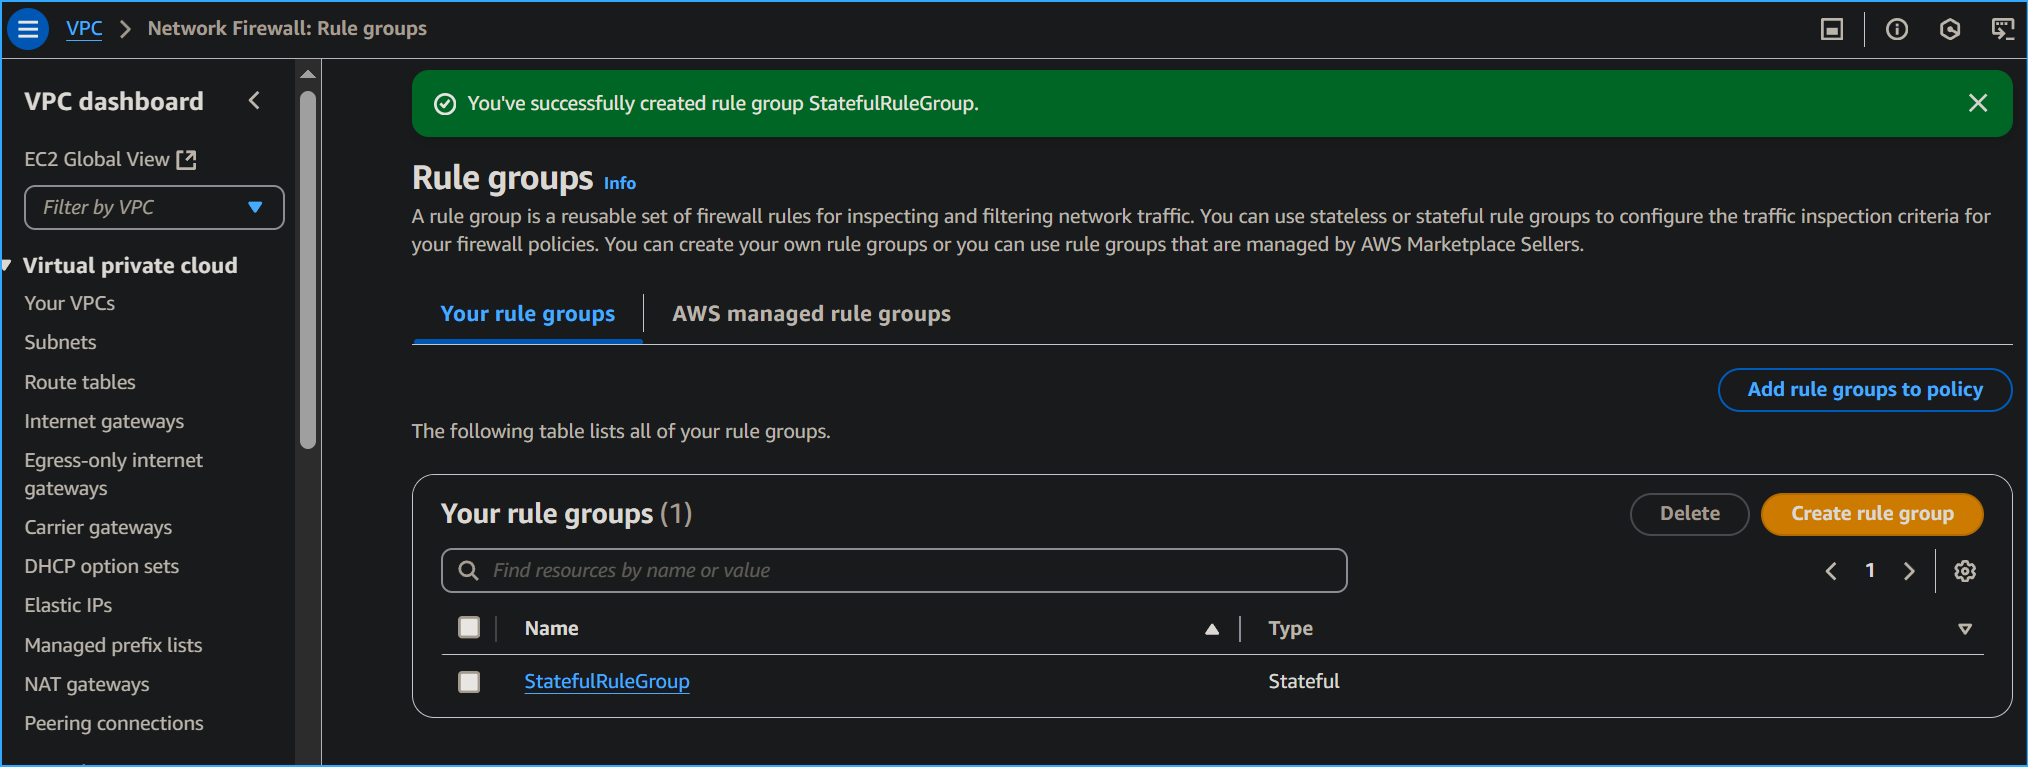
-
I chose Next a few times to skip to the Review and create section.
Finally, I created the stateful rule group.
In this task, I created a stateful network firewall rule group that uses
Suricata rules. Once I attached this rule group to the network firewall,
it blocks the malicious websites that AnyCompany users accessed.
Task 4: Attach a Rule Group to the Network Firewall
In this task, I attached the network firewall rule group that I created
to the network firewall.
-
In the left navigation pane under NETWORK FIREWALL, I chose Firewalls.
- I chose LabFirewall.
-
Under Associated firewall policy, I selected the LabFirewallPolicy.
Under Stateful rule groups I selected the dropdown list, and then
chose Add unmanaged stateful rule groups.
-
I selected the check box for StatefulRuleGroup, and then chose Add
stateful rule group.
At the top of the page, I saw a green You successfully updated
FirewallPolicy banner.
I scrolled to the Stateful rule groups section to see the successfully
added firewall rule group.
I attached the rule group to the firewall, which blocks attempts to
access the malicious actor files hosted within the website.
Task 5: Validate the Solution
In this task, I logged back into the TestInstance to test that the
network firewall properly blocks attempts to access the malicious
website files.
-
In the AWS Management Console, I entered EC2 in the search bar, and
then chose EC2.
- In the left navigation pane, I chose Instances.
-
I selected the check box next for TestInstance, and then chose
Connect.
- I chose the Session Manager tab, and then chose Connect.
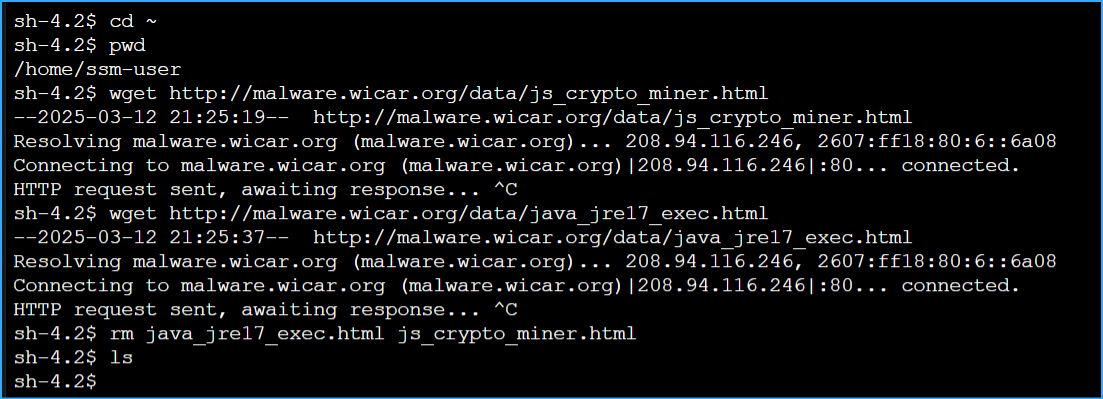
-
To change directories and view the current working directory, I ran
the following commands:
cd ~ pwd
-
To try and access the first malicious file, I ran the following wget
command.
wget http://malware.wicar.org/data/js_crypto_miner.html
The output displayed the following:
HTTP request sent, awaiting response...
This output showed that the malware site and file were no longer
accessible and had been successfully blocked by the network firewall.
- I pressed Ctrl+c to stop the command.
-
To test access to the other malicious URL, I ran the following
command:
wget http://malware.wicar.org/data/java_jre17_exec.html
The output displayed the following:
HTTP request sent, awaiting response...
-
Next, to remove the test malware files, I ran the following command:
rm java_jre17_exec.html js_crypto_miner.html
- To confirm that the files were deleted, I ran the ls command:
ls
I saw a blank output, which confirmed that the files had been removed.
In this task, I verified that the network firewall had been updated and
configured properly to block the malicious websites. I confirmed that
access was blocked by logging into the TestInstance EC2 instance and
running wget commands to these files. Users are now unable to access
these malicious files from this website.
Conclusion
Congratulations! I successfully:
- Updated a network firewall
- Created a firewall rules group
- Verified and tested that access to malicious sites is blocked
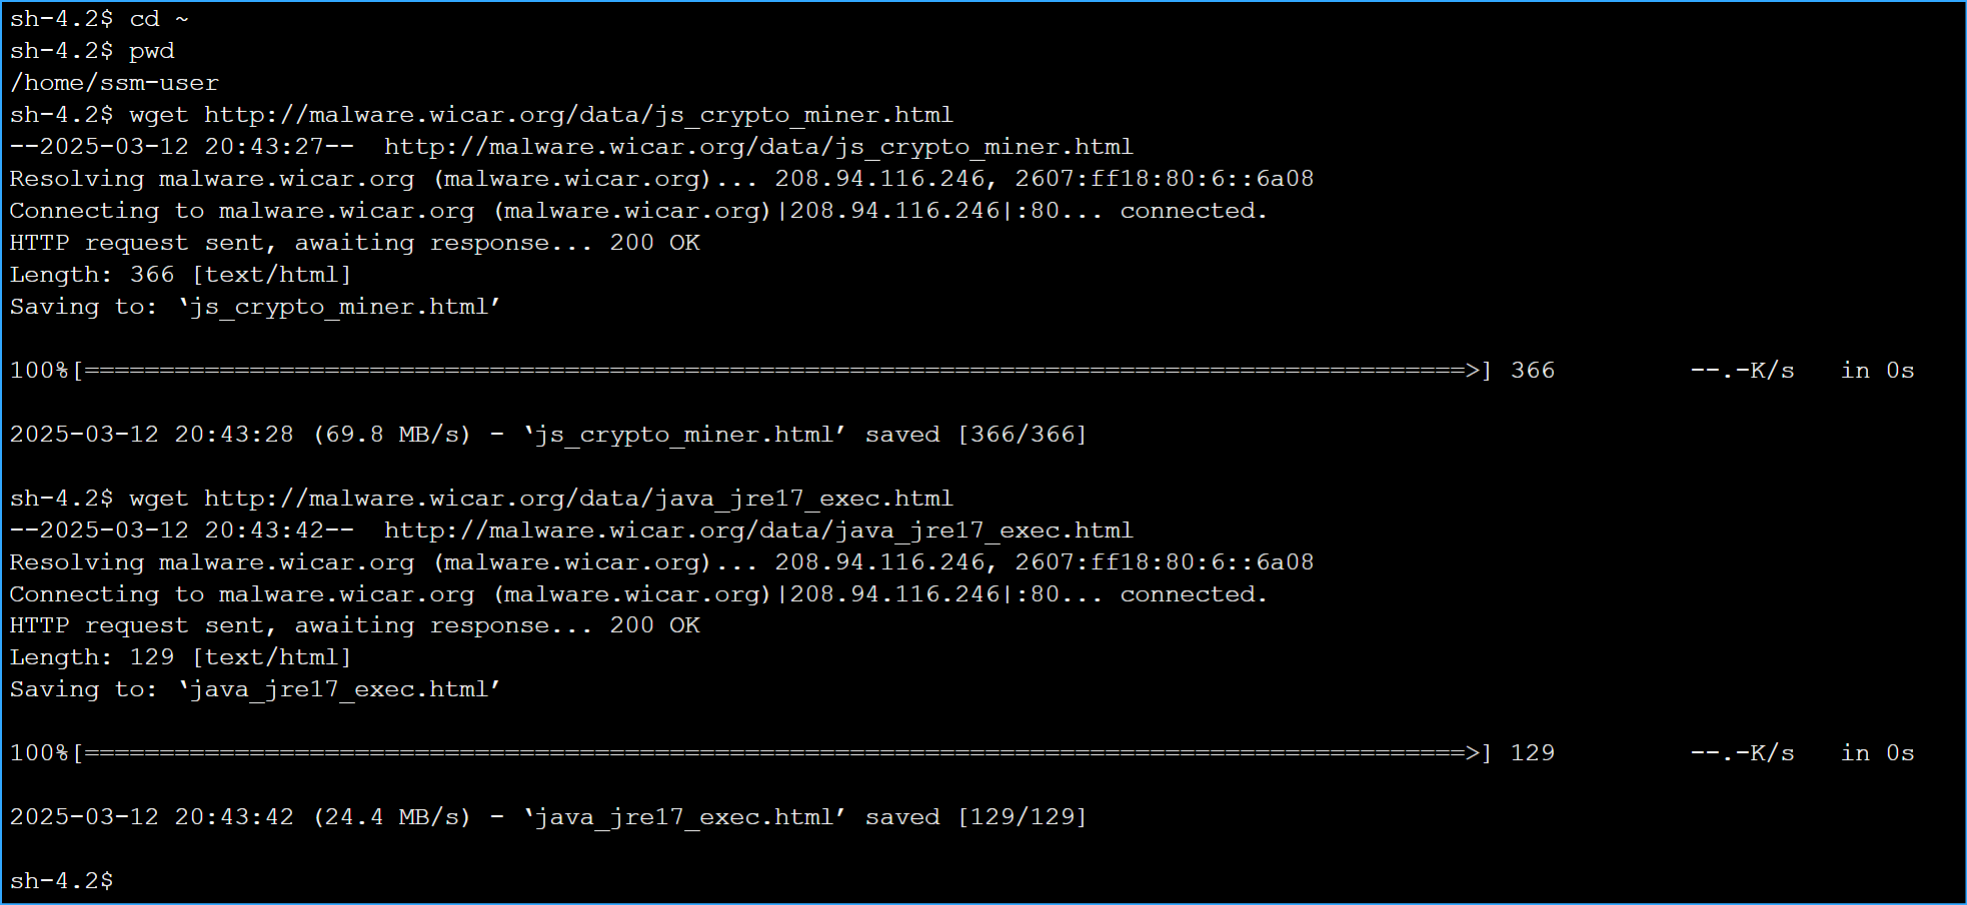 Installed Malware in Protected Environment
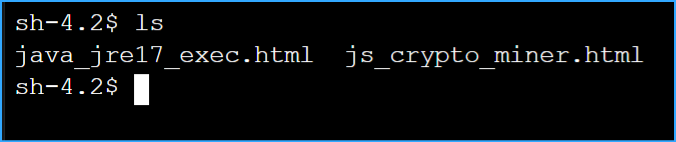 Confirmed Installed Malware
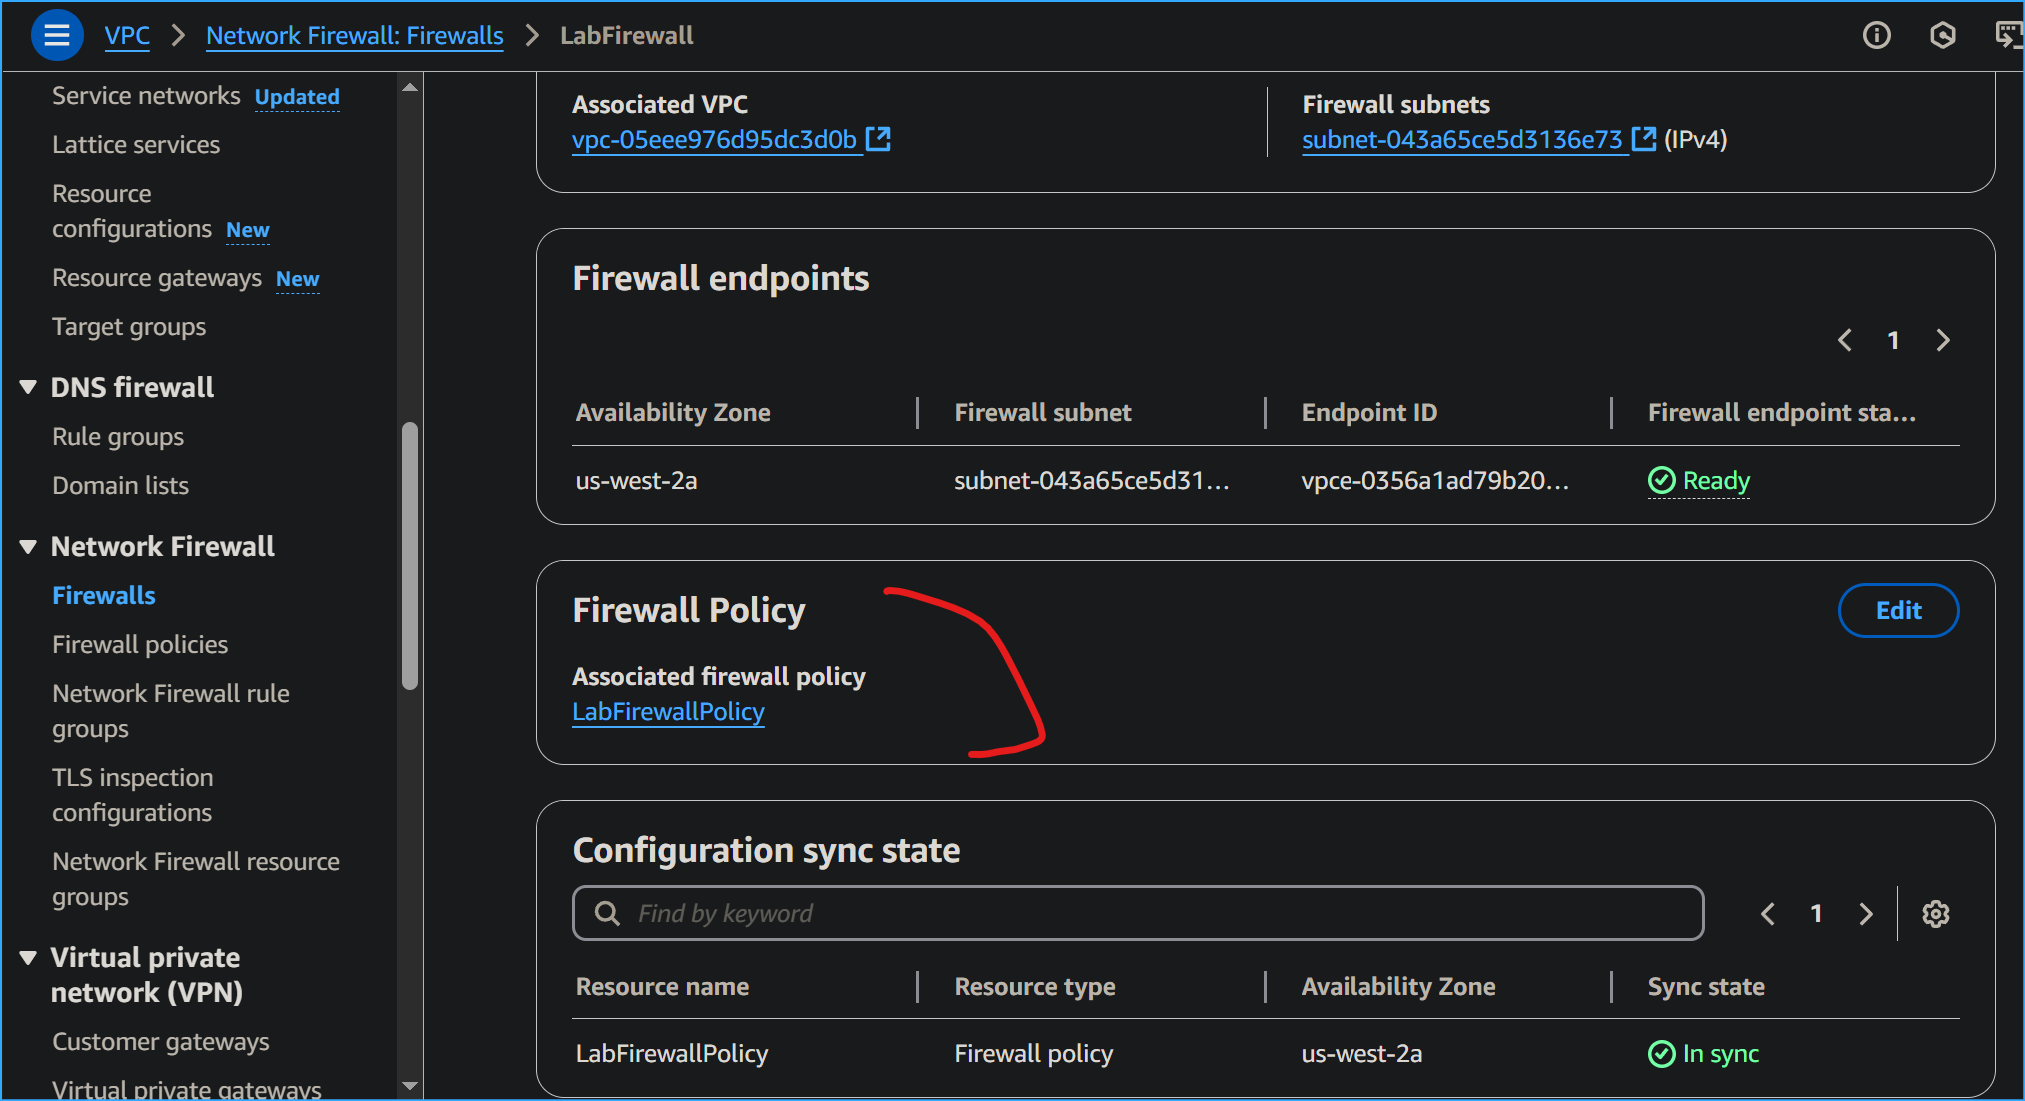 Choosing Lab Firewall Policy
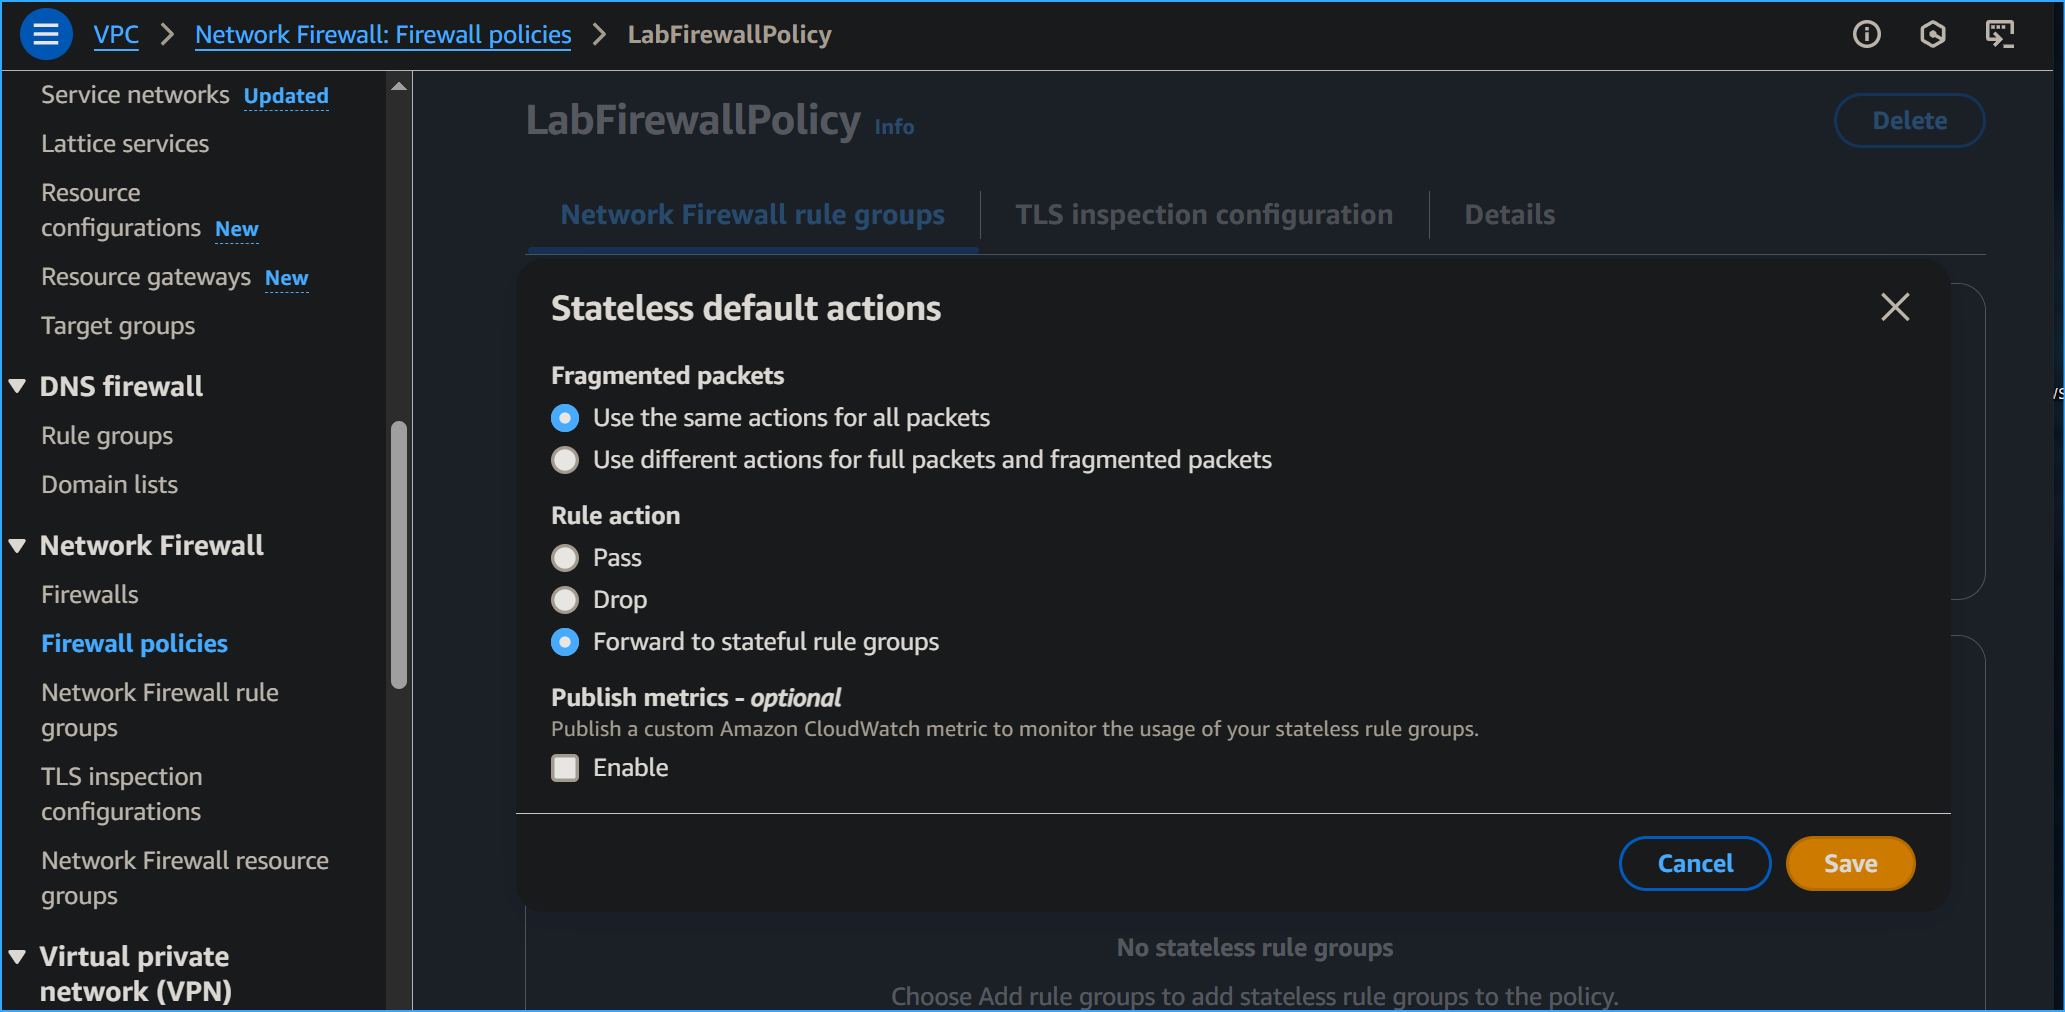 Editing Stateless Default Actions
 Creating Network Firewall Rule Group
 Setting Rule Group Details
 Entered Suricata Compatible IPS Rule Strings
 Created Stateful Network Firewall Group
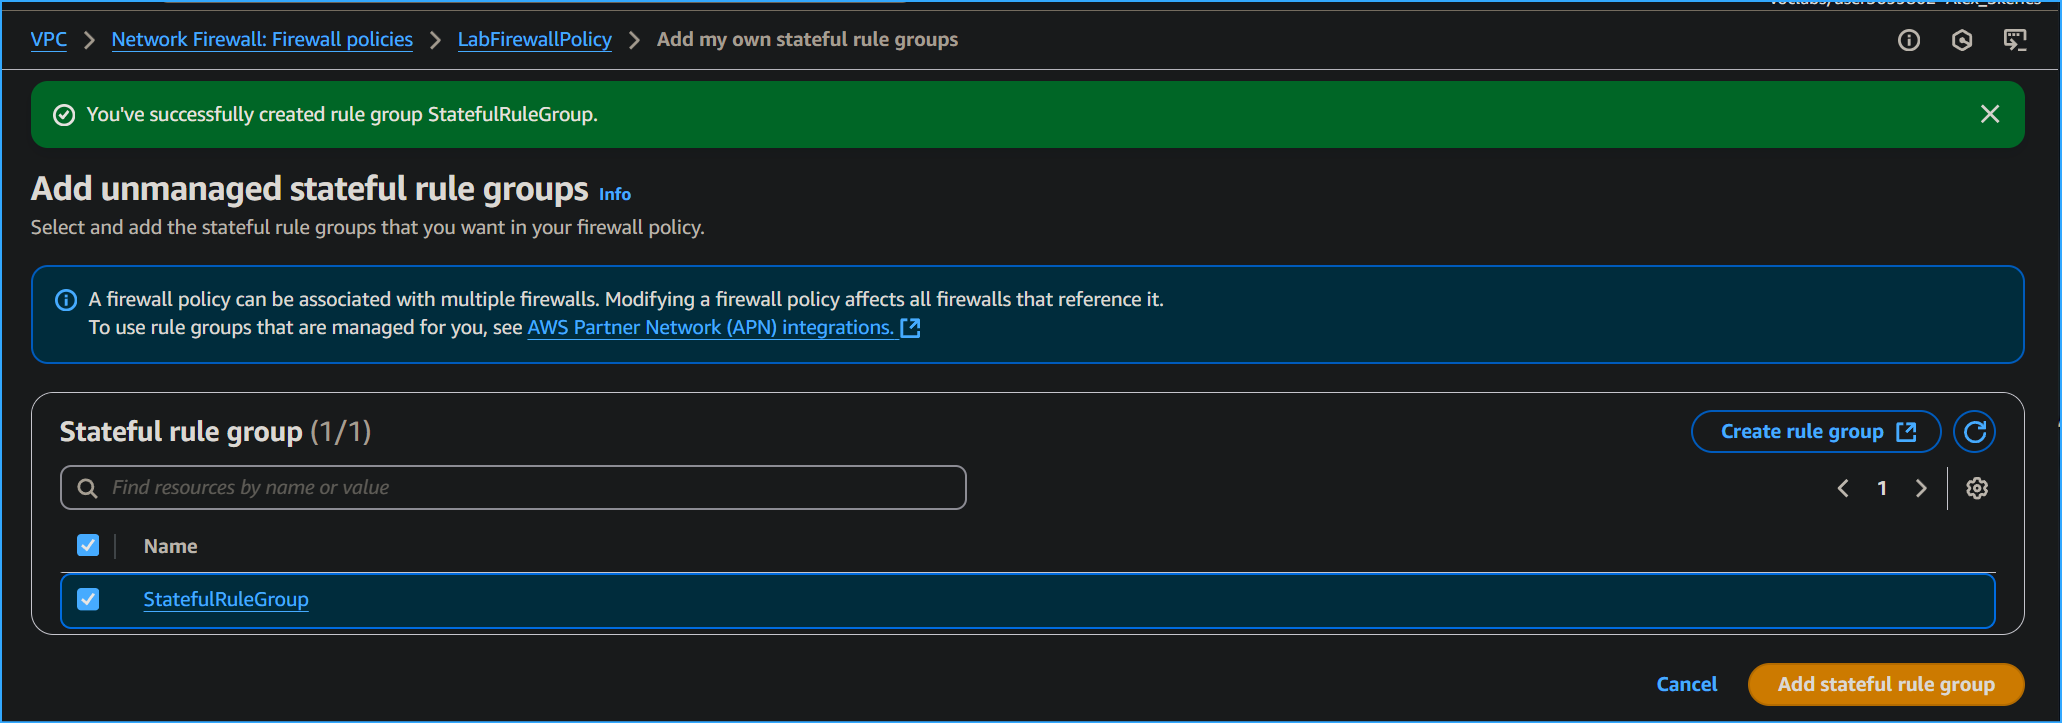 Adding Stateful Rule Group to Lab Firewall Policy
 Successfully Updated Firewall Policy
 Malware Sites Are Blocked By Network Firewall