Identity and Access Management (IAM)
Introduction
The tasks in this work consisted of exploring AWS Identity and Access
Management (IAM). In many business environments, access typically
involves a single login to a computer or network that provides access to
all resources. This includes rights to personal and shared folders,
company intranets, printers, and other network resources. Without proper
access control and authentication procedures, unauthorized users can
quickly exploit these resources.
Throughout, I explored users, user groups, and policies within the AWS
IAM service, which gave me valuable experience with AWS security
fundamentals.
Objectives I Accomplished
In the end, I successfully:
- Created and applied an IAM password policy
- Explored pre-created IAM users and user groups
- Inspected IAM policies applied to the pre-created user groups
- Added users to user groups with specific capabilities
- Located and used the IAM sign-in URL
- Experimented with the effects of policies on service access
Task 1: Creating an Account Password Policy
First, I noted my current AWS Region (for example, Oregon) in the
upper-right corner of the console.
I started by searching for "IAM" in the AWS Management Console and
selecting it. Then in the left navigation pane, I chose "Account
settings" where I could see the default password policy currently in
effect.
Since the company I was working for has stricter requirements, I needed
to update this policy. I clicked "Change password policy" and configured
the following options:
-
Changed the minimum password length from 8 to
10 characters
-
Selected every check box except
"Password expiration requires administrator reset"
-
Left the default option of 90 days for password
expiration
-
Left the default option of 5 passwords for preventing
password reuse
After making these changes, I clicked "Save changes." I noted that these
changes took effect at the AWS account level and applied to every user
associated with the account.
By strengthening the password requirements with this custom password
policy, I made the passwords much more difficult to crack, enhancing
overall security.
Task 2: Exploring Users and User Groups
Next, I explored the users and user groups that had already been created
in IAM.
In the left navigation pane, I chose "Users" and saw three IAM users:
I selected user-1 to view their Summary page and noticed on the
Permissions tab that user-1 didn't have any permissions. On the Groups
tab, I saw that user-1 wasn't a member of any user groups. I understood
that user groups consist of several users who need access to the same
data, and privileges can be distributed to the entire group rather than
to each individual. This approach is much more efficient and provides
greater overall control of access to resources.
On the Security credentials tab, I observed that user-1 was assigned a
Console password.
Then, I checked the User groups by selecting this option in the left
navigation pane. Three user groups had been created:
- EC2-Admin
- EC2-Support
- S3-Support
I selected the EC2-Support group to view its Summary page, then clicked
the Permissions tab. This group had a managed policy called
AmazonEC2ReadOnlyAccess attached to it.
I learned that managed policies are pre-built policies that can be
attached to IAM users and user groups, and when the policy is updated,
changes are immediately applied to all attached users and groups.
I expanded the AmazonEC2ReadOnlyAccess policy by selecting the plus sign
next to it. The policy granted permission to list and describe
information about EC2, ELB, CloudWatch, and EC2 Auto Scaling - ideal for
a support role that needs to view resources but not modify them.
I observed the basic structure of statements in an IAM policy:
- Effect (Allow or Deny permissions)
-
Action (API calls that can be made against an AWS
service)
-
Resource (scope of entities covered by the policy
rule)
I then returned to User groups and selected S3-Support, which had the
AmazonS3ReadOnlyAccess policy attached.
I expanded this policy and saw it had permissions to get and list
resources in Amazon S3.
Finally, I examined the EC2-Admin group and noticed it was different
from the other two. Instead of a managed policy, it had a customer
inline policy (EC2-Admin-Policy), which is typically used for one-off
situations. This policy granted permission to view information about EC2
and also allowed starting and stopping instances.
Task 3: Adding Users to User Groups
I implemented a business scenario where I needed to give access to new
staff members based on their job functions:
- user-1: S3-Support (read-only access to Amazon S3)
- user-2: EC2-Support (read-only access to Amazon EC2)
- user-3: EC2-Admin (view, start, and stop EC2 instances)
First, I added user-1 to the S3-Support group:
- I selected User groups from the left navigation pane
- Chose the S3-Support group
- Selected the Users tab
- Clicked "Add users"
- Selected the checkbox for user-1
- Clicked "Add Users"
I verified that user-1 was added to the group in the Users tab.
Following the same process, I added user-2 to the EC2-Support group and
user-3 to the EC2-Admin group.
I confirmed that each group showed "1" in the Users column for the
number of users in each group, verifying that each user was assigned to
the appropriate group as outlined in the business scenario.
I ignored any not authorized errors that appear during this task. They
are caused by the account having limited permissions and didn't impact
my ability to complete the tasks.
Task 4: Signing in and Testing User Permissions
To test the permissions of each IAM user, one can go to the Dashboard in
the left navigation pane and copy the Sign-in URL for IAM users in this
account (which looked similar to
https://123456789012.signin.aws.amazon.com/console) to a text editor.
Instead I used multi-session support and added a session. Then copied
the account ID and used that to sign in to the user accounts with their
user name and password. But expanding on the sign-in URL method I could
have opened a private window in my web browser and pasted the sign-in
URL. Then sign in as user-1 (the S3 storage support staff) using the
credentials:
- IAM user name: user-1
- Password: Lab-Password1
After signing in and switching to the new Console Home (when prompted),
I tested user-1's S3 access by selecting S3 from the Services menu. I
was able to choose one of my buckets and browse the contents, confirming
that as a member of the S3-Support group, user-1 had permission to view
S3 buckets and their contents.
Next, I tested whether user-1 had access to EC2 by selecting EC2 from
the Services menu and clicking on Instances in the left navigation pane.
I received a message saying "You are not authorized to perform this
operation," confirming that user-1 had no permissions to use Amazon EC2.
I then signed out of user-1 and signed in as user-2 (the EC2 support
person) using:
- IAM user name: user-2
- Password: Lab-Password2
After signing in, I selected EC2 from the Services menu and clicked on
Instances. I could see EC2 instances due to the read-only permissions,
but when I tried to make changes by selecting an instance and choosing
"Stop instance" from the Instance state dropdown, I received an error:
"Failed to stop the instance. You are not authorized to perform this
operation." This verified that the policy gave user-2 permission to only
view information but not make changes.
If you cannot see an EC2 instance, then your Region may be incorrect. In
the upper-right of the screen, choose the Region menu, and select the
Region that you noted at the start (for example, Oregon).
I also checked user-2's access to S3 by selecting S3 from the Services
menu and received a "You don't have permissions to list buckets"
message, confirming that user-2 didn't have permission to use Amazon S3.
Finally, I signed out of user-2 and signed in as user-3 (the EC2
administrator) using:
- IAM user name: user-3
- Password: Lab-Password3
After signing in, I selected EC2 from the Services menu and clicked on
Instances. As an EC2 administrator, I had permissions to stop the EC2
instance. I selected the instance and chose "Stop instance" from the
Instance state dropdown, confirmed by clicking "Stop," and the instance
entered the Stopping state and began shutting down.
I successfully verified that:
- user-1 could view S3 buckets but not EC2 instances
-
user-2 could view EC2 instances but couldn't perform the stop instance
action and couldn't view S3 buckets
-
user-3 could view EC2 instances and perform the stop instance action
Conclusion
Through the tasks, I successfully:
- Created and applied an IAM password policy
- Explored pre-created IAM users and user groups
- Inspected IAM policies applied to pre-created user groups
- Added users to user groups with specific capabilities
- Located and used the IAM sign-in URL
- Experimented with the effects of policies on service access
This hands-on experience gave me valuable insight into how AWS
implements role-based access control and the importance of proper
permissions management in a cloud environment.
×
![]()
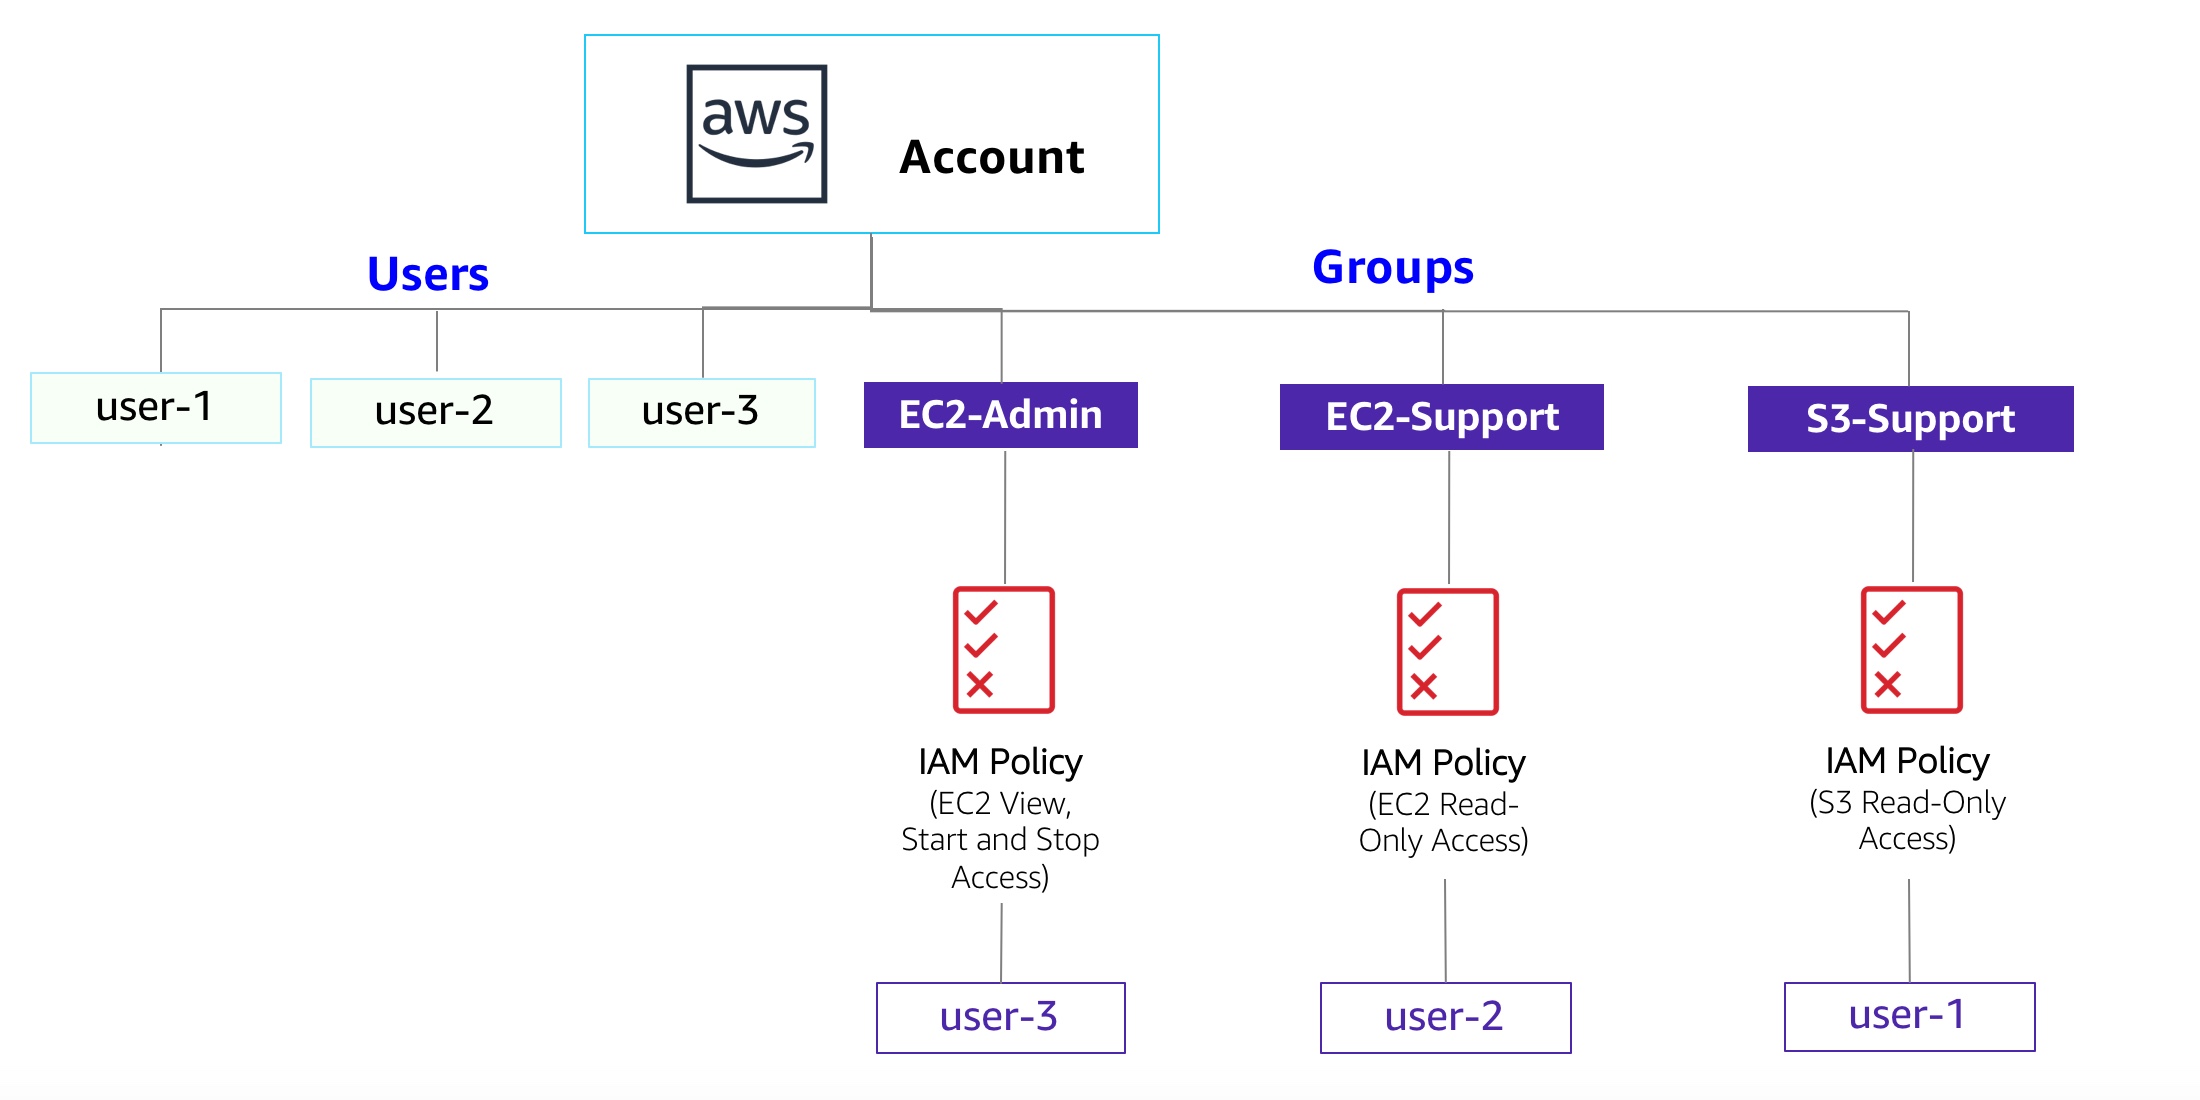 Diagram of Current Environment
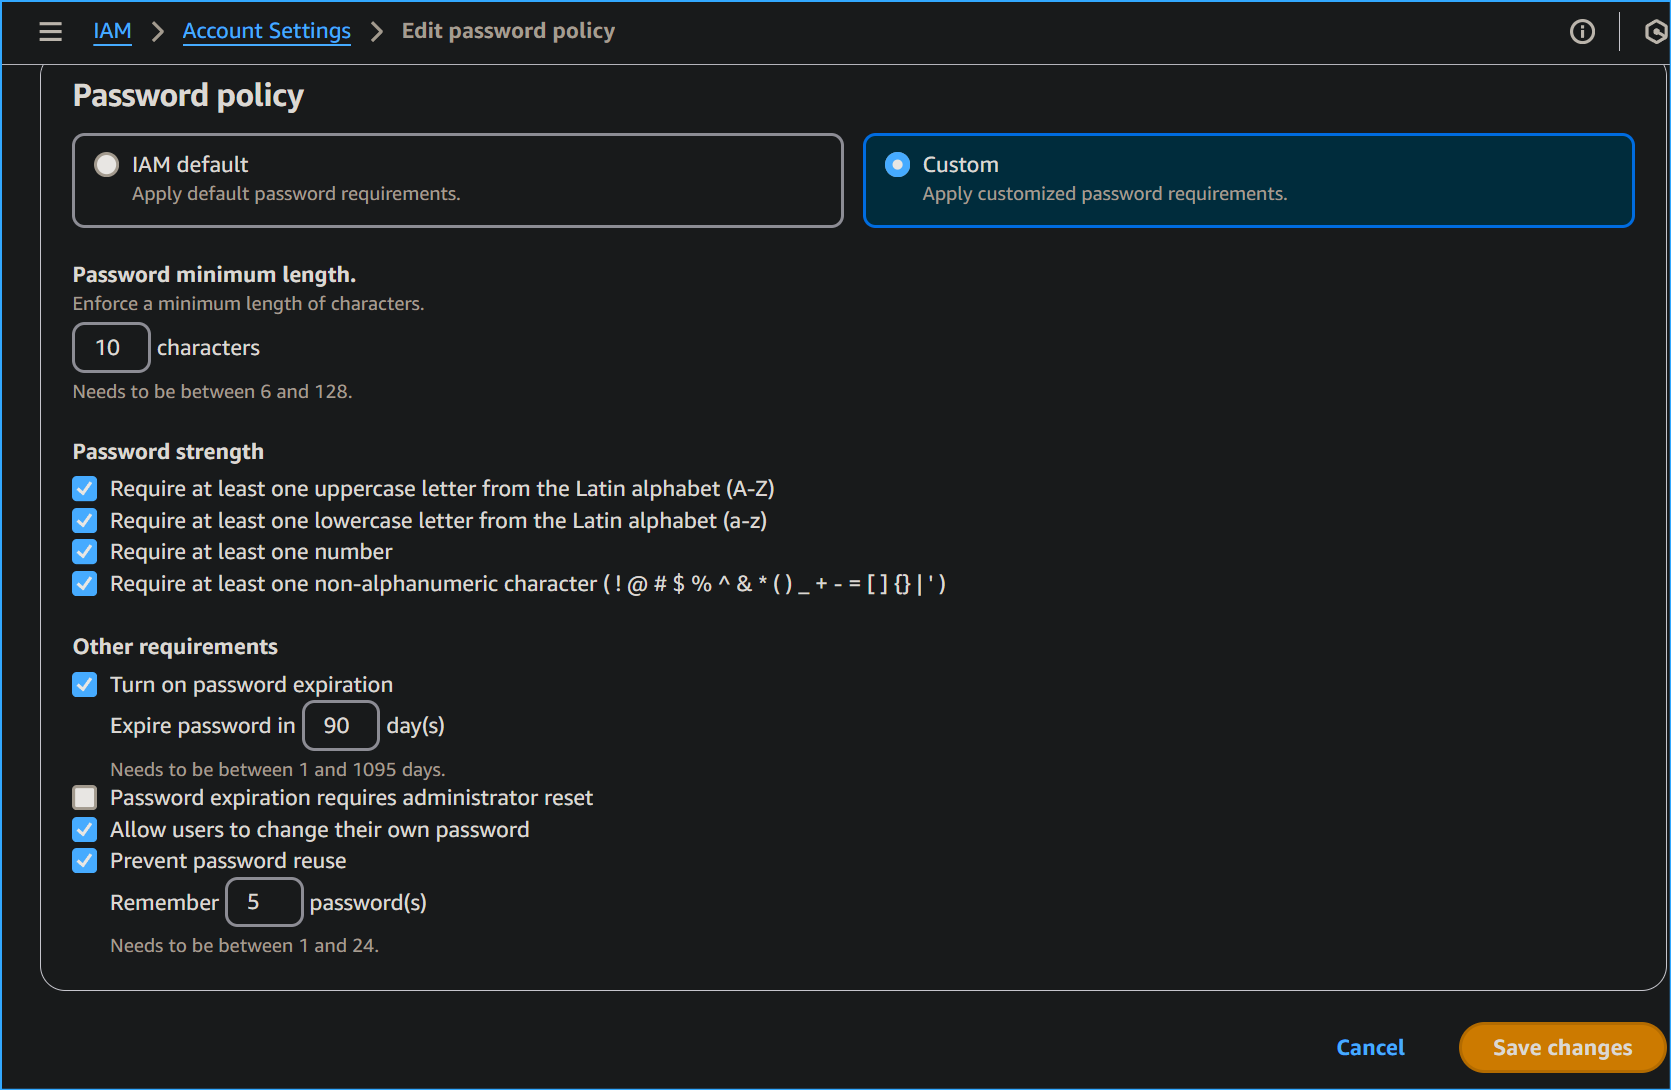 Editing Password Policy in Account Settings of IAM
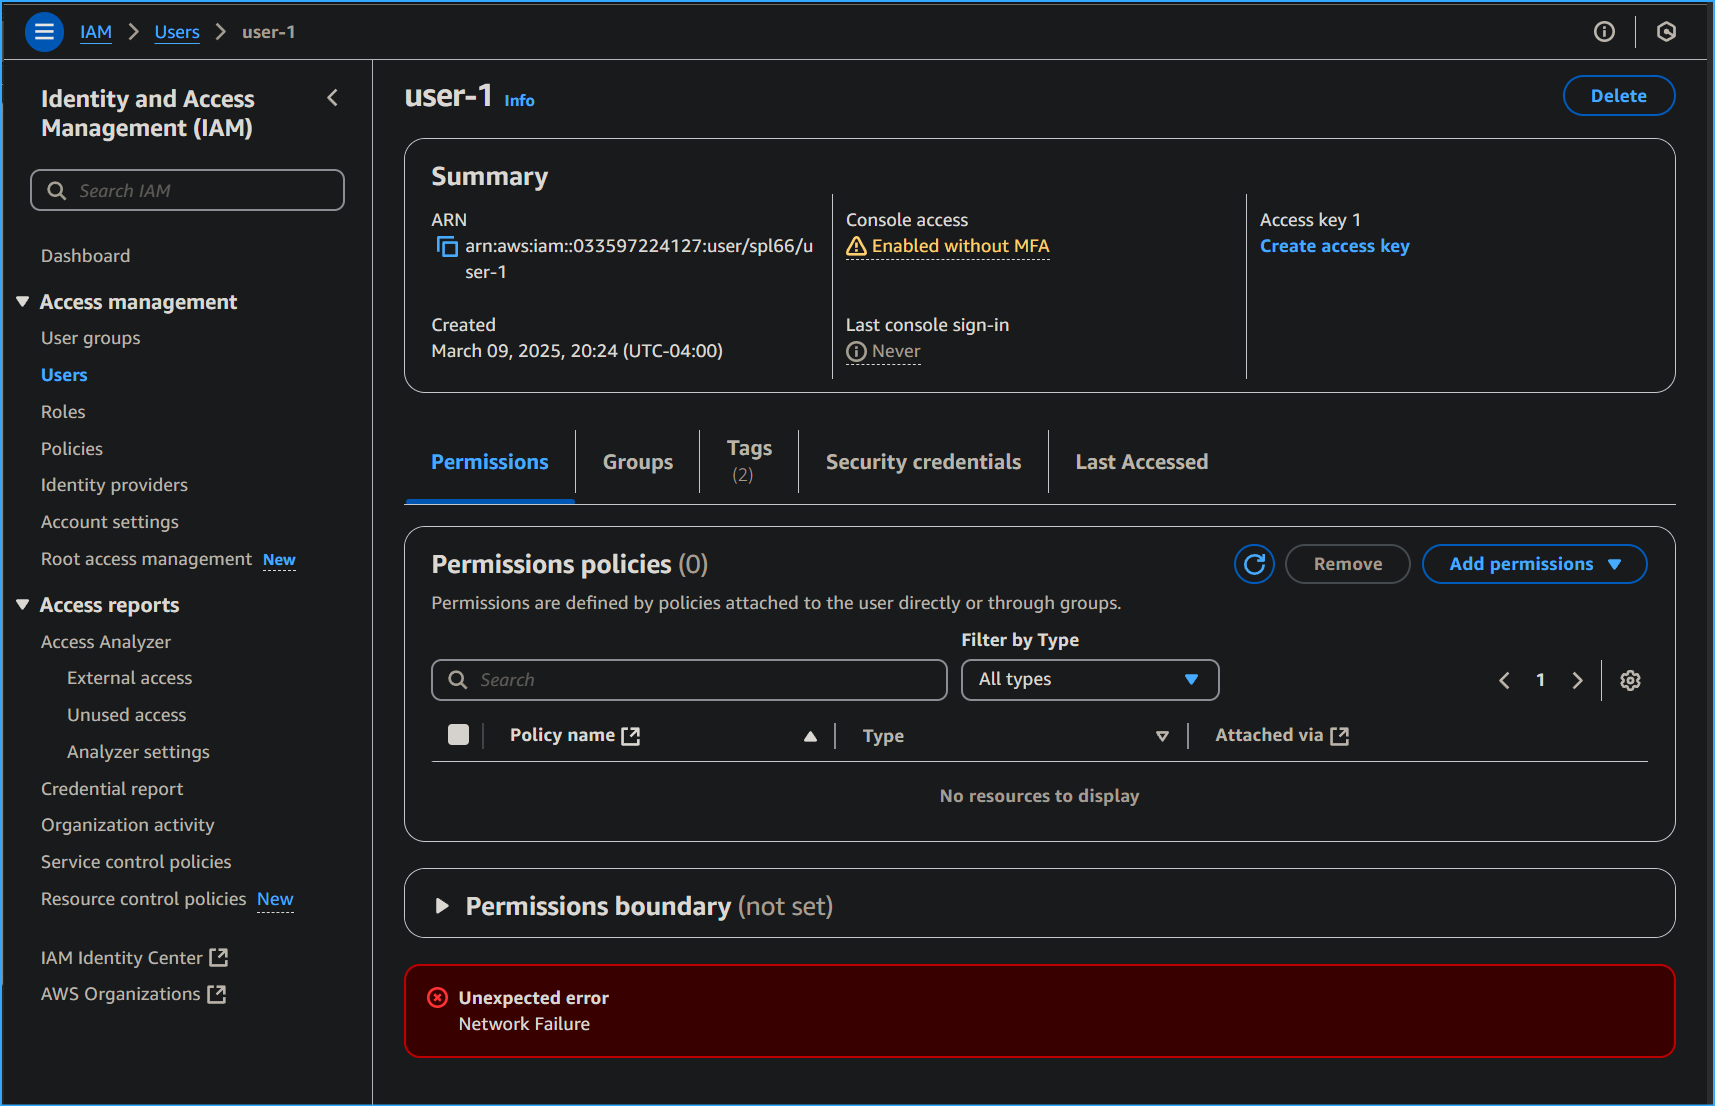 User One Has No Permissions
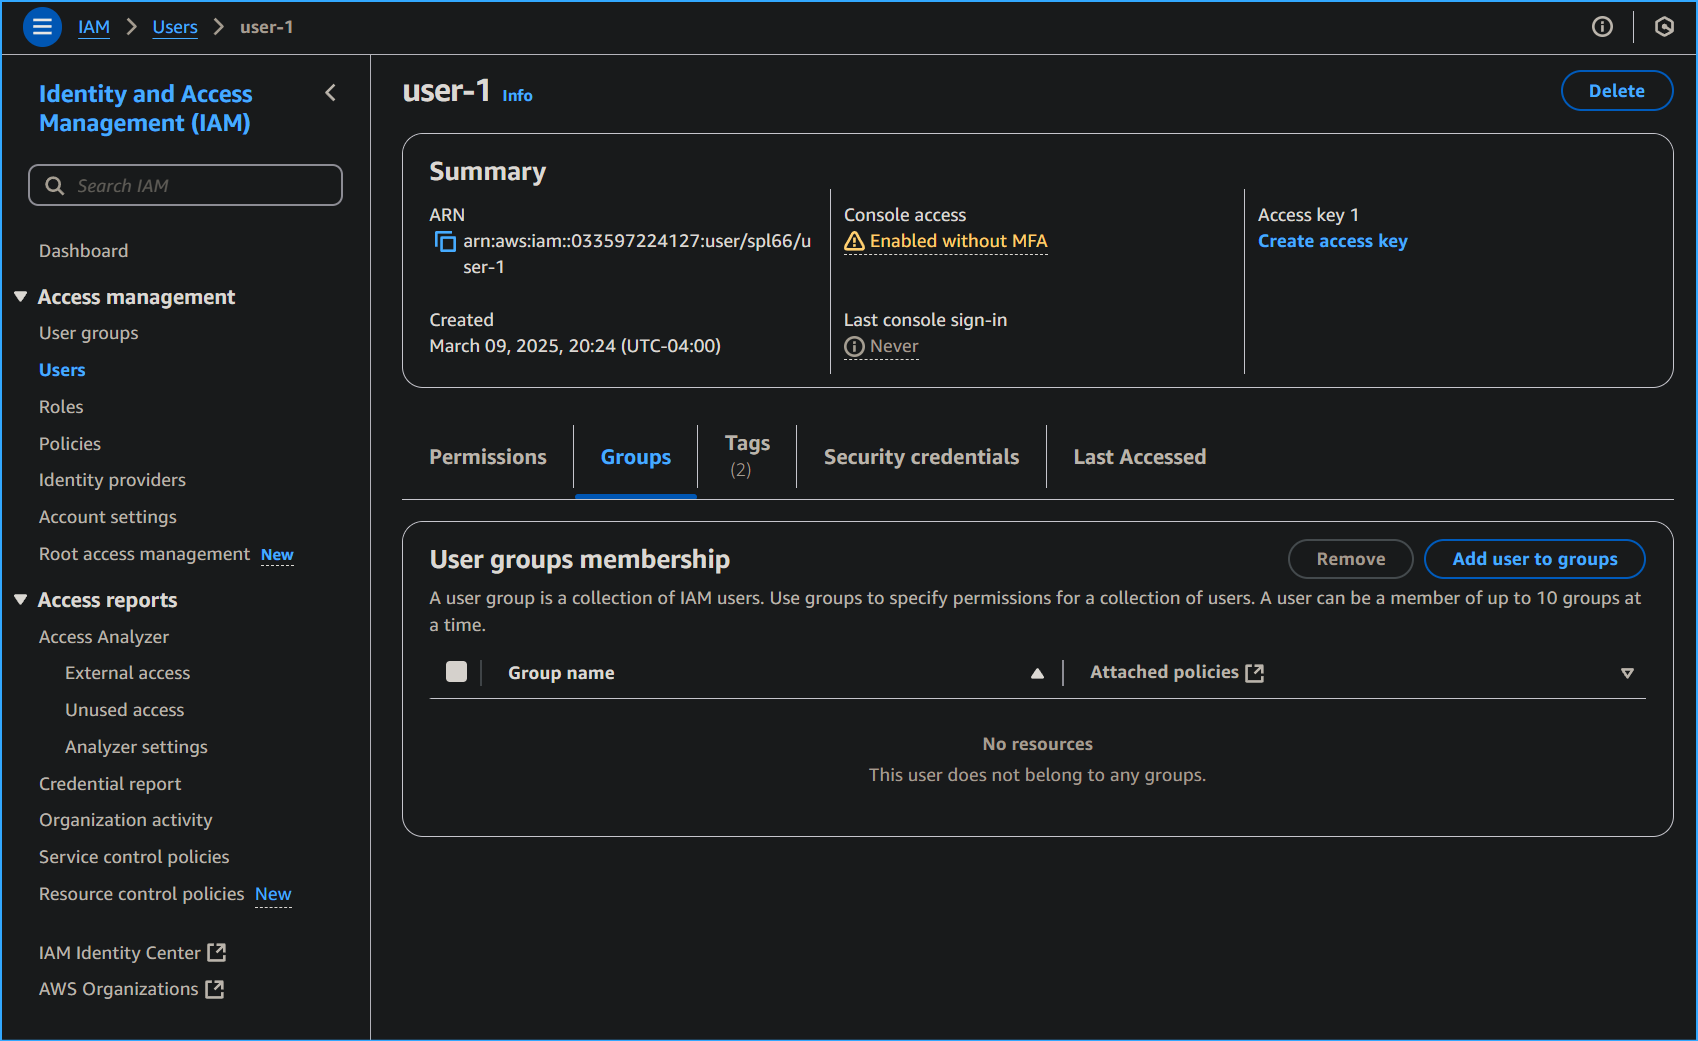 User One in No Group
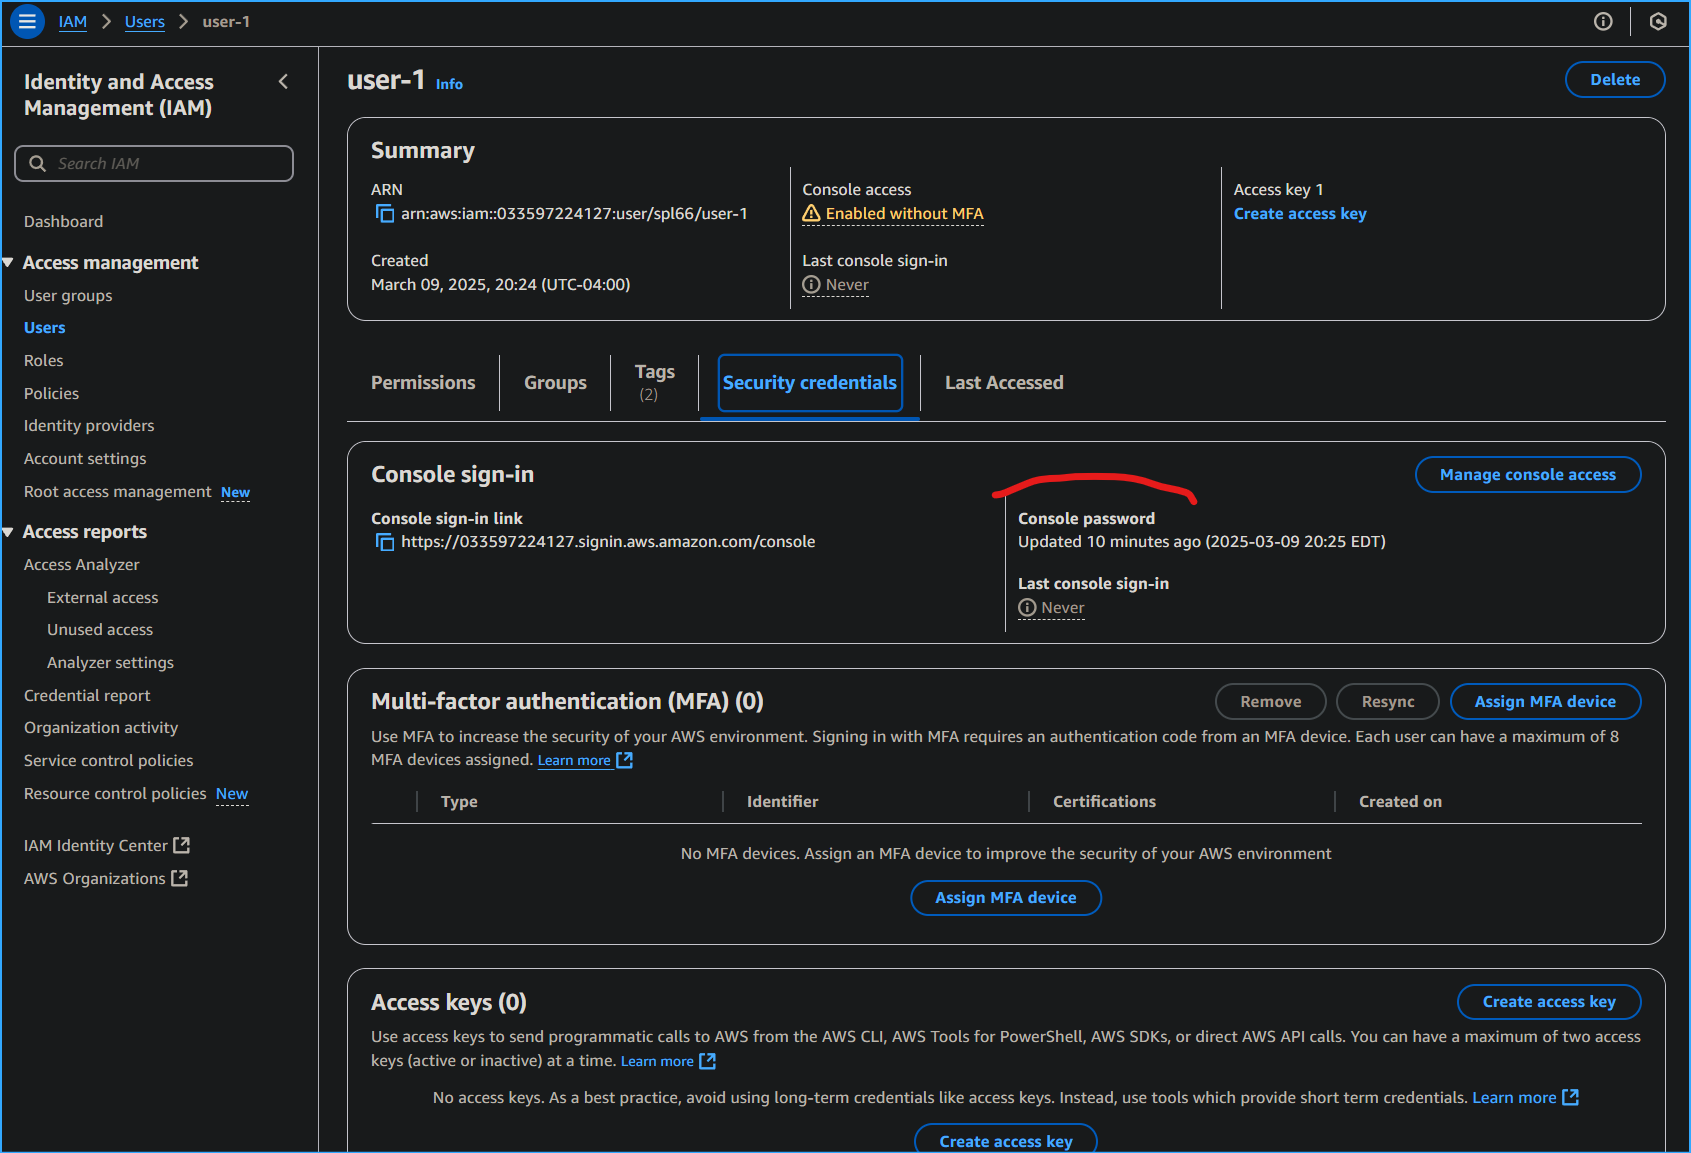 User One Has Console Password
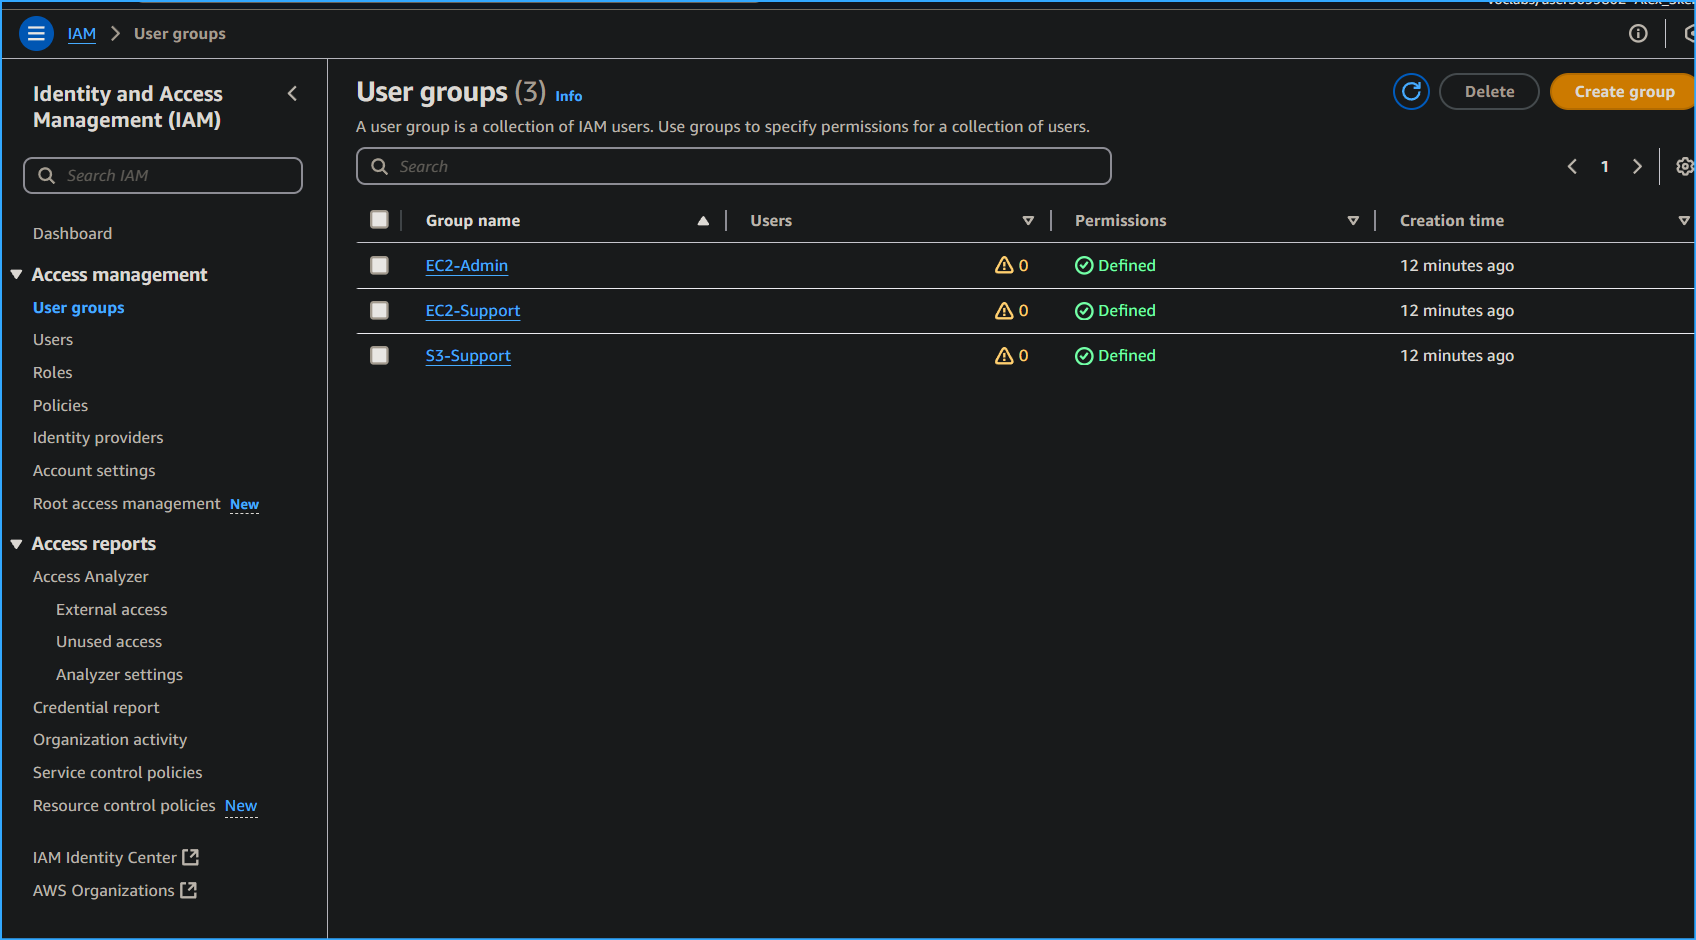 There Are Three User Groups
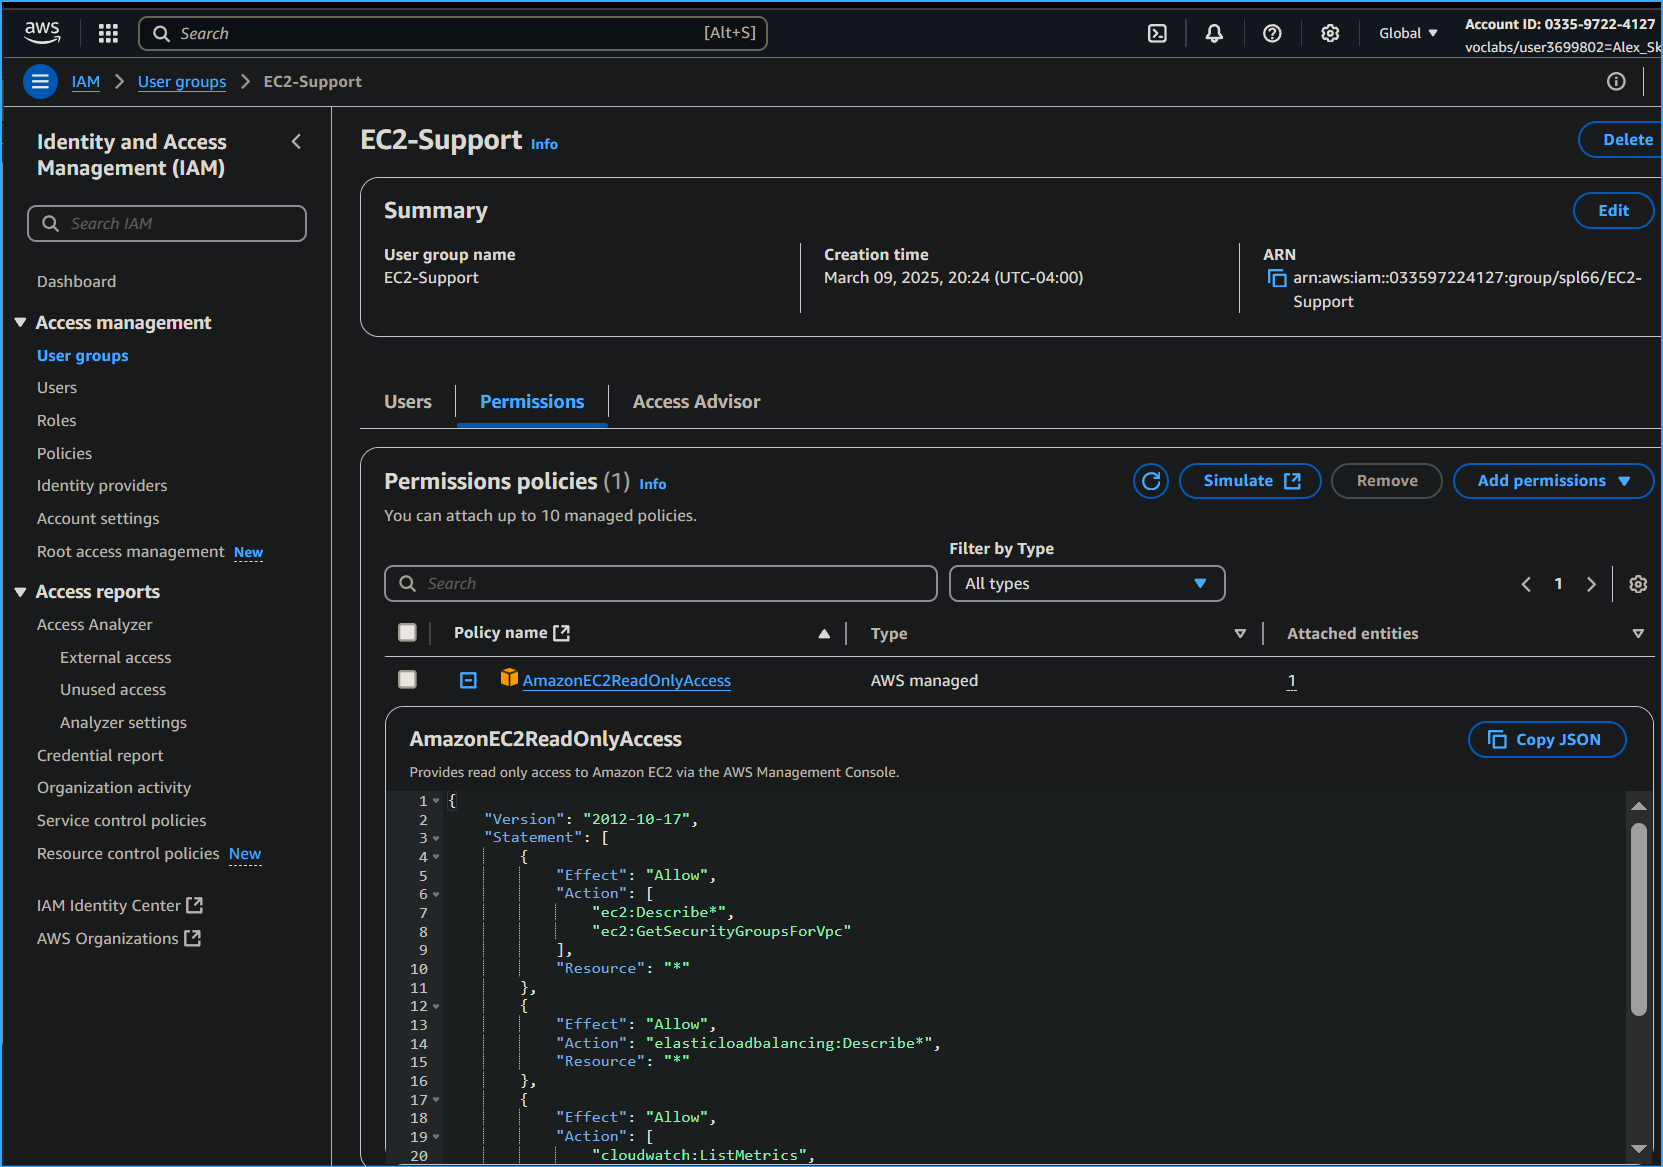 This User Group Has Read Only Access Outlined in JSON Policy
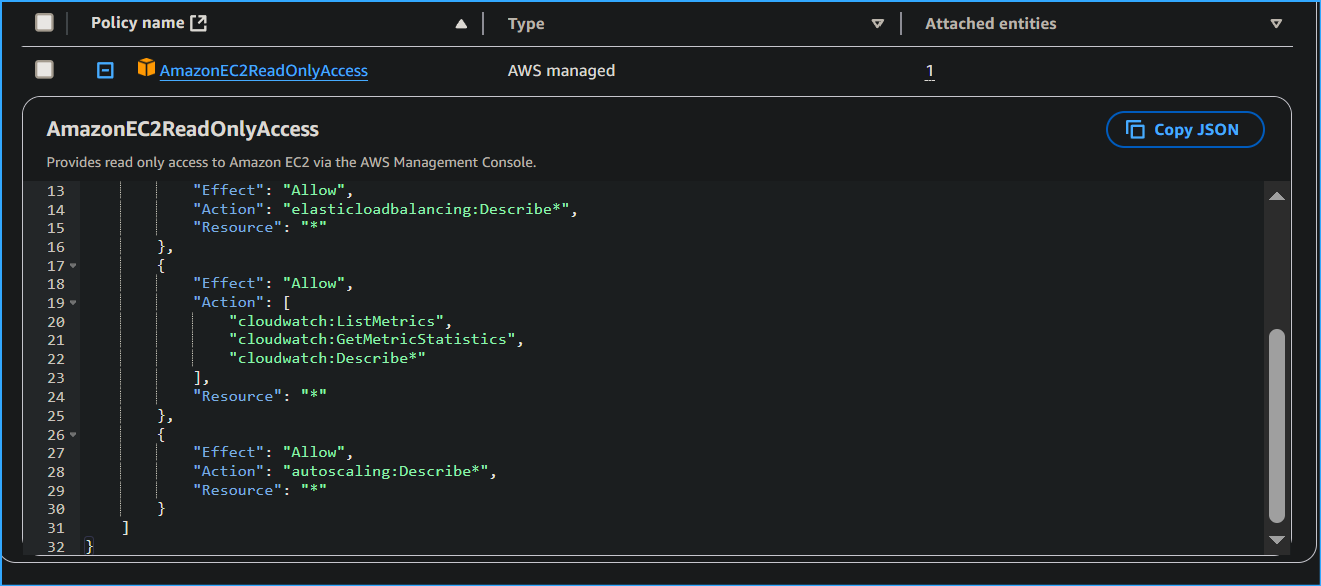 Second Part of Policy
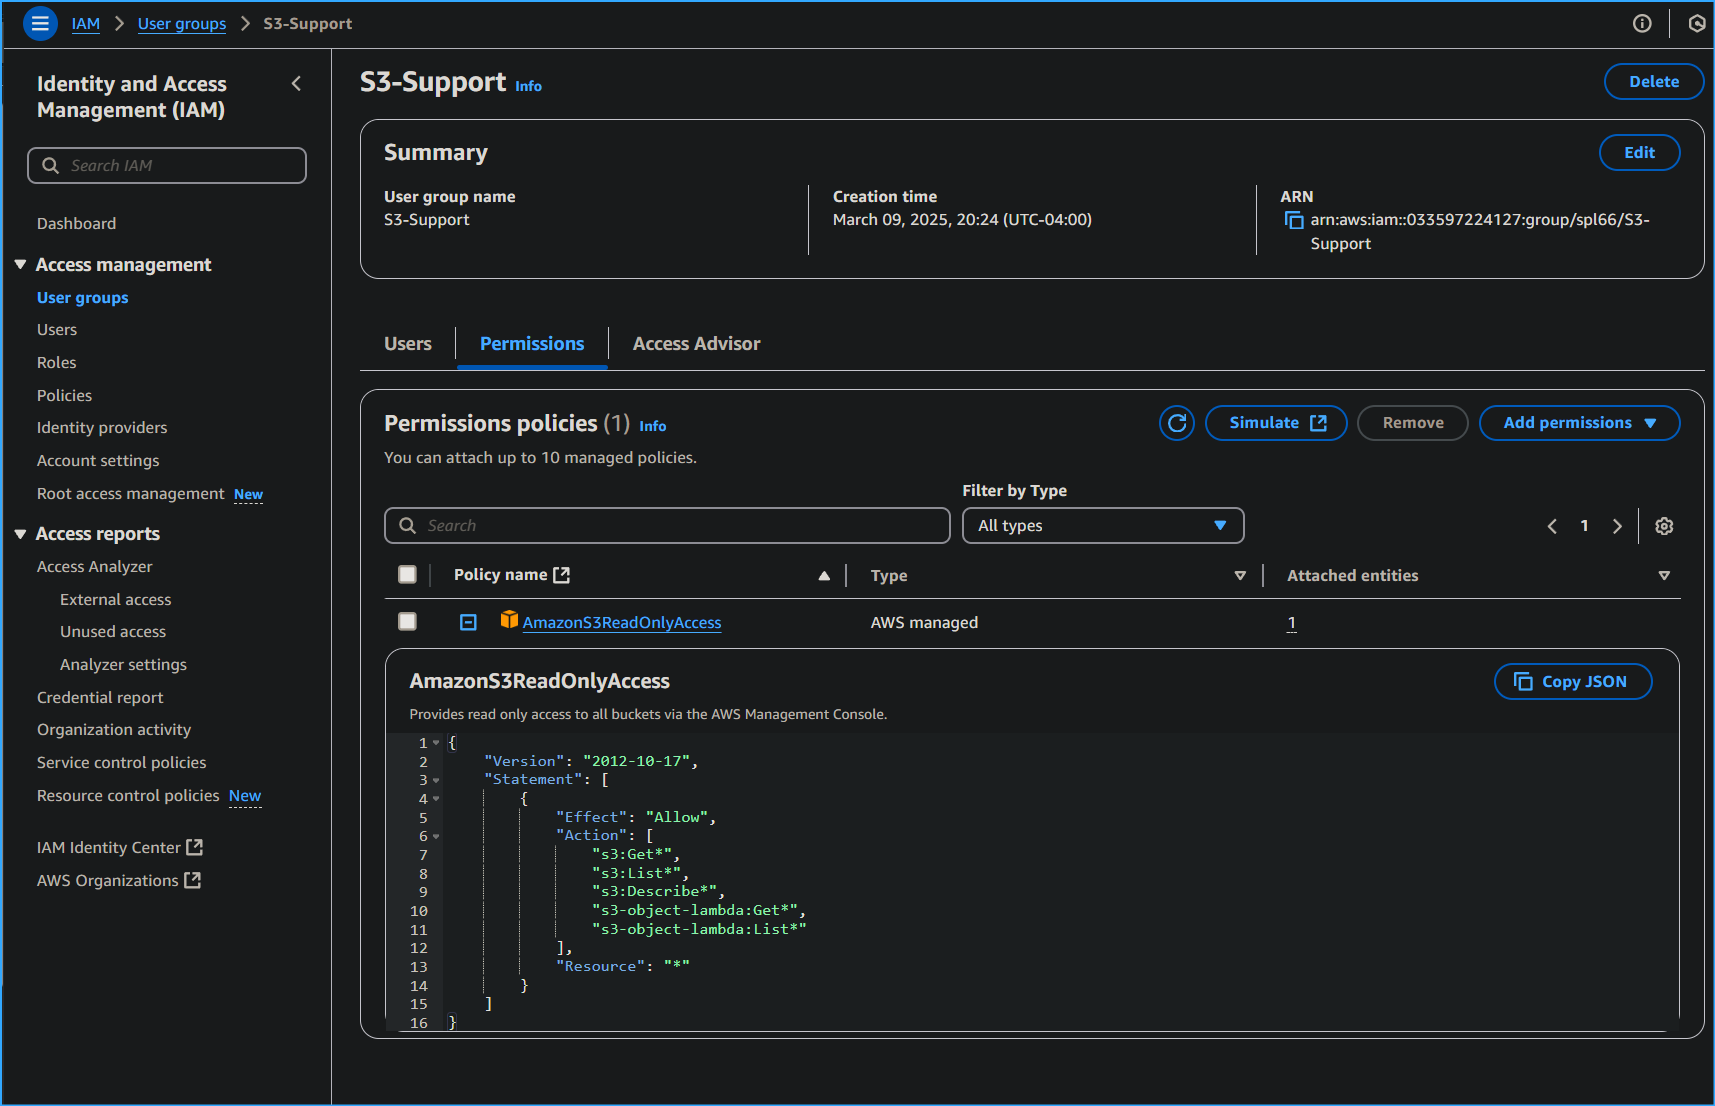 This User Group Has Read Only Access to its Respective
Resource
This User Group Has Read Only Access to its Respective
Resource
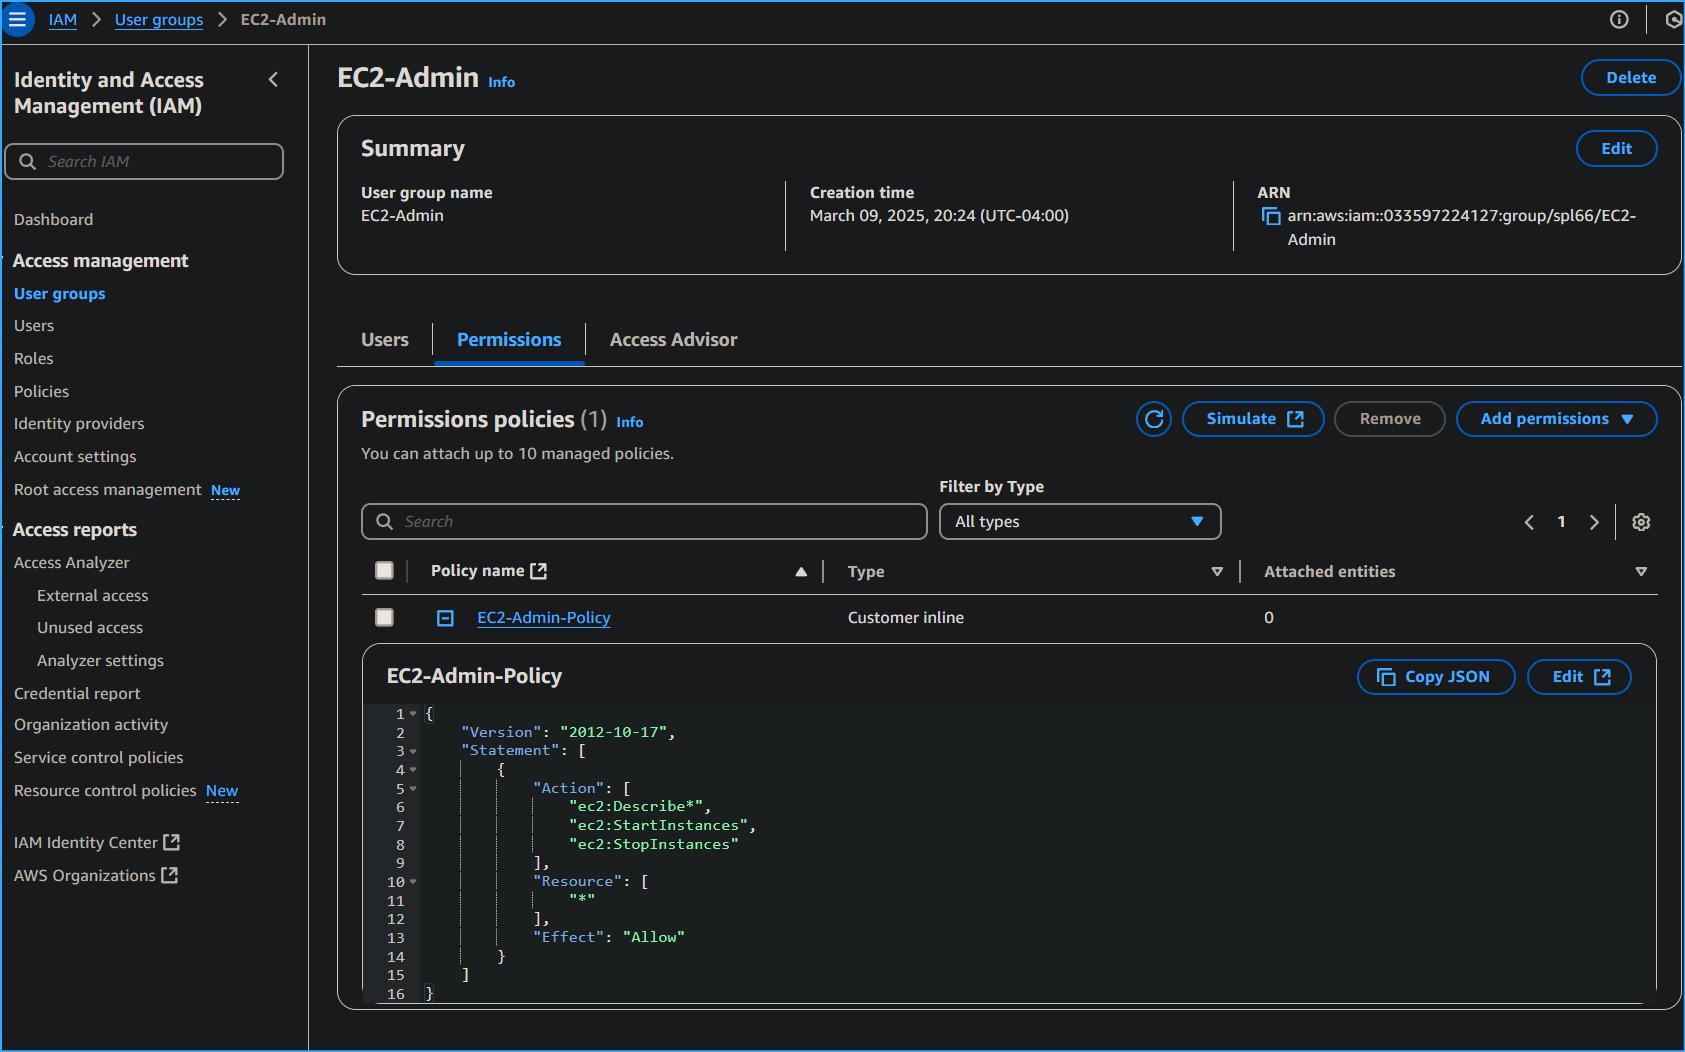 This User Has the Ability to do the Following
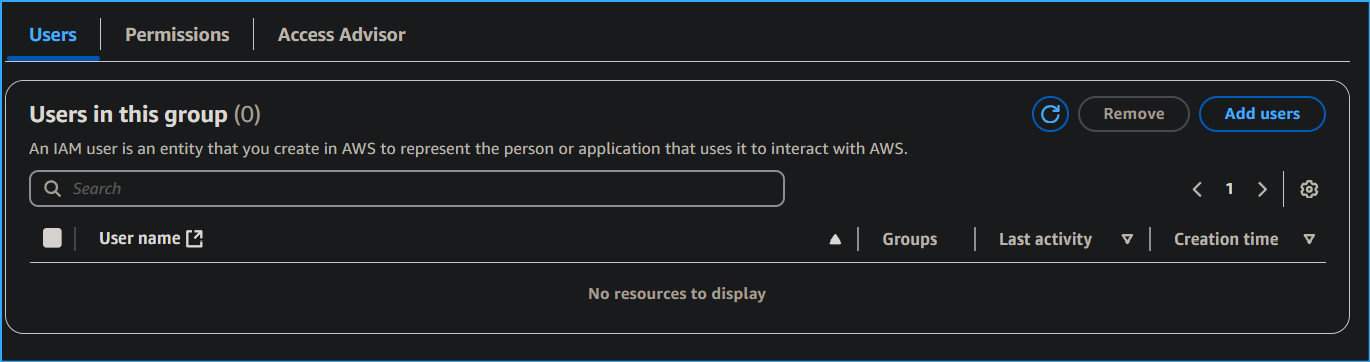 Adding Users to User Groups
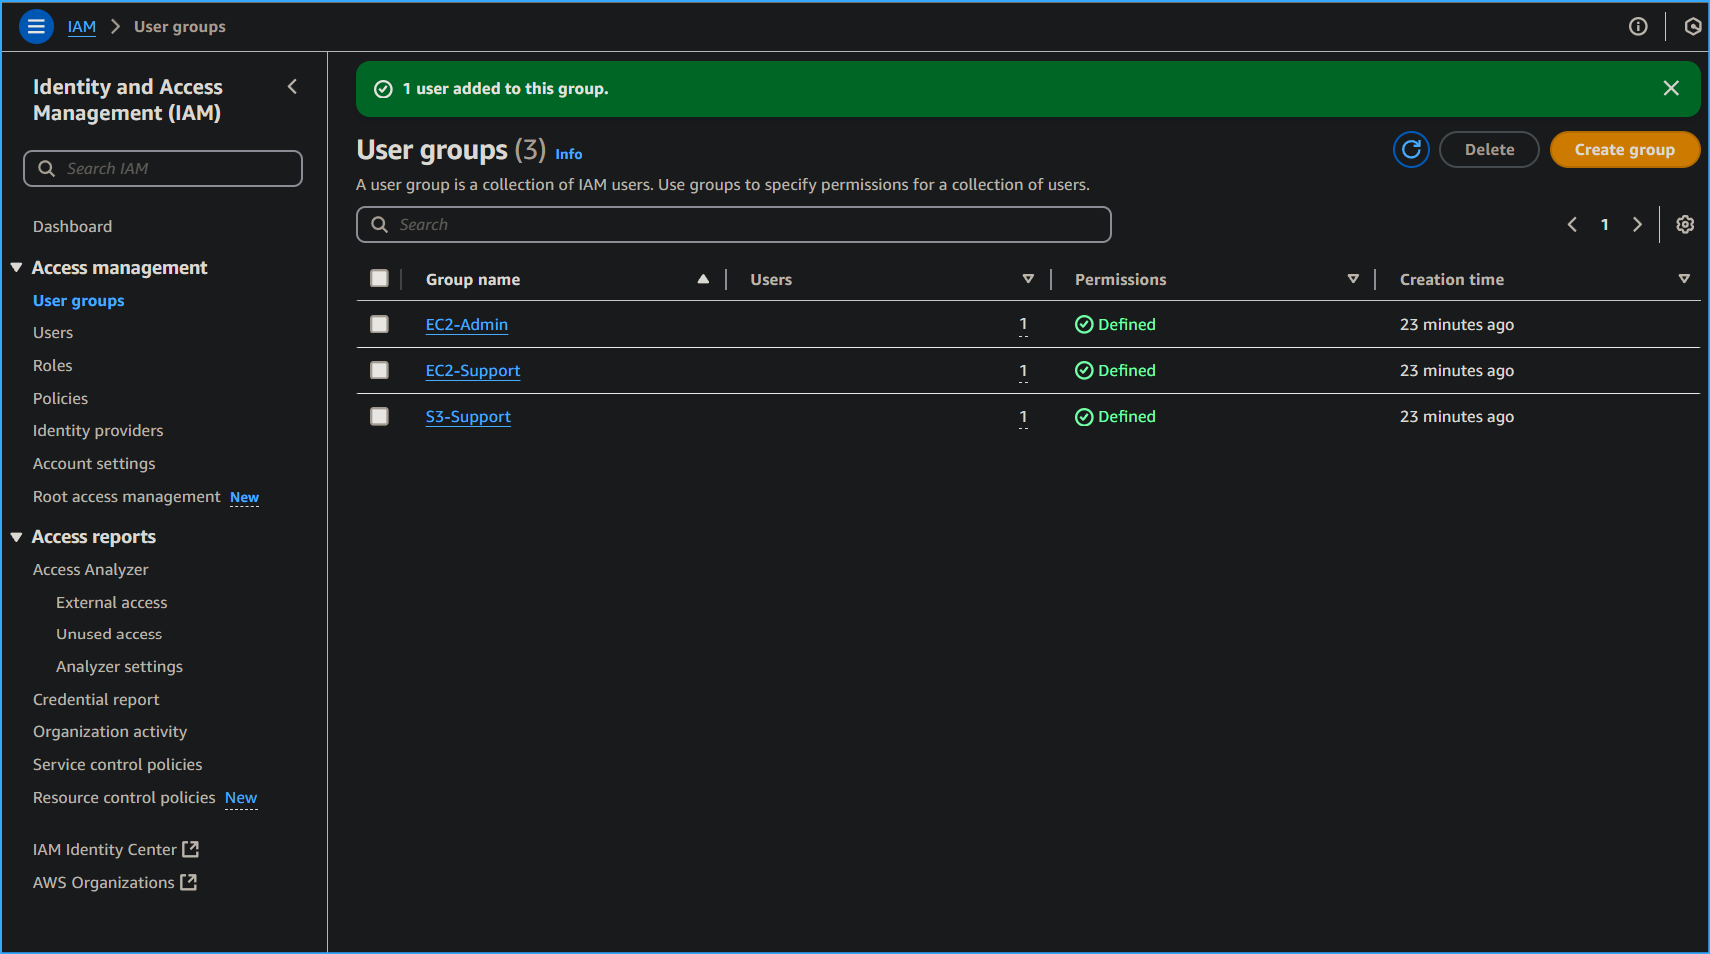 Users Have Been Assigned to Their Respective User Group
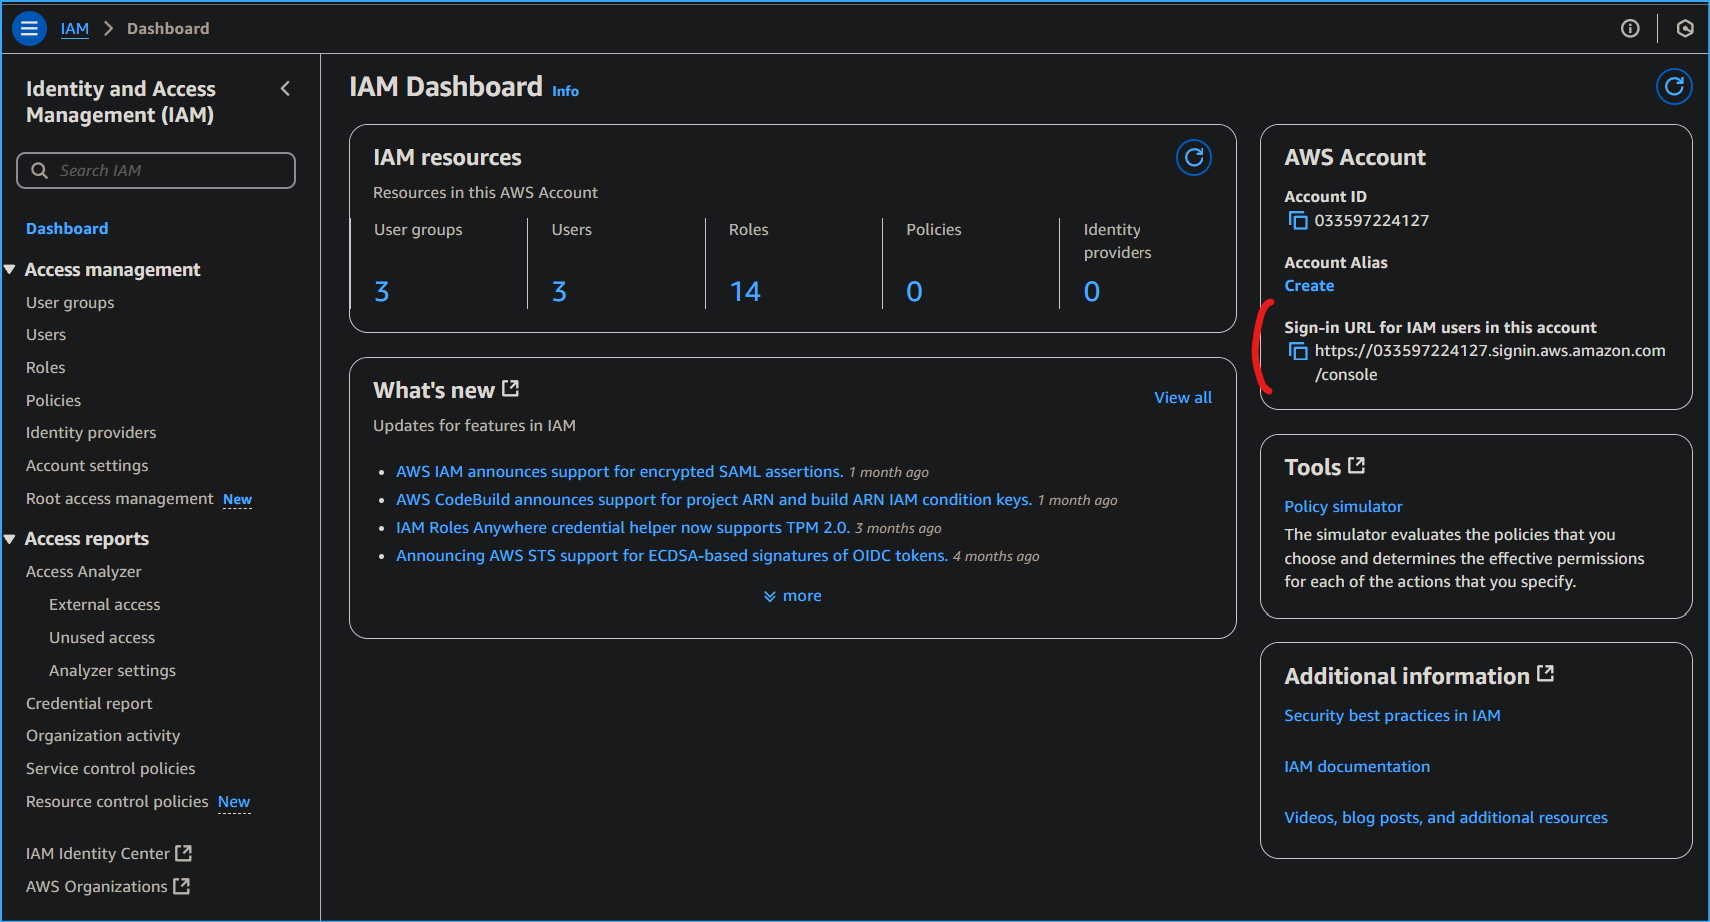 IAM Sign-in URL Location in Dashboard
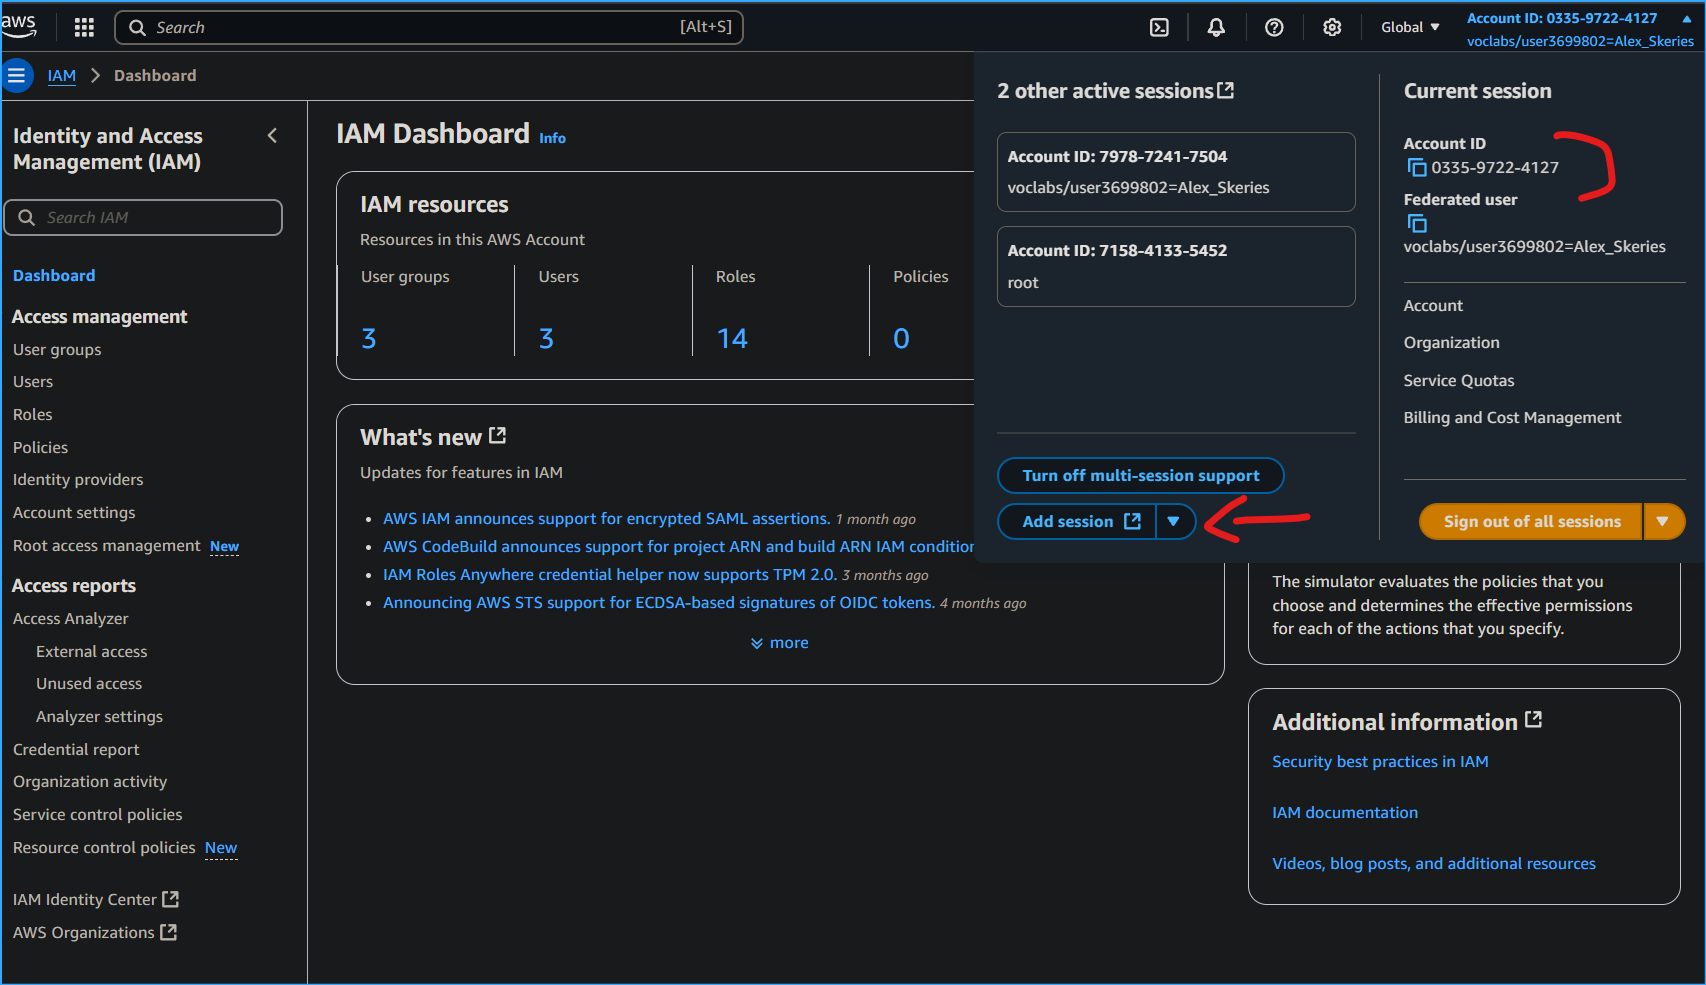 Can Also Turn On Multi-session Report and Add Session While Using
Account ID
Can Also Turn On Multi-session Report and Add Session While Using
Account ID