Network Hardening
Overview
As a new security engineer for AnyCompany, I needed to identify weak
areas in the company's network security and update our environment for
better efficiency and optimization. I decided to use Amazon Inspector
for this task.
Amazon Inspector runs scans that analyze all network configurations—such
as security groups, network ACLs, route tables, and internet
gateways—together to infer reachability. What's great is that it doesn't
require sending packets across the VPC network or connecting to EC2
instance network ports. It's essentially packetless network mapping and
reconnaissance.
I specifically used the network reachability package from Amazon
Inspector to analyze our network configurations and find security
vulnerabilities in our EC2 instances. The findings generated by Amazon
Inspector also provided guidance about restricting access that was not
secure.
My Objectives
My goals were to:
- Configure Amazon Inspector
- Run an agentless network audit
- Investigate the scan results
- Update security groups
-
Log in to an application server instance using AWS Systems Manager
Session Manager
Task 1: Viewing EC2 Instances and Adding Tags
To create an assessment target for Amazon Inspector Classic to assess, I
started by tagging the EC2 instances I wanted to include in the target.
In this task, I tagged the BastionServer instance.
Every AWS tag consists of a key and value pair. I followed these steps:
-
In the AWS Management Console, I chose Services and selected EC2.
-
I confirmed that "New EC2 Experience" was selected at the upper-left
of my screen, as this projeect was designed to use the new Amazon EC2
console.
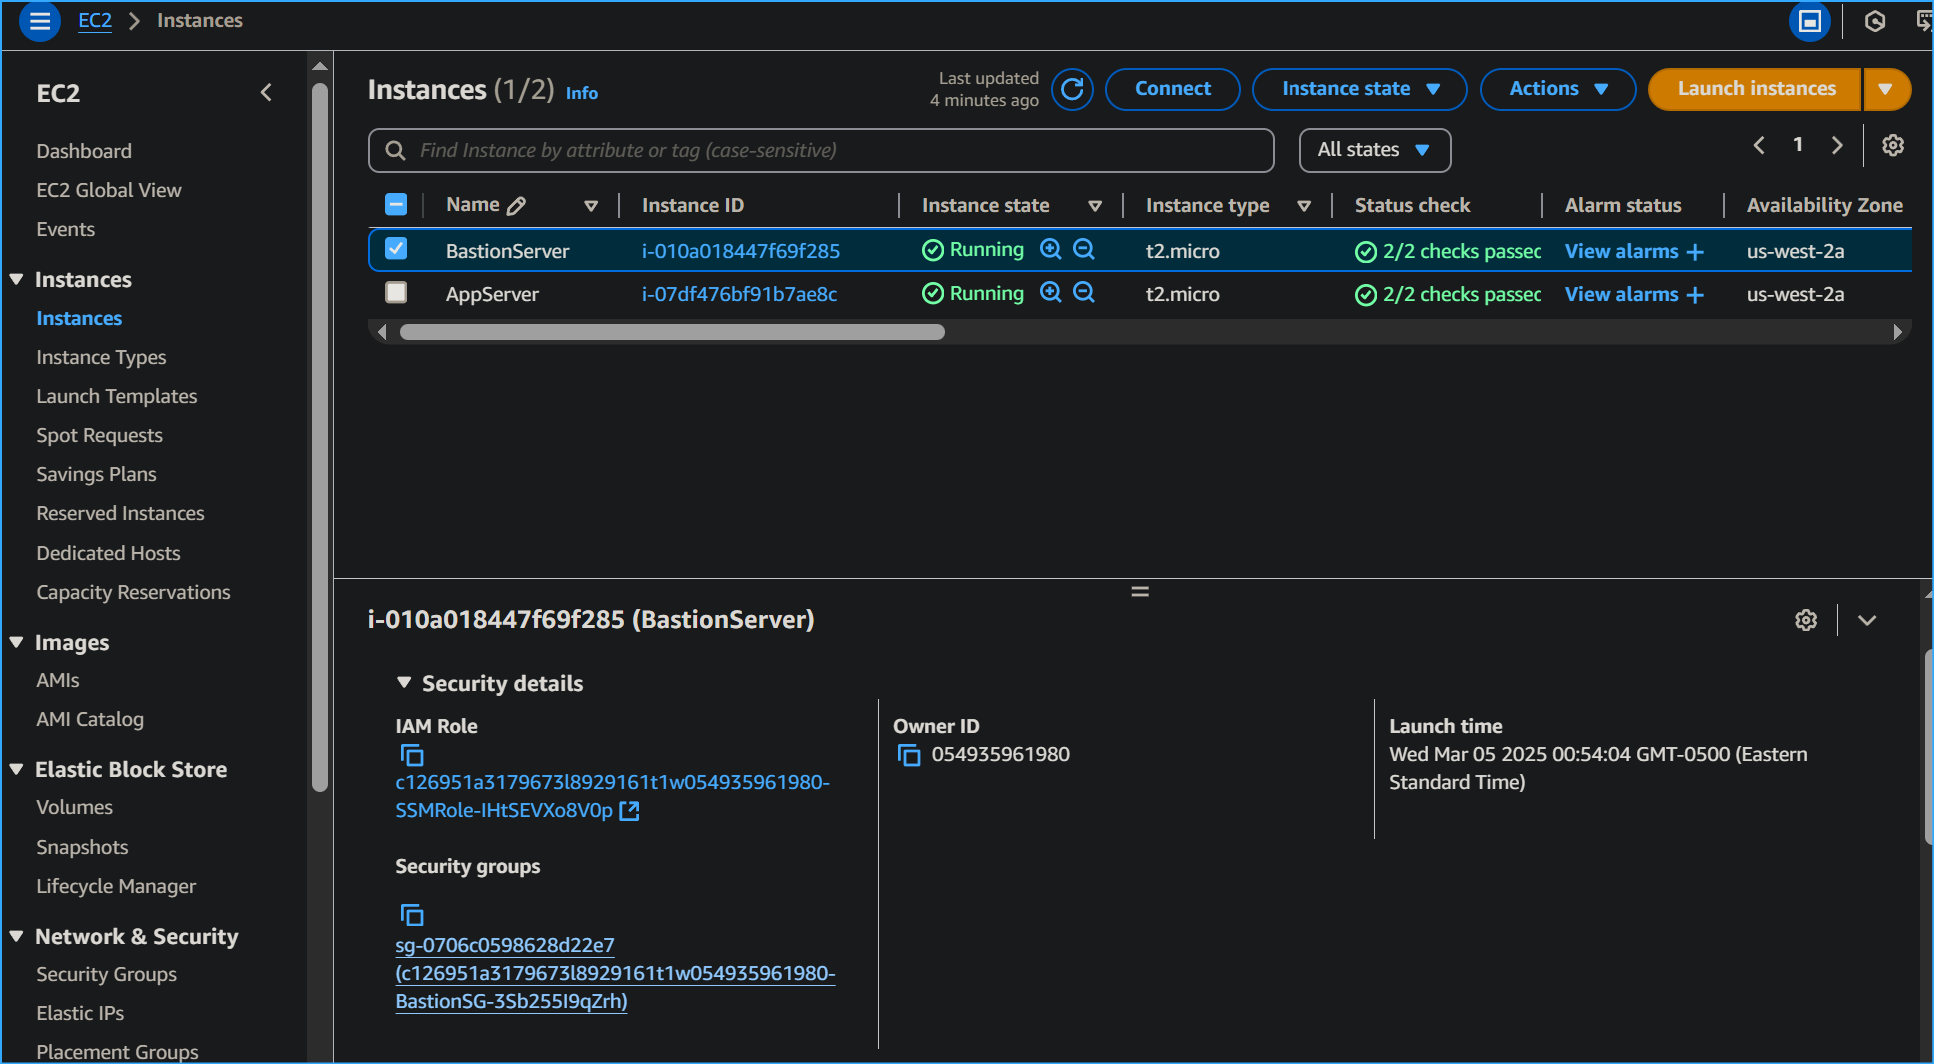
- In the left navigation pane, I chose Instances.
-
I could see the running BastionServer and AppServer EC2 instances
listed.
- I selected the BastionServer instance.
- I chose the Tags tab.
- I clicked on Manage tags.
- I chose Add tag, and entered the following information:
Key: SecurityScan
Value: true
- I clicked Save.
Summary of Task 1
I successfully applied tags for the BastionServer instance, which
allowed the security scan to find and scan this instance.
Task 2: Configuring and Running Amazon Inspector
Next, I learned how to run an agentless network audit on our EC2
instances using Amazon Inspector. I used the network reachability rules
package.
Use case: I realized it might not be possible to install agents on all
hosts in our deployment, as not all types of operating systems support
Amazon Inspector agents. Using this method, I would be able to run
network audit on all hosts.
Here's what I did:
-
In the AWS Management Console, I chose the Services menu. Then I
selected Security, Identity, & Compliance and chose Inspector.
-
To open the navigation pane, I clicked on the menu icon on the left.
- I chose "Switch to Inspector Classic"
- I clicked "Start Free Trial"
- I selected "Assessment Targets" on left side
-
In the Define an assessment target section, I configured the following
options:
For Name, I entered "Network-Audit"
I cleared the check box for All Instances.
For Tags: Key, I chose SecurityScan.
For Tags: Value, I chose true.
I cleared the check box for Install Agents.
- I clicked Next.
-
In the Define an assessment template section, I configured the
following options:
For Name, I entered "Assessment-Template-Network"
For Rules packages, I left Network Reachability-1.1 selected, but chose
the X next to each of the other packages to remove them.
For Duration, I chose 15 Minutes.
I cleared the check box for Assessment Schedule.
- I clicked Next.
- I chose Create.
I saw a SUCCESS notification, which confirmed that the assessment run
was initiated. It took about 3-5 minutes to complete.
While waiting, I took some time to learn more about Amazon Inspector.
To check the status of the scan:
- In the left navigation pane, I chose Assessment runs.
-
In the Amazon Inspector - Assessment Runs section, I chose the expand
icon in the row for the run I initiated to access more options.
- To see the status of the run, I chose Show status.
-
Once the status changed to Analysis complete, I chose Findings in the
left navigation pane.
Summary of Task 2
In this task, I created an assessment target (a collection of AWS
resources for Amazon Inspector Classic to analyze). Then I created an
assessment template (a blueprint to configure the assessment). I used
the template to start an assessment run, which is the monitoring and
analysis process that results in a set of findings.
Task 3: Analyzing Amazon Inspector Findings
The findings that these rules generated showed whether our ports were
reachable from the internet through an internet gateway (including
instances behind Application Load Balancers or Classic Load Balancers),
a VPC peering connection, or a virtual private network (VPN) through a
virtual gateway. These findings also highlighted network configurations
that allow for potentially malicious access, such as mismanaged security
groups, ACLs, and internet gateways.
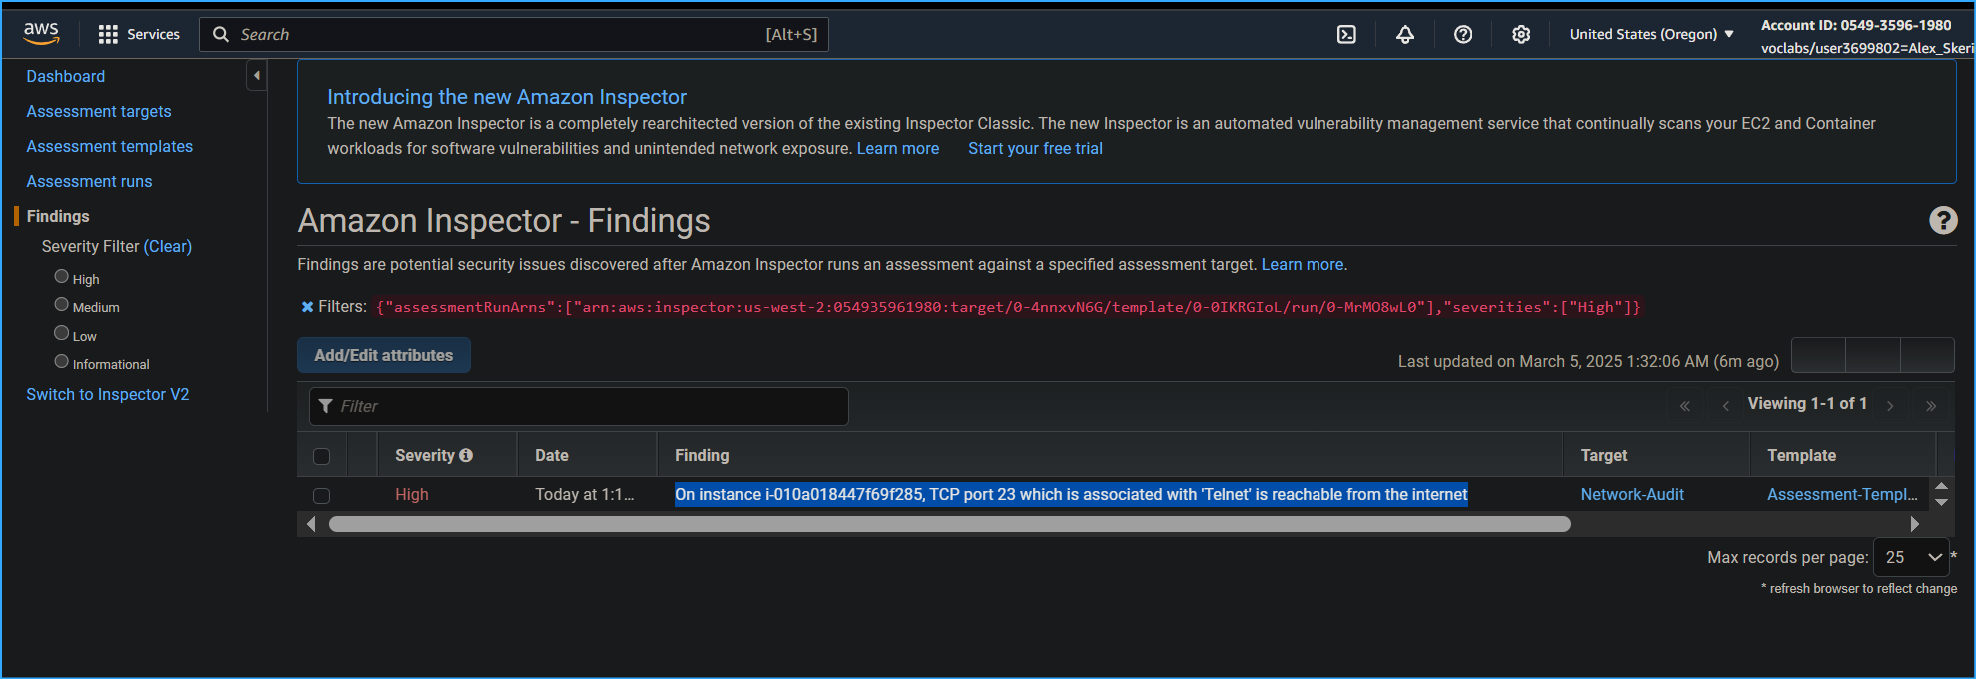
I expanded the high-severity finding and saw the following key details:
- AWS agent ID showed me the affected EC2 instance.
-
Description showed the reason for the finding. In this case, TCP port
23, which is associated with Telnet, was reachable from the internet.
- Recommendation provided remediation suggestions.
Telnet is a text-based terminal emulation utility that is part of the
TCP/IP suite of protocols. It allows a system to connect to a remote
host to perform commands as if you were on the console of the remote
machine.
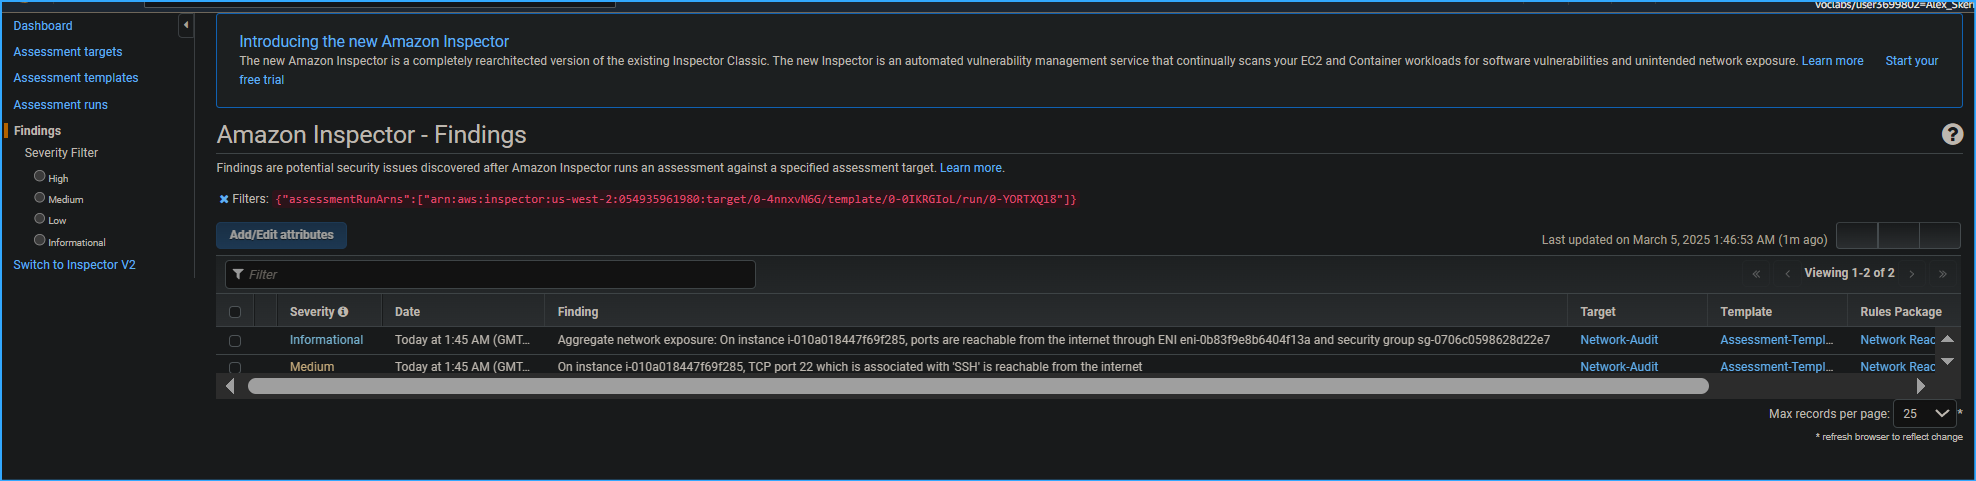
I then expanded the medium-severity findings and analyzed the details:
-
For the medium-severity finding, TCP port 22, which is associated with
SSH, was reachable from the internet.
SSH, like the Telnet utility, gives a user the ability to log in to a
remote machine and perform commands as if they were on the console of
that system. Telnet, however, is insecure because its data isn't
encrypted when communicated. SSH provides a secure, encrypted tunnel to
access another system remotely.
Task 4: Updating Security Groups
In this task, I explored a few remediation options for the security
findings that Amazon Inspector discovered. The first option showed how
to lock down port 22 to specific IP addresses.
Here's what I did:
- I expanded the details of the high-severity finding.
-
In the Recommendation section, I chose the link to the security group
(which looked similar to: sg-0b2dc685cd6e6e706).
-
When the link opened, I could see the BastionServerSG security group
attached to the BastionServer that produced findings within Amazon
Inspector.
-
I chose the Inbound rules tab to see the current inbound rules for
this security group. These were also the high and medium findings that
Amazon Inspector caught.
- I chose Edit inbound rules.
-
For the inbound rule associated with port range 23, I chose Delete. I
noted that Port 23 Telnet is vulnerable to security attacks, and the
SSH protocol helps overcome many security issues of Telnet.
-
For the SSH rule, I removed the current inbound IP address of
0.0.0.0/0 by choosing the X next to it.
The 0.0.0.0/0 IP address for inbound rules means that port 22 is
accessible from anyone on the internet.
I decided to adjust the inbound rules so that only my IP address could
access port 22. Although this option is much more secure, I understood
it still has vulnerabilities. For example, someone could access the
computer associated with that IP address and gain access.
-
For Source, I chose the Custom dropdown list, and then selected My IP.
- I chose Save rules.
Re-scan the environment
-
I navigated to the browser tab that had Amazon Inspector open. In the
left navigation pane, I chose Assessment templates.
-
I selected the check box next to Assessment-Template-Network, and
chose Run.
-
This ran the same scan from earlier in the lab and produced findings
from the security group updates.
The scan took approximately 30-60 seconds to complete.
-
In the left navigation pane, I chose Assessment runs, and refreshed
every 10-15 seconds until the Status changed to Analysis complete.
-
In the left navigation pane, I chose Findings, and then chose Date to
sort by most-recent findings.
I observed that the high-severity finding was now gone, but the
medium-severity finding remained. Although port 22 was scoped down to
allow access to only my IP address, port 22 was still technically open
to the internet outside the VPC.
Summary of Task 4
In this task, I successfully updated the security group attached to
the BastionServer so that it allows traffic from only my IP address
instead of the open internet and removed the wide-open and
no-longer-needed Telnet port.
Task 5: Replacing BastionServer with Systems Manager
In this final task, I replaced the BastionServer instance, which had
primarily used SSH to connect to the AppServer within the private
subnet. Instead, I opted to use Session Manager via Systems Manager.
I noted that Systems Manager is a secure end-to-end management solution
for hybrid cloud environments. It's the operations hub for AWS
applications and resources and consists of four core feature groups.
Here's what I did:
-
In the AWS Management Console, I chose Services and selected EC2.
- In the left navigation pane, I chose Security Groups.
- I chose the Security group ID for BastionServerSG.
- I chose Edit inbound rules.
-
I chose Delete, and then chose Save rules to remove the SSH inbound
rule.
- In the left navigation pane, I chose Instances.
-
I selected the check box for BastionServer. Then I chose the Instance
state dropdown list, and chose Stop instance.
- In the confirmation dialog, I chose Stop.
Next, I connected to the AppServer directly using Session Manager.
I learned that with Session Manager, I could quickly and securely access
EC2 instances through an interactive one-click browser-based shell or
through the AWS CLI without the need to open inbound ports, maintain
bastion hosts, or manage SSH keys.
-
I selected the check box next to AppServer, and then chose Connect.
- I was now connected directly to the AppServer.
-
I entered the following Linux commands to change the directory and to
view the current working directory of the AppServer:
cd ~ pwd
The output showed: /home/ssm-user
Final scan of the environment
- I went to my browser tab that had Amazon Inspector open.
- In the left navigation pane, I chose Assessment runs.
-
I selected the check box for the previously run assessment, and then
chose Run.
-
I waited for the Status to show Analysis complete, and expanded the
details of the most recent assessment run.
- I verified that there were zero Findings.
Summary of Task 5
I successfully improved the network security by adding an IAM role to
the AppServer and removing the SSH inbound rule within the Bastion
security group while making it even easier to connect using Session
Manager provided by Systems Manager.
Conclusion
I successfully completed all the objectives of this lab:
- Configured Amazon Inspector
- Ran an agentless network audit
- Investigated the scan results
- Updated security groups
- Logged in to an application server using Session Manager
Through this hands-on experience, I gained valuable skills in
identifying and remediating security vulnerabilities in AWS environments
using modern, secure methods for server access and management.
×
![]()
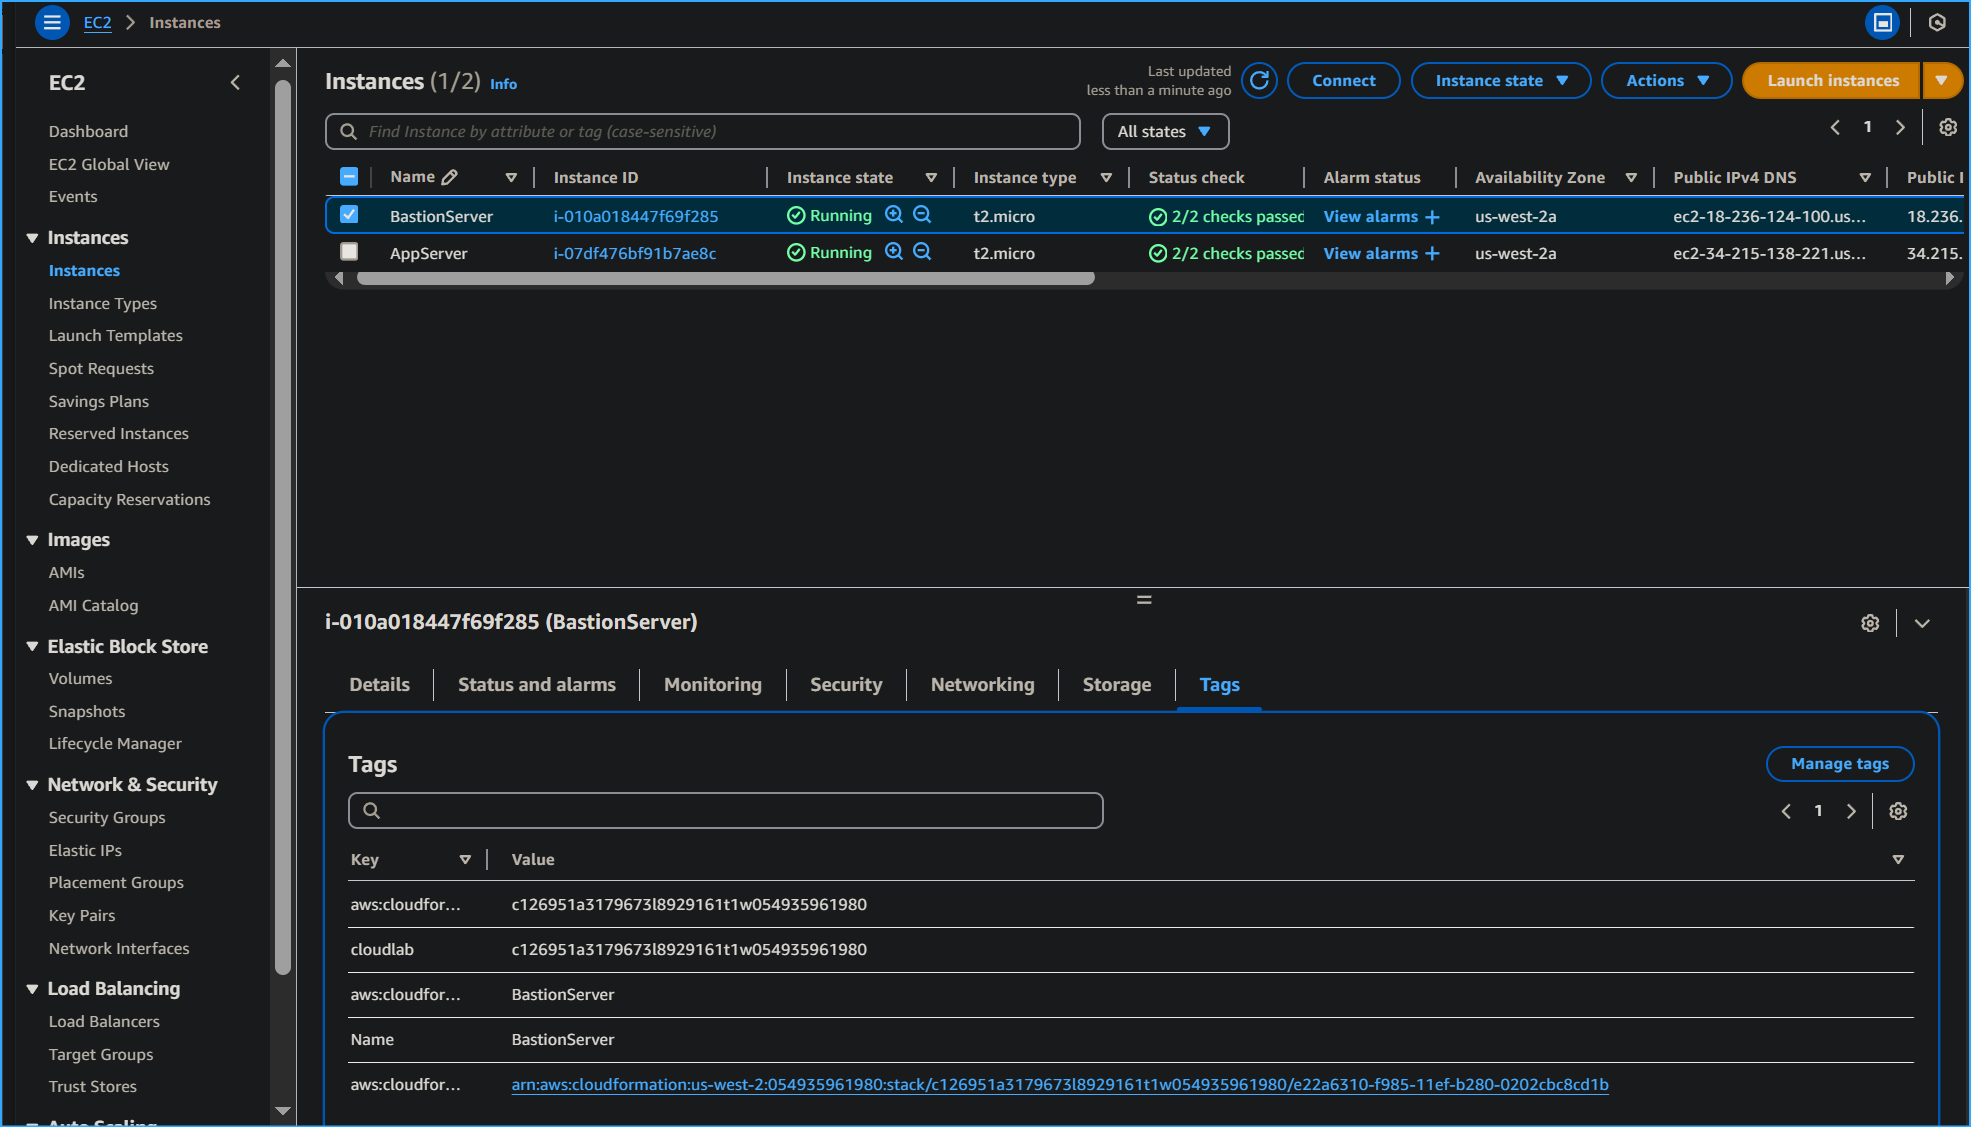 Tags tab on bastion server instance
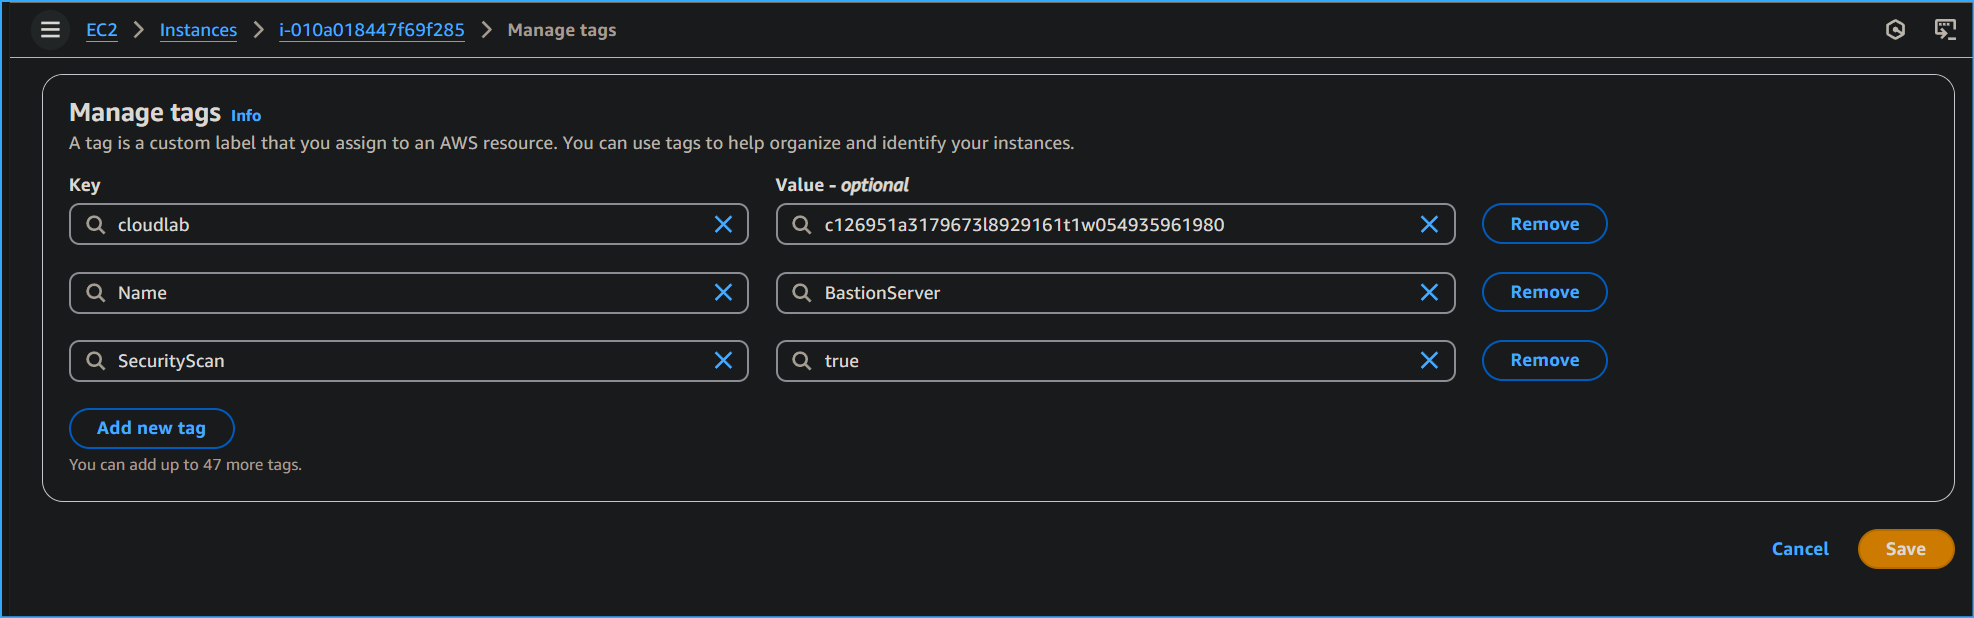 Added security scan tag value true
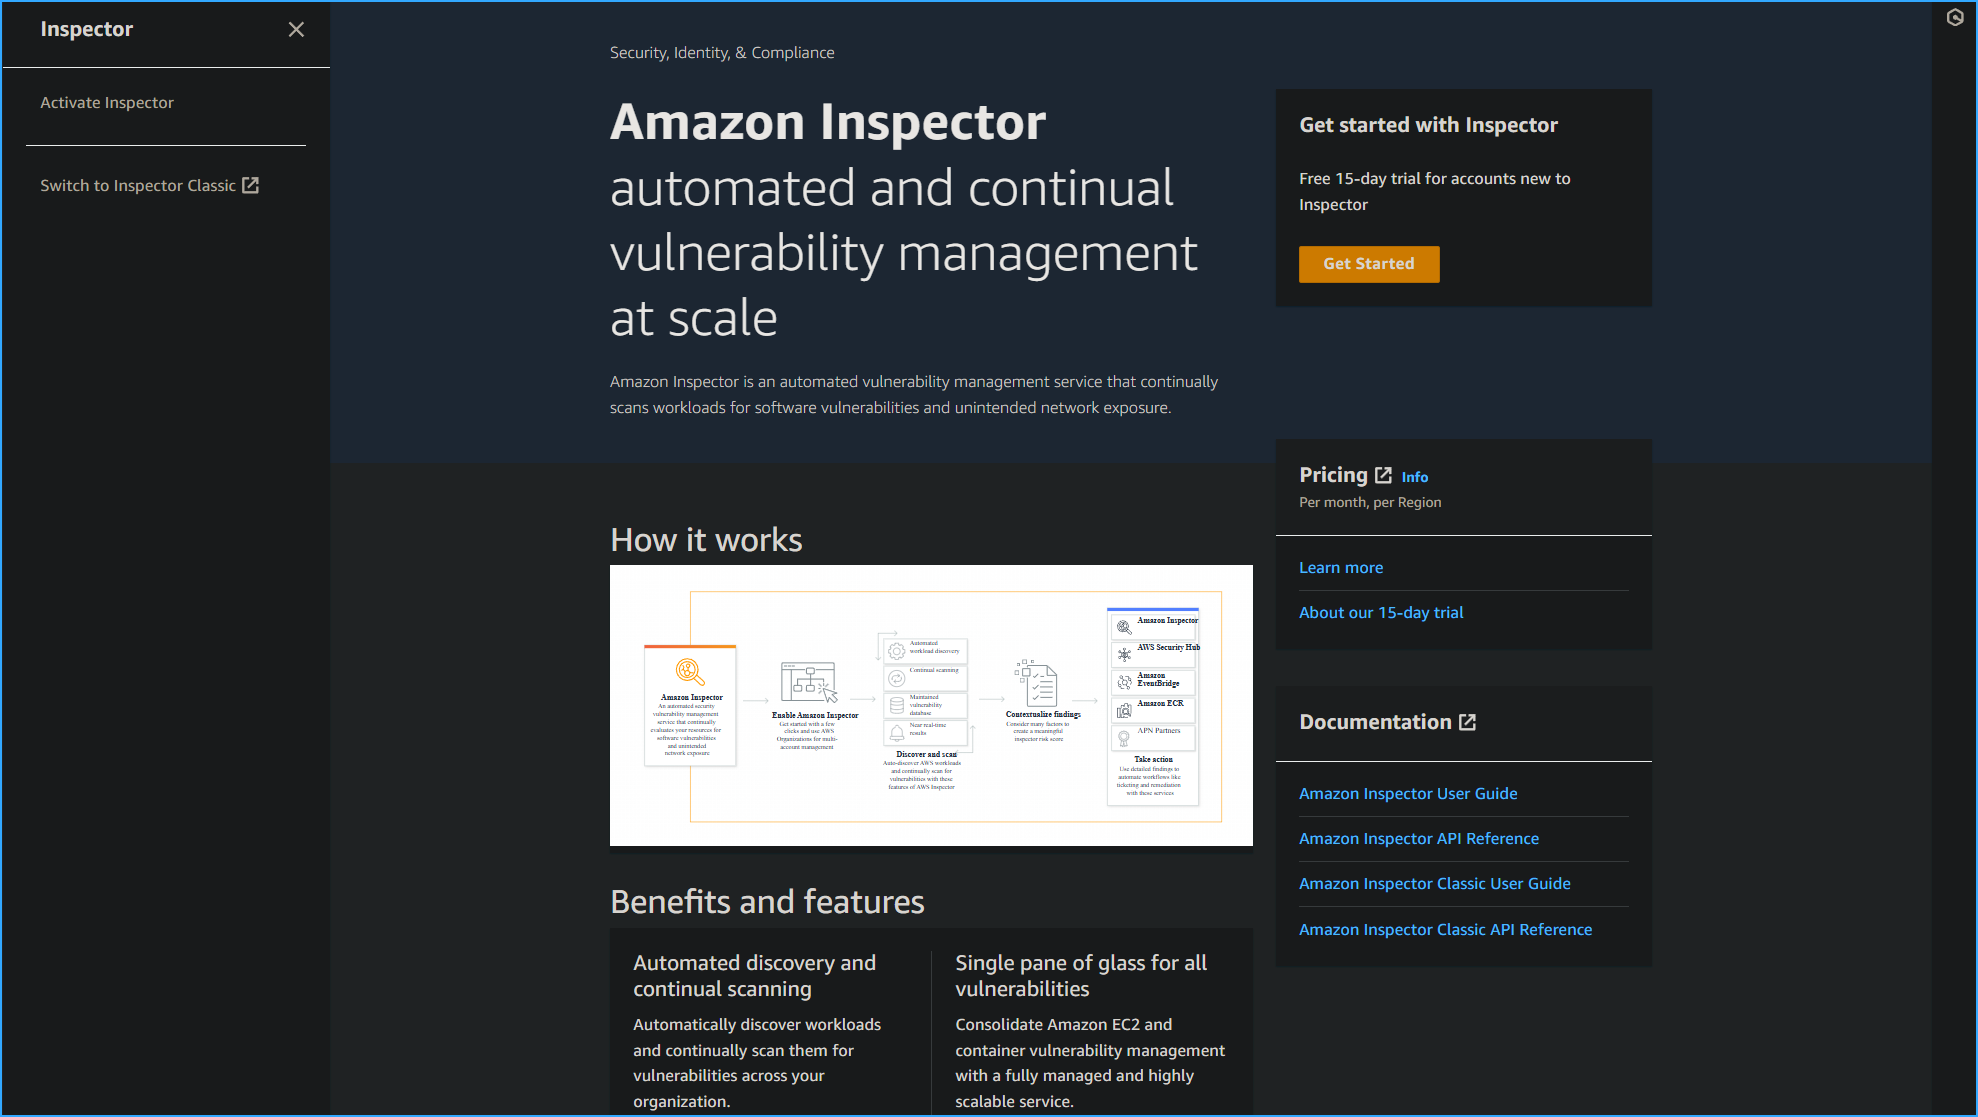 Amazon Inspector then switch to Inspector Classic on left
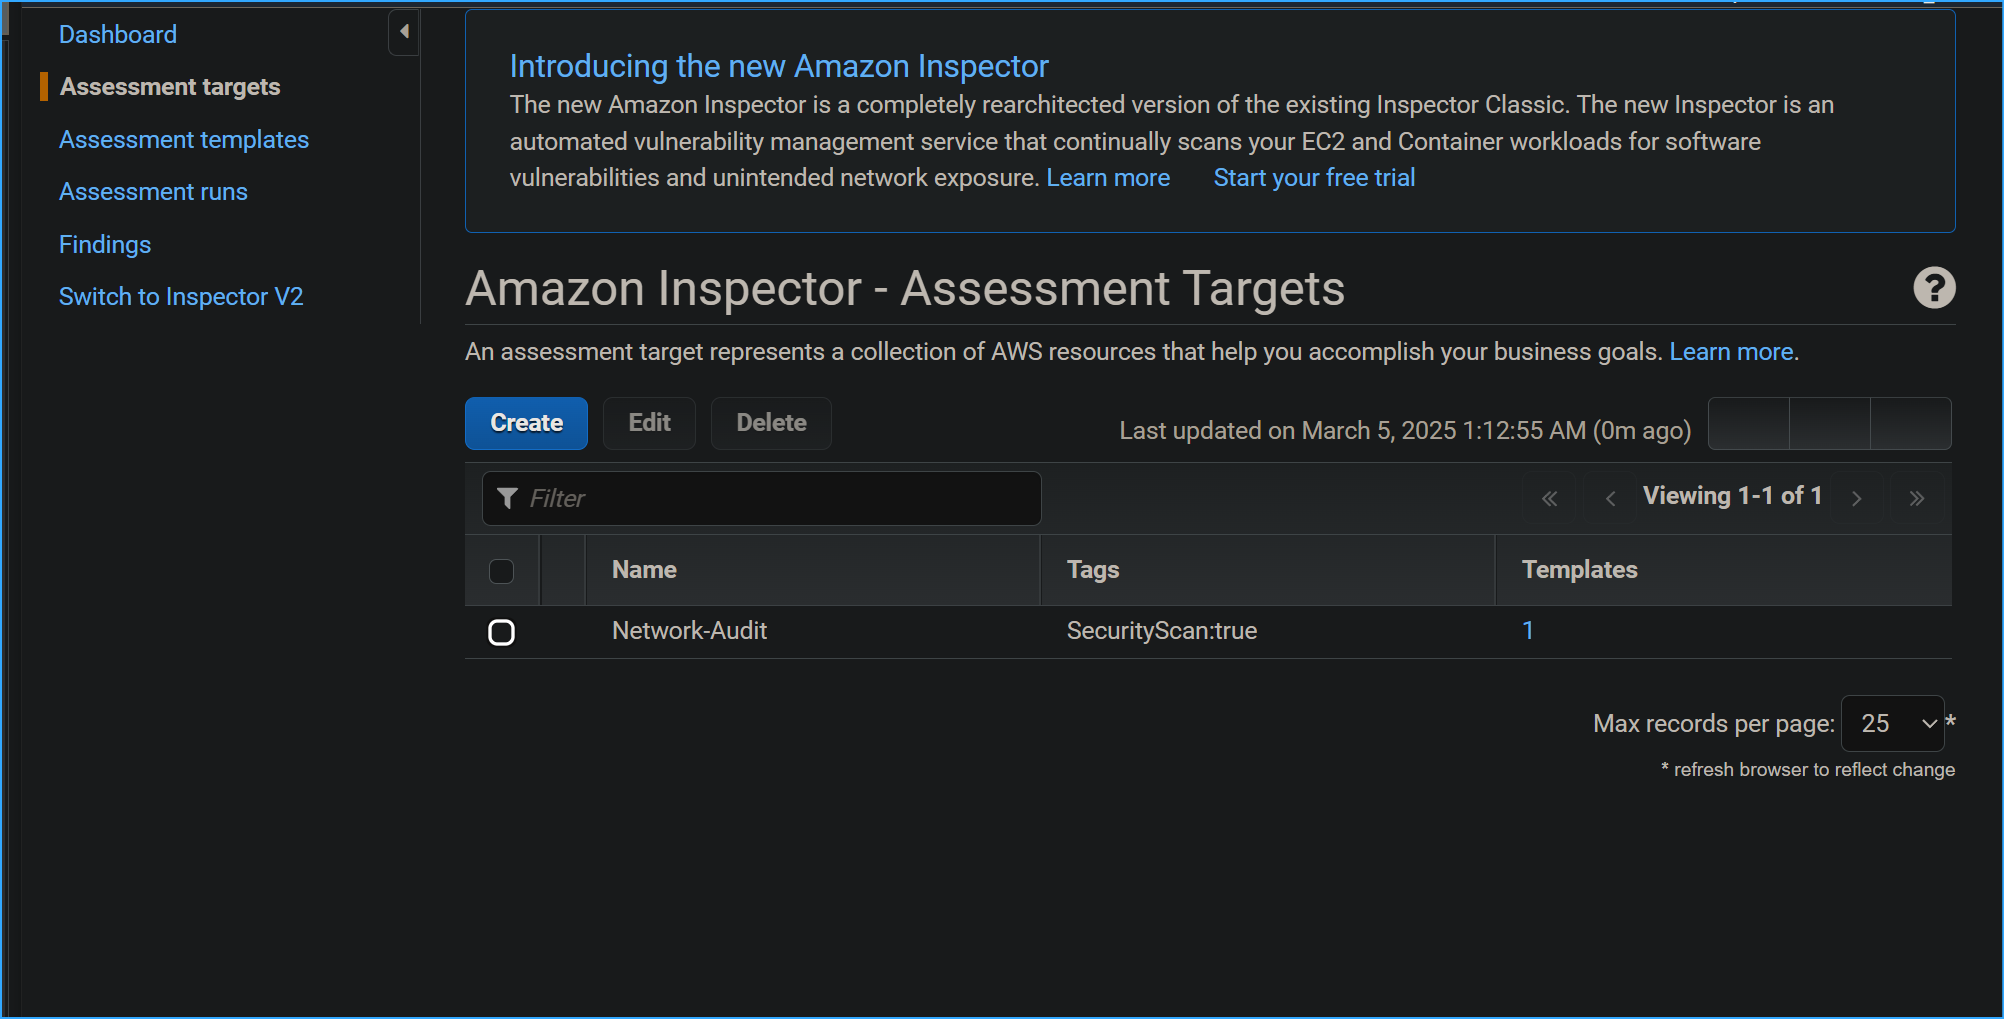 In assessment targets configured the following
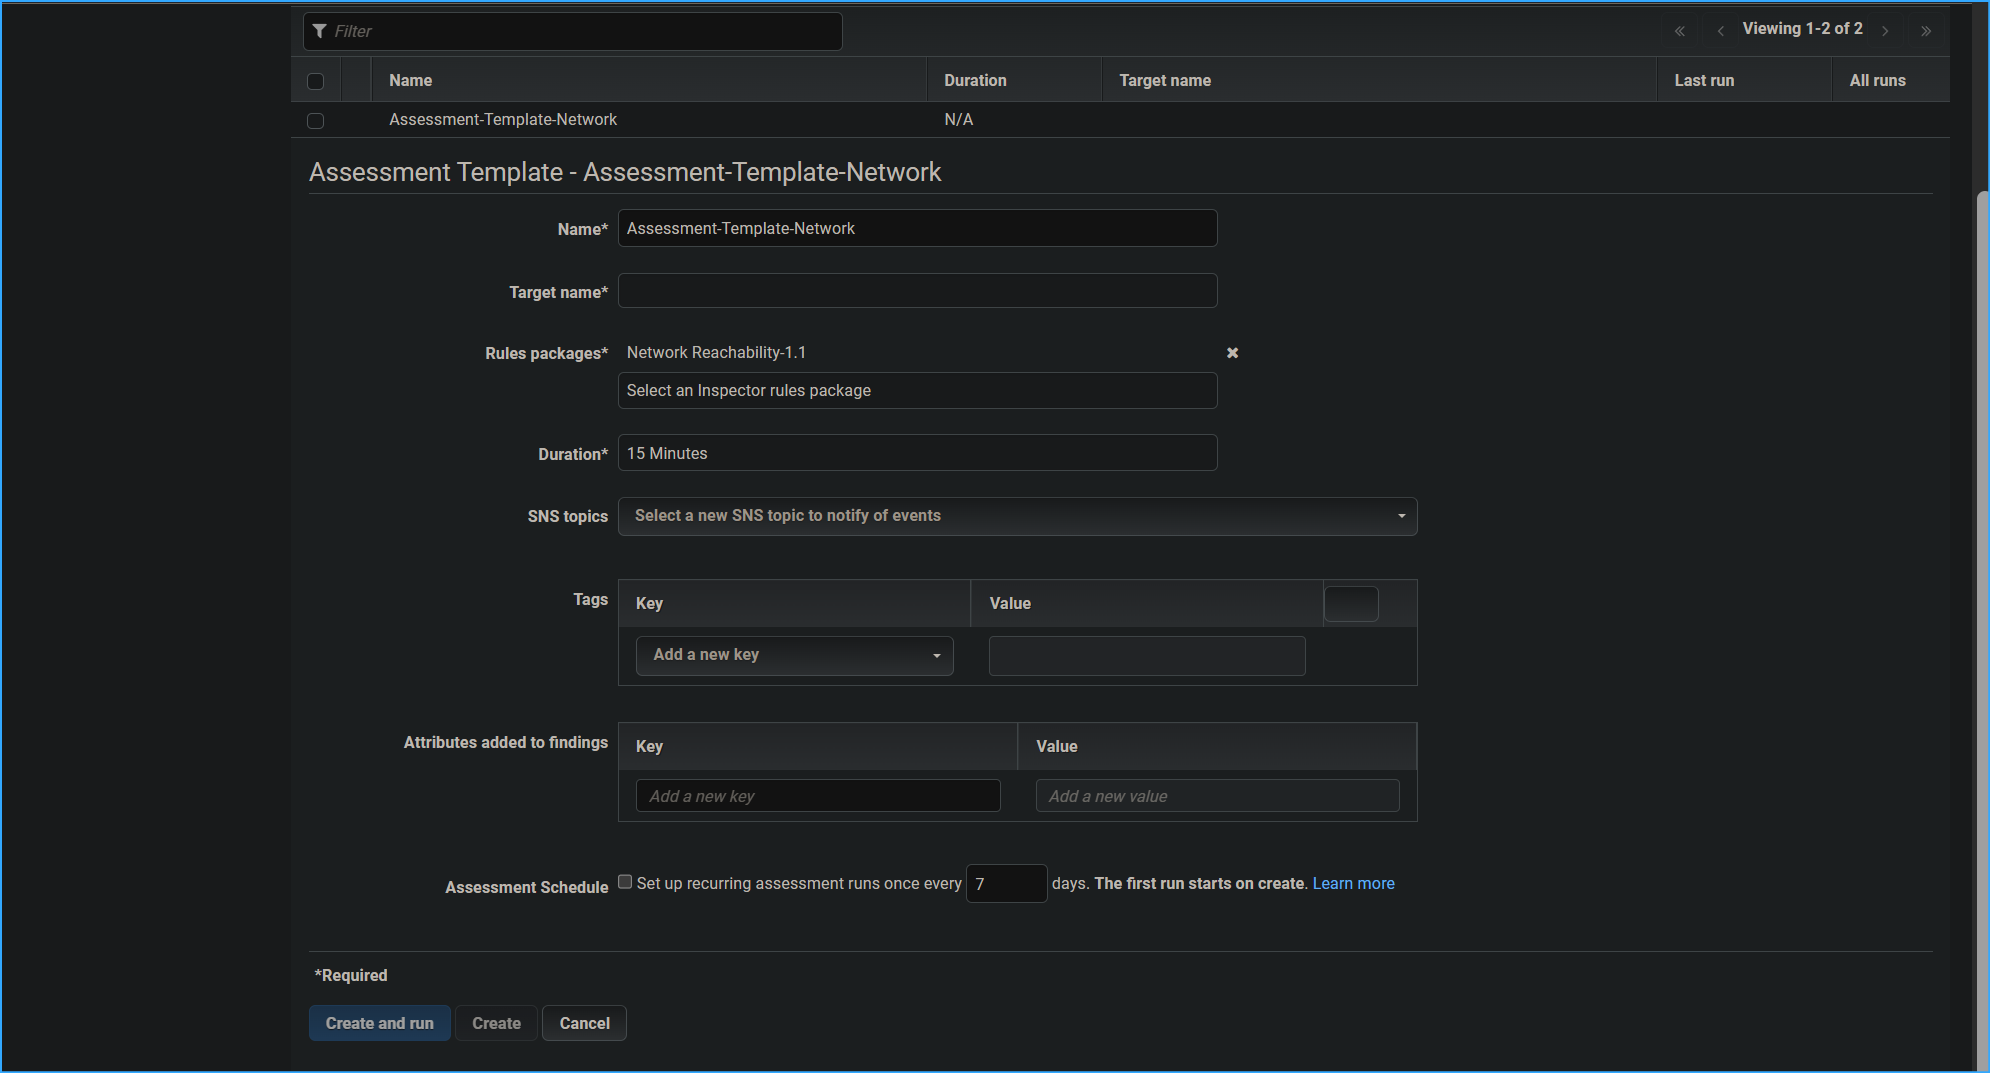 Define assessment template
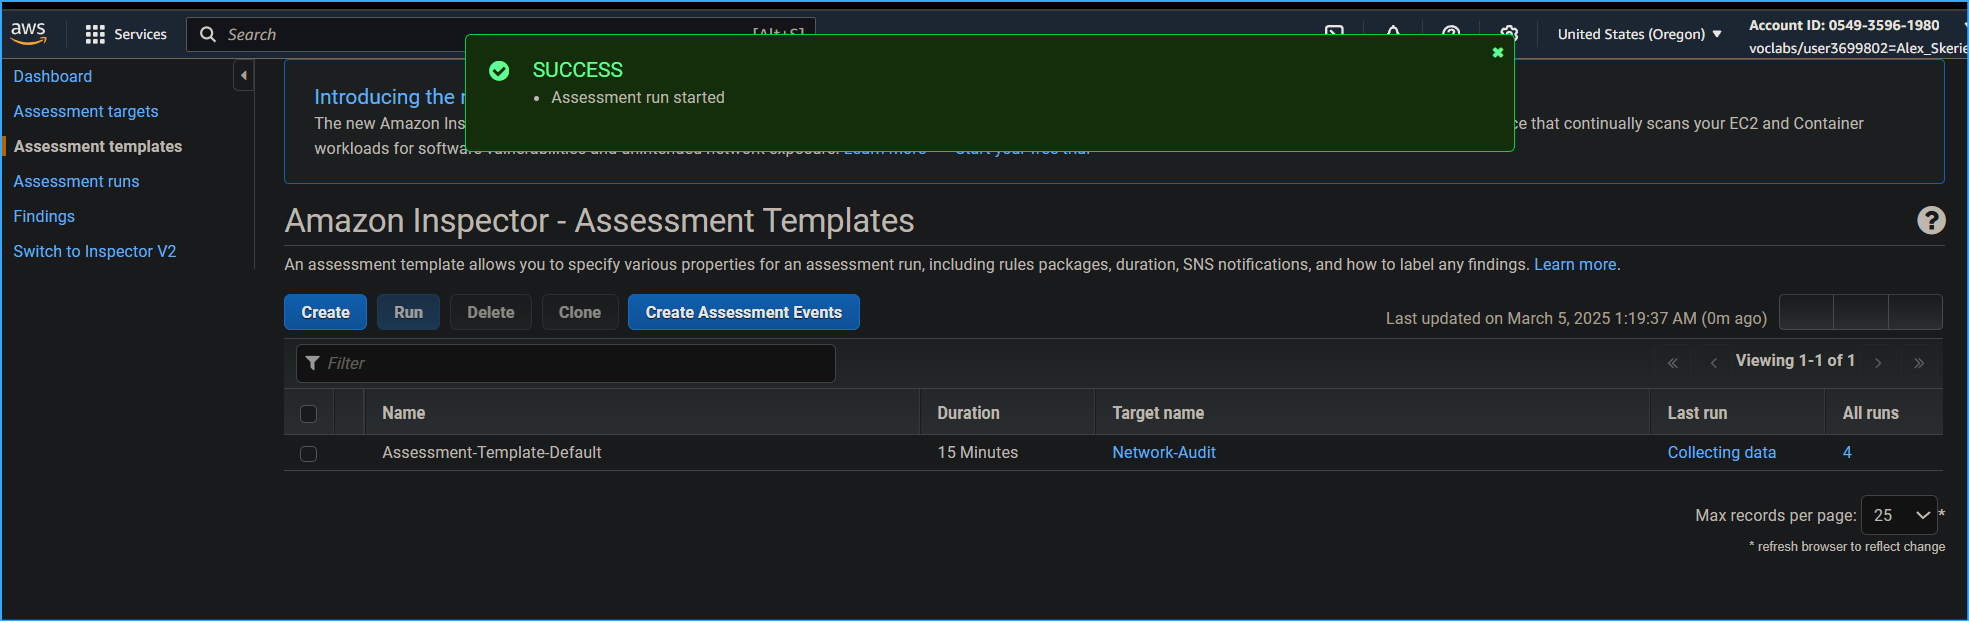 Ran assessment
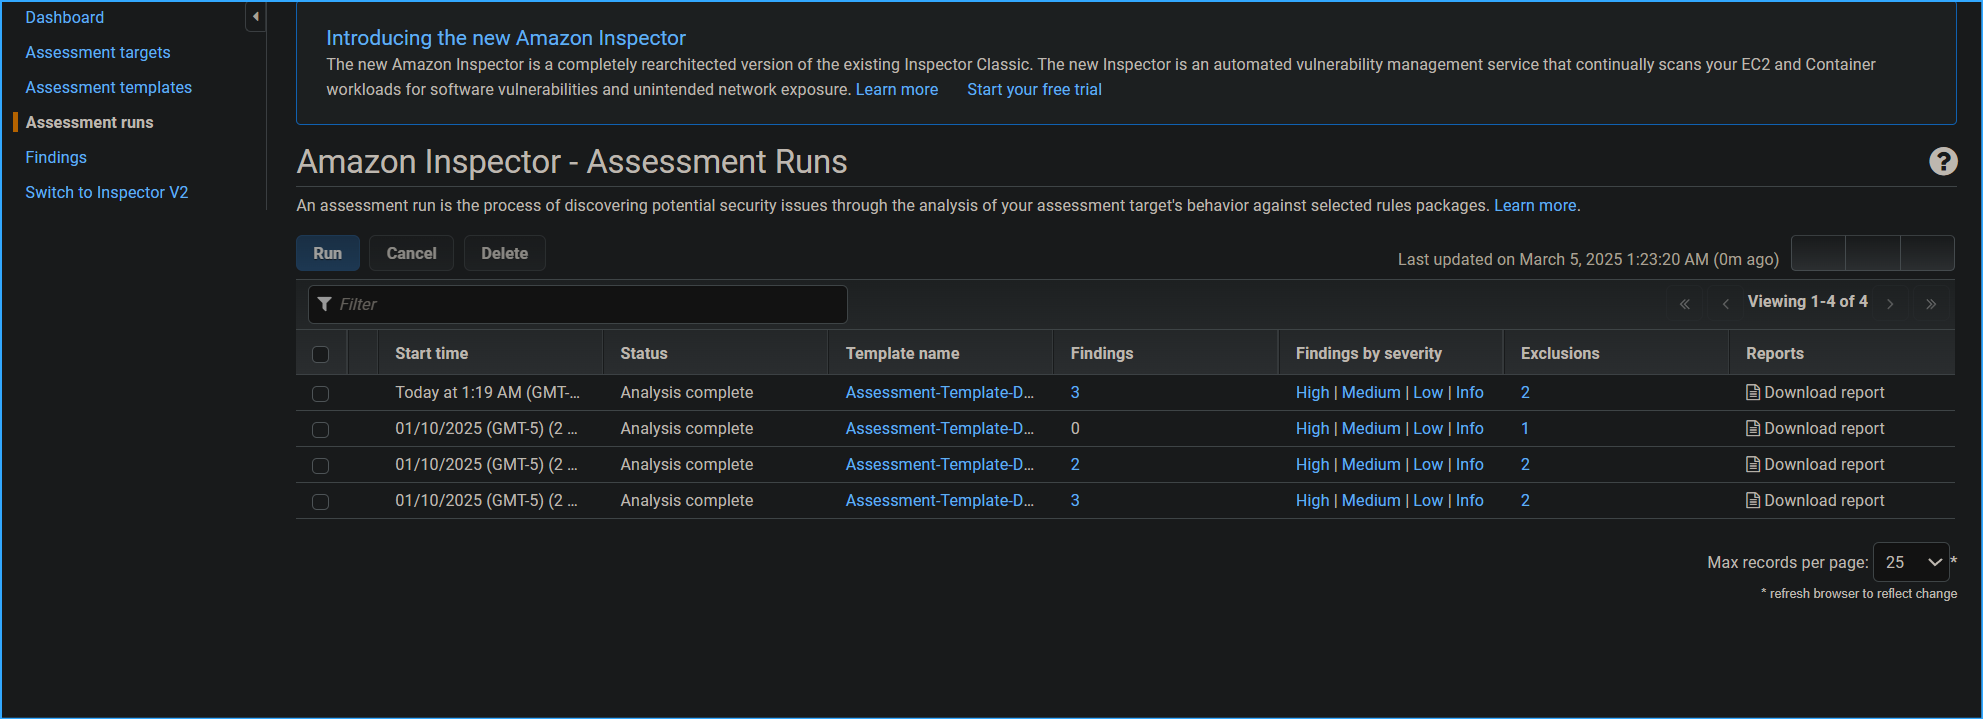 Assessment runs page
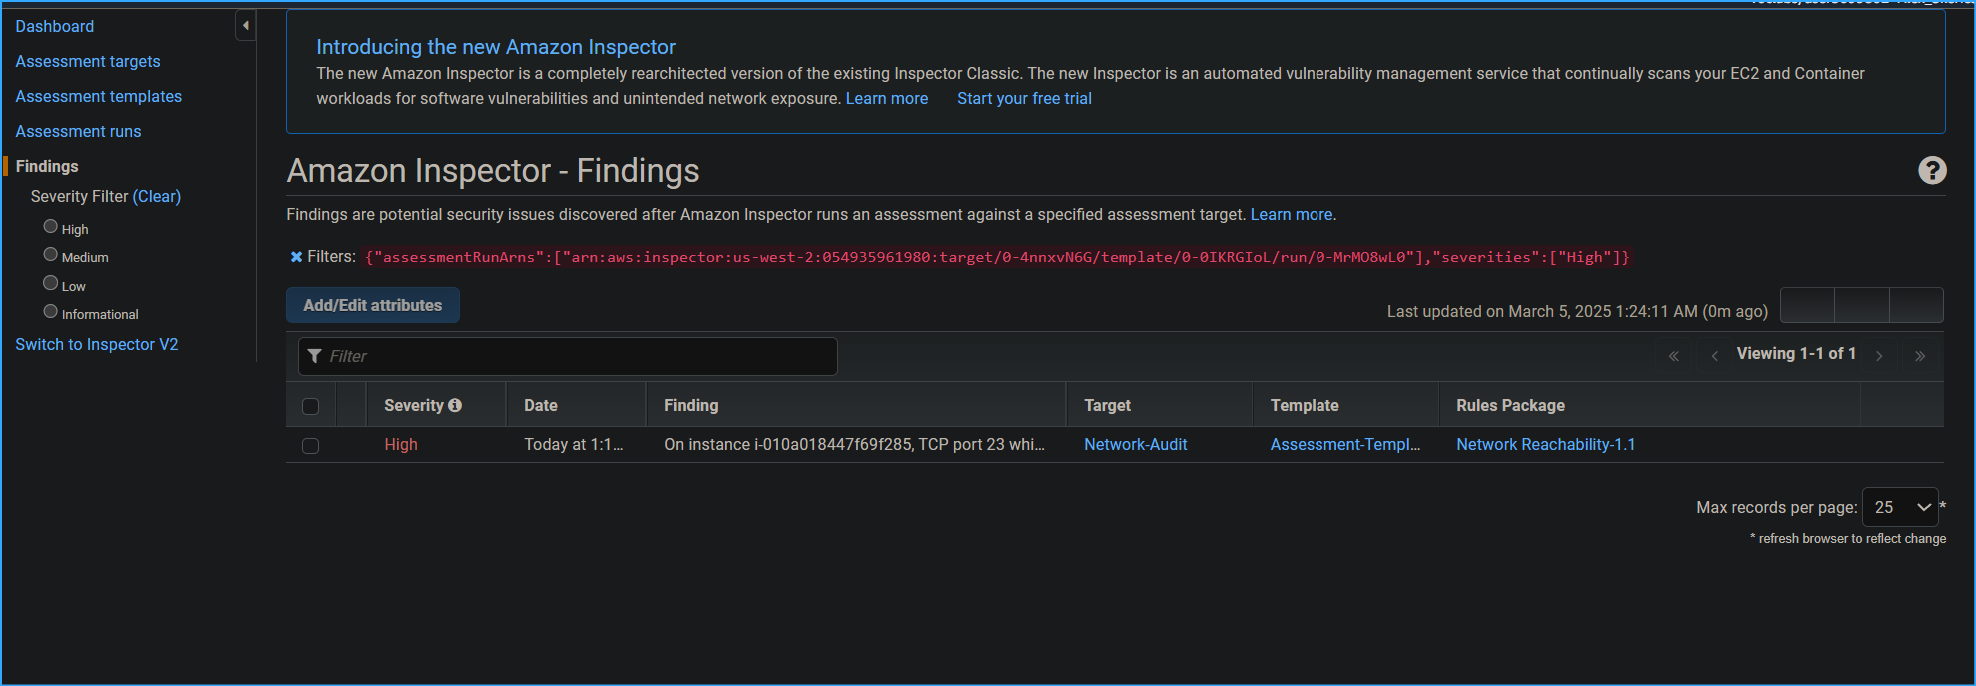 Finding shows high severity on TCP port 23
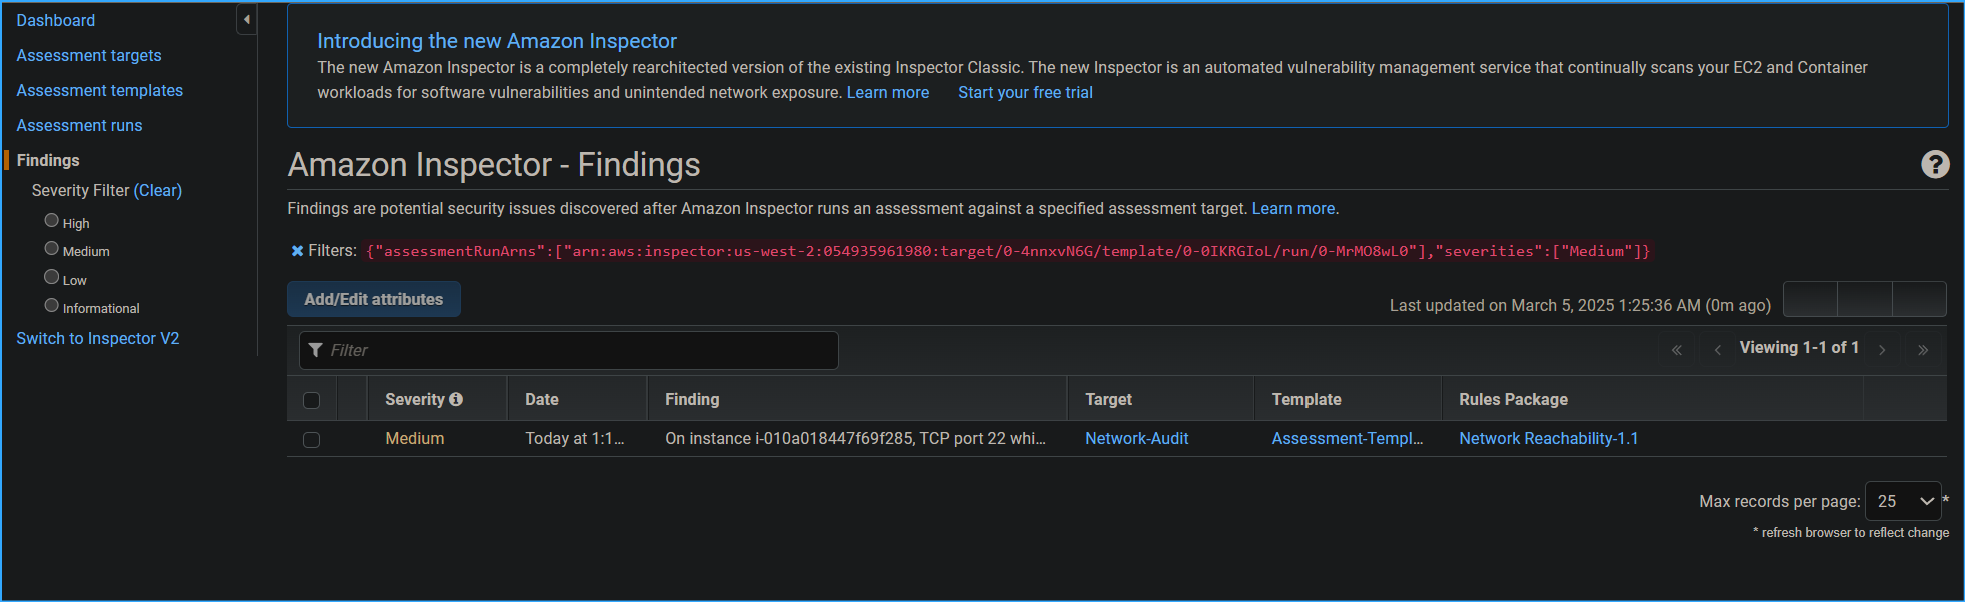 Medium severity on port 22 SSH
 No link for recommendations in findings have to take alternate
route
No link for recommendations in findings have to take alternate
route
 In bastion server security tab there is SG to fix high severity
finding
In bastion server security tab there is SG to fix high severity
finding
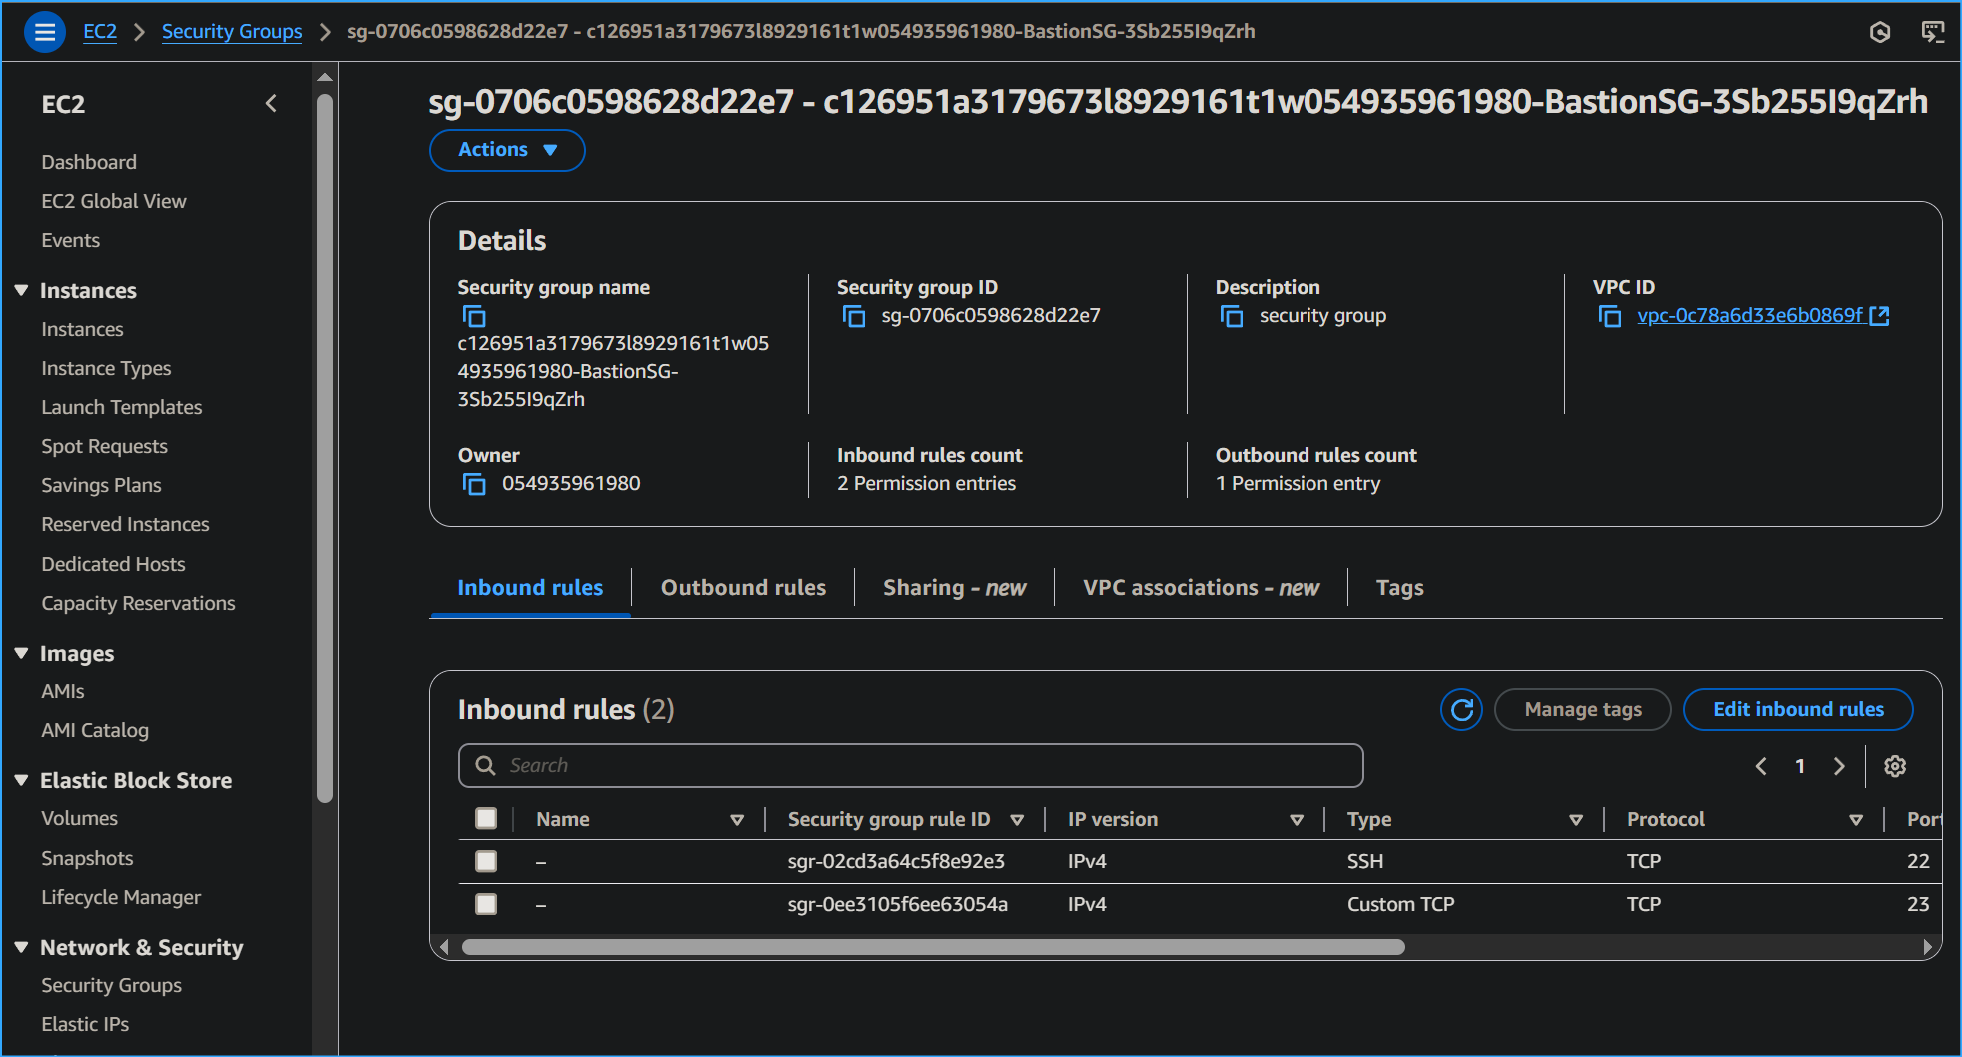 Need to edit inbound rules for bastion server SG
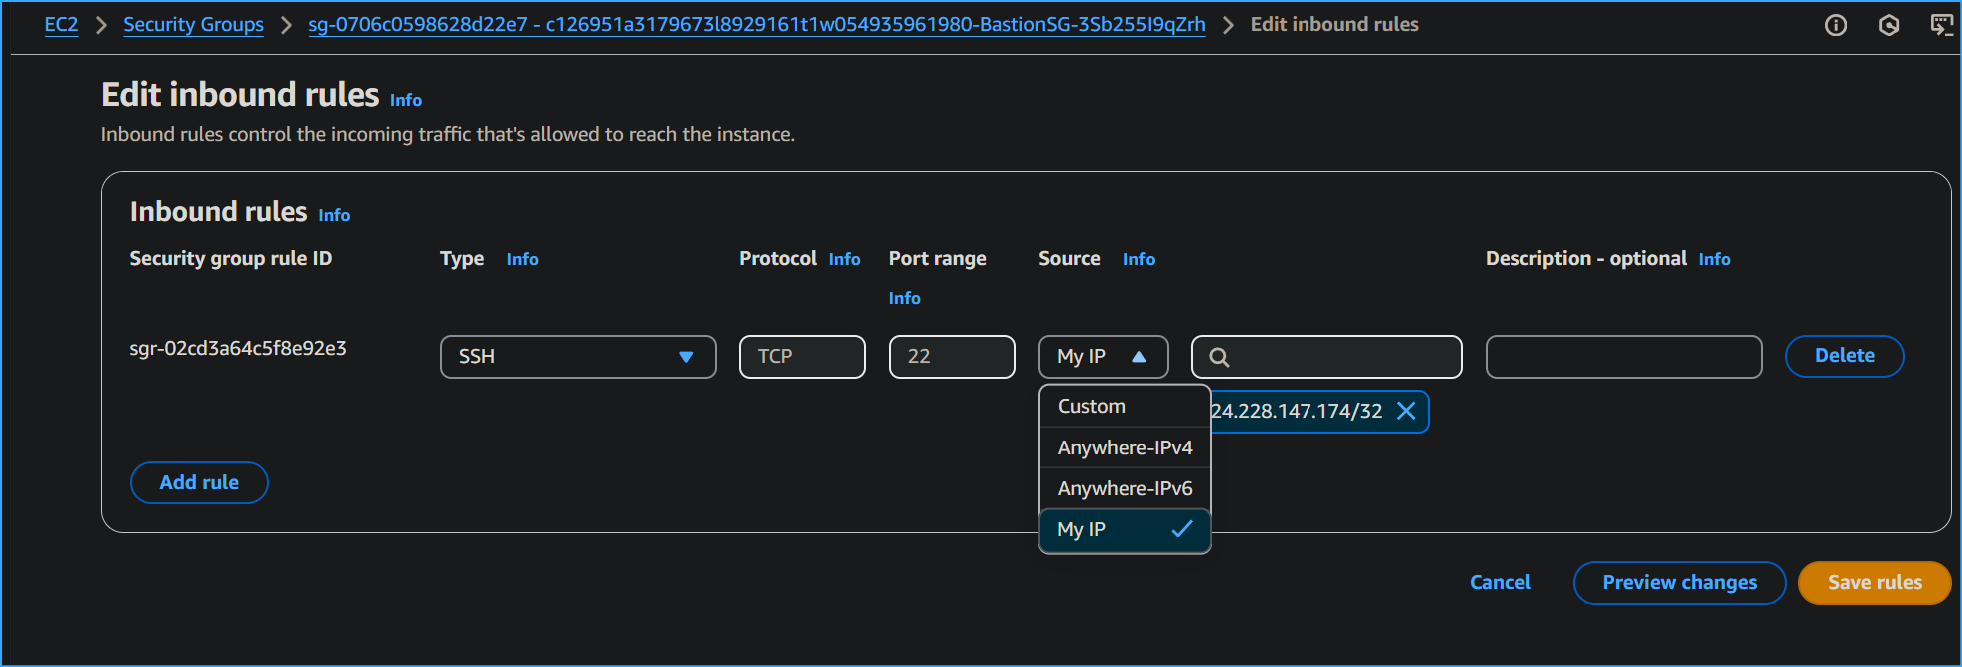 Removed telnet changed source to my IP for SSH inbound rules
 Analysis of next assessment run shows findings excluding high
severity now
Analysis of next assessment run shows findings excluding high
severity now
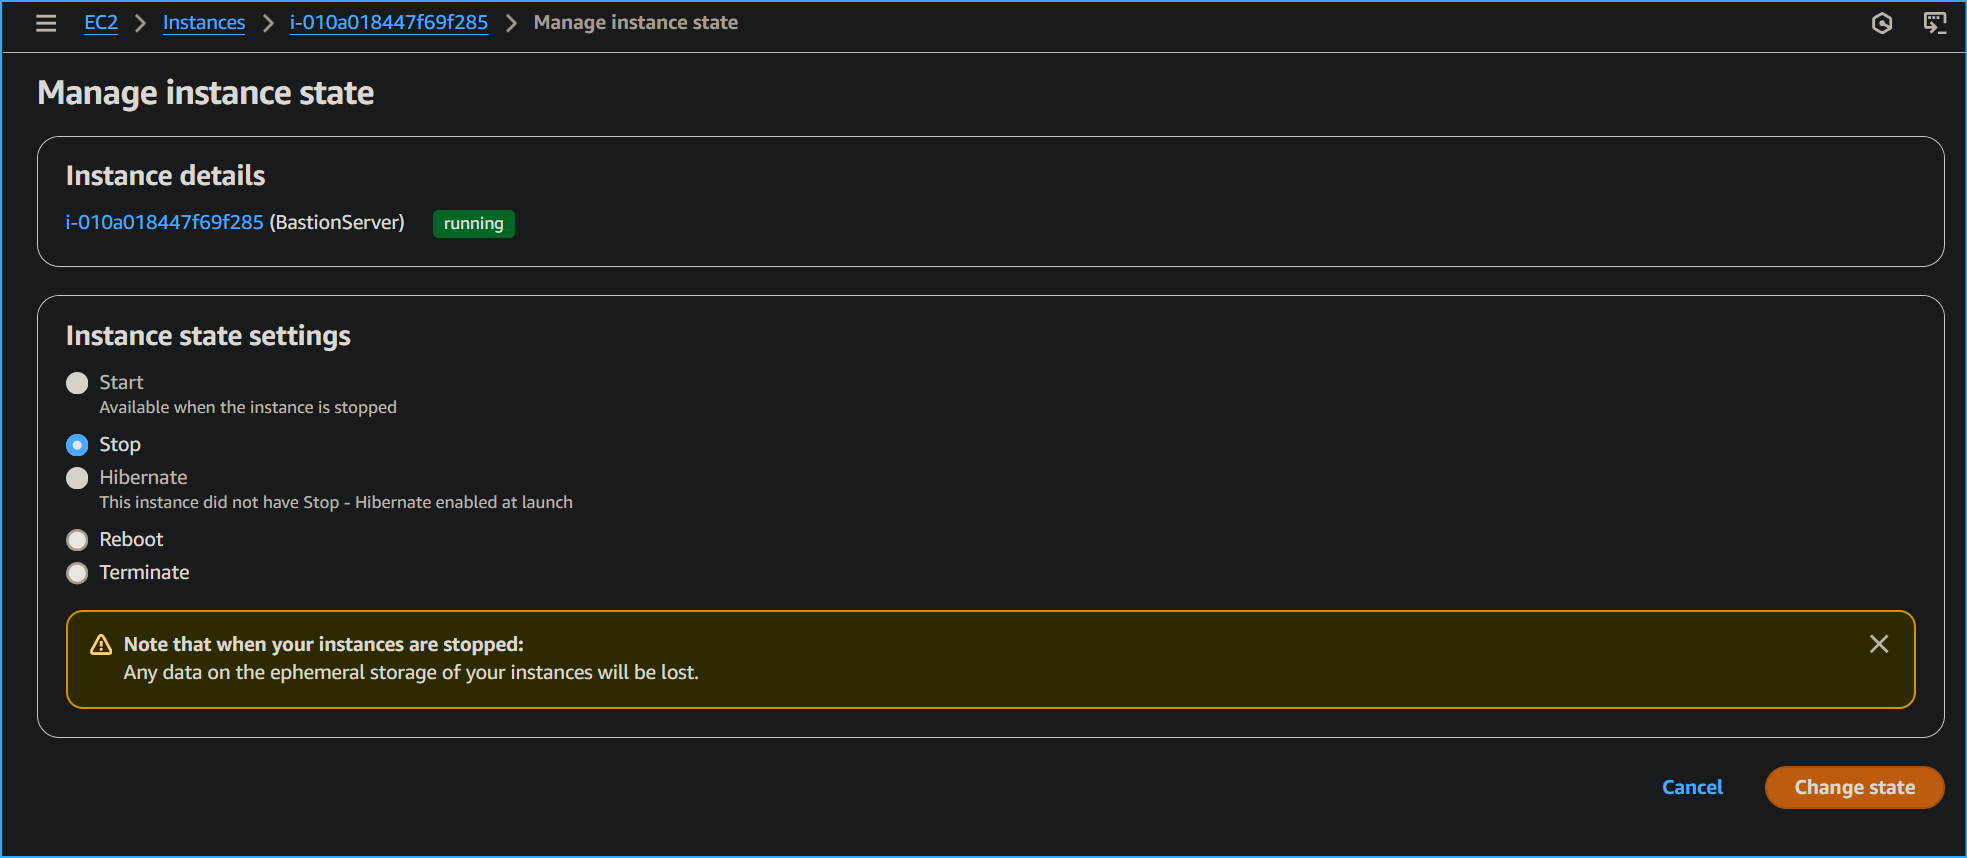 Deleted SSH then stopped bastion server instance
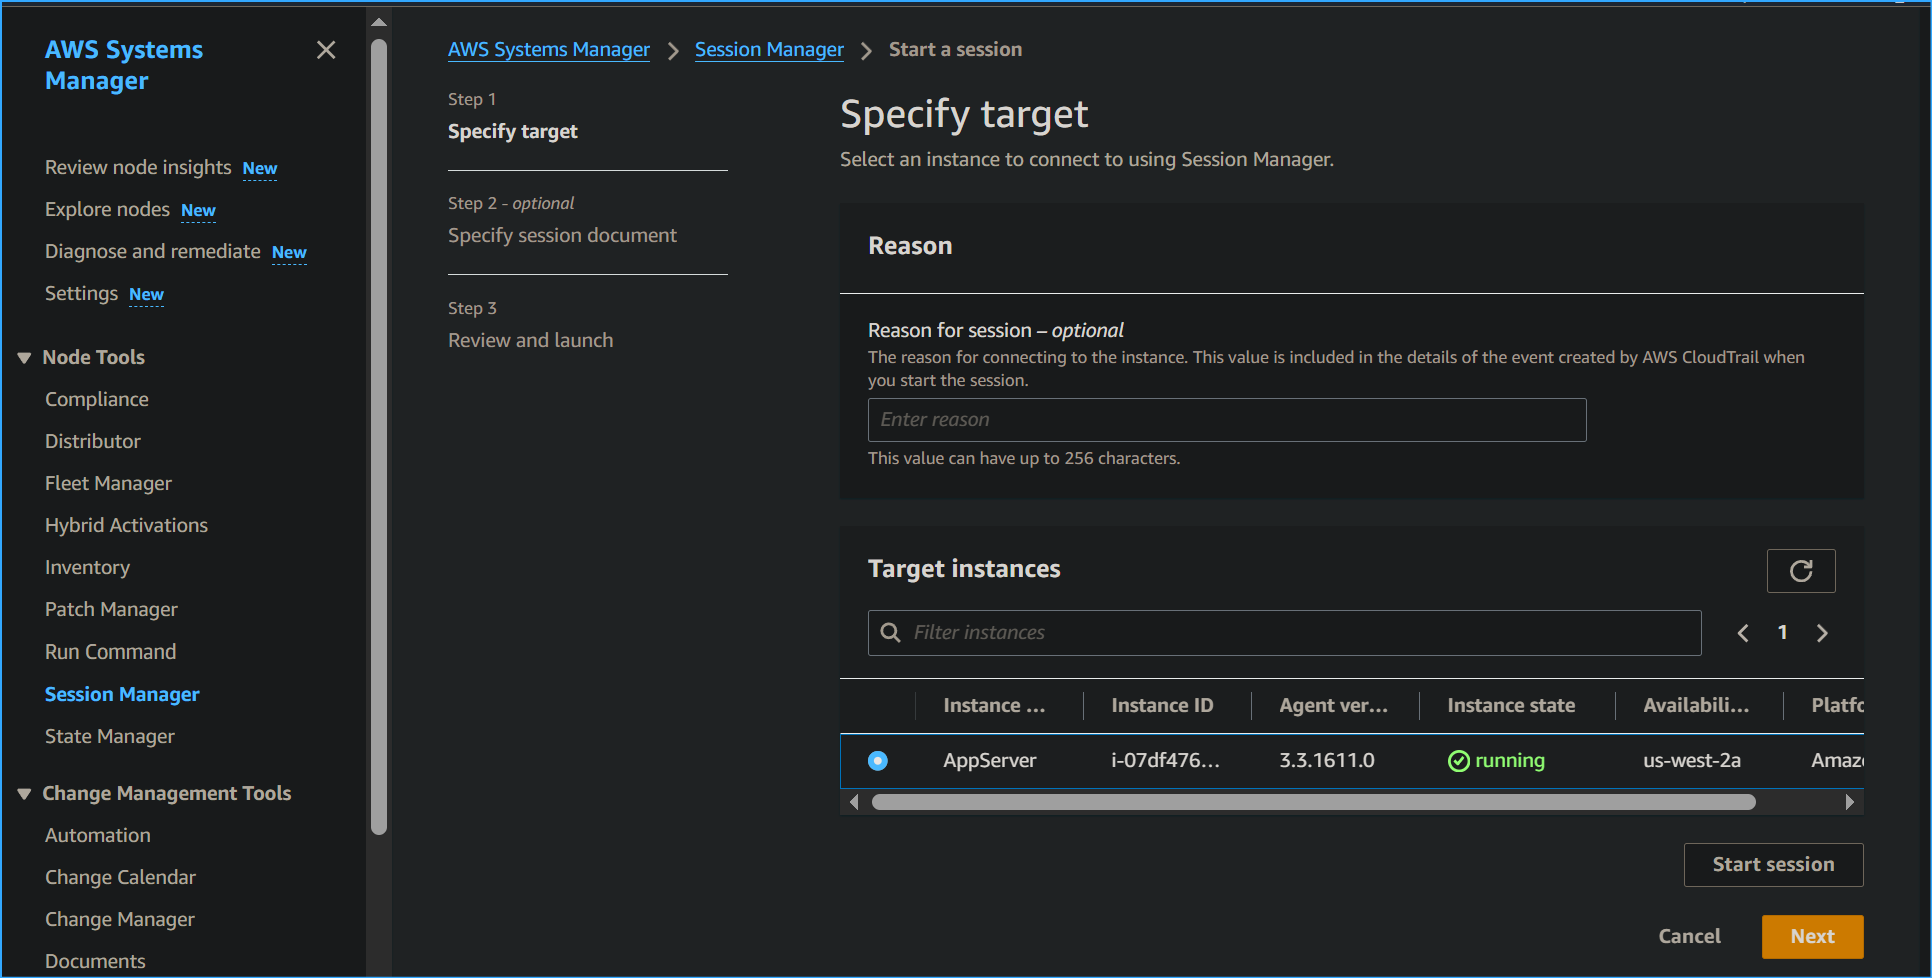 Connecting to app server through Systems Manager
 CD then PWD in app server Session Manager session
 Selected box next to recent assessment run chose run verified zero
findings now
Selected box next to recent assessment run chose run verified zero
findings now