Overview
During this project with AWS, I learned multiple ways to launch Amazon
EC2 instances. I used the AWS Management Console to launch an EC2
instance as a bastion host, then used that host to launch another EC2
instance configured as a web server using the AWS Command Line Interface
(AWS CLI).
Task 3: Launching an EC2 Instance Using the AWS CLI
Step 1: Retrieving the Latest AMI
-
I entered the following script in my EC2 Instance Connect terminal:
#Set the Region AZ=`curl -s
http://169.254.169.254/latest/meta-data/placement/availability-zone`
export AWS_DEFAULT_REGION=${AZ::-1} #Retrieve latest Linux AMI AMI=$(aws
ssm get-parameters --names
/aws/service/ami-amazon-linux-latest/amzn2-ami-hvm-x86_64-gp2 --query
'Parameters[0].[Value]' --output text) echo $AMI
-
I saw the script retrieve the Availability Zone using instance
metadata
-
It then extracted the Region from the AZ and exported it as an
environment variable
-
Using AWS Systems Manager, it retrieved the latest Amazon Linux 2 AMI
ID
-
The AMI ID was stored in the AMI environment variable and displayed on
screen
-
I made a note that if my session disconnected, I would need to re-run
all these steps
Step 2: Retrieving the Subnet ID
- I entered the following command to find the subnet ID:
SUBNET=$(aws ec2 describe-subnets --filters 'Name=tag:Name,Values=Public
Subnet' --query Subnets[].SubnetId --output text) echo $SUBNET
-
This command used the aws ec2 describe-subnets command with a filter
to find the public subnet
-
The subnet ID was stored in the SUBNET environment variable and
displayed on screen
Step 3: Retrieving the Security Group ID
- I ran the following command to find the security group ID:
SG=$(aws ec2 describe-security-groups --filters
Name=group-name,Values=WebSecurityGroup --query SecurityGroups[].GroupId
--output text) echo $SG
-
This command used the aws ec2 describe-security-groups command with a
filter for the WebSecurityGroup
-
The security group ID was stored in the SG environment variable and
displayed on screen
Step 4: Downloading the User Data Script
- I downloaded the user data script with this command:
wget
https://aws-tc-largeobjects.s3.us-west-2.amazonaws.com/CUR-TF-100-RSJAWS-3-23732/171-lab-JAWS-create-ec2/s3/UserData.txt
- To view the script contents, I ran:
cat UserData.txt
-
I observed that the script would install a web server, download a web
application zip file, and install the web application
Step 5: Launching the Web Server Instance
-
With all parameters gathered, I launched the instance using this
command:
INSTANCE=$(\ aws ec2 run-instances \ --image-id $AMI \ --subnet-id
$SUBNET \ --security-group-ids $SG \ --user-data
file:///home/ec2-user/UserData.txt \ --instance-type t3.micro \
--tag-specifications 'ResourceType=instance,Tags=[{Key=Name,Value=Web
Server}]' \ --query 'Instances[*].InstanceId' \ --output text \ ) echo
$INSTANCE
-
I saw that the command specified:
- The AMI ID from Parameter Store
- The subnet ID for the public subnet
- The web security group ID allowing HTTP access
- The user data script path for web server configuration
- A t3.micro instance type
- A Name tag with "Web Server" as the value
-
The command returned the new instance ID, which was stored in the
INSTANCE environment variable
Step 6: Monitoring the Instance Status
- To check all instance details, I ran:
aws ec2 describe-instances --instance-ids $INSTANCE
- This displayed comprehensive JSON information about my instance
- To see just the instance state, I ran:
aws ec2 describe-instances --instance-ids $INSTANCE --query
'Reservations[].Instances[].State.Name' --output text
- I saw that the status was initially "pending"
-
I continued running this command repeatedly until the status changed
to "running"
Step 7: Testing the Web Server
- To get my web server's public DNS name, I ran:
aws ec2 describe-instances --instance-ids $INSTANCE --query
Reservations[].Instances[].PublicDnsName --output text
-
The command returned a DNS name similar to:
ec2-35-11-22-33.us-west-2.compute.amazonaws.com
- I copied this DNS name to my clipboard
-
I opened a new browser tab and pasted the DNS name into the address
bar
- I pressed Enter and waited for the page to load
-
I confirmed that the web page loaded successfully, showing that my web
server was operational
Step 8: Verifying in the Console
- I returned to the AWS Management Console browser tab
- In the left navigation pane, I clicked on Instances
- I clicked the refresh button to update the instance list
-
I confirmed that both my Bastion host and Web Server instances were
now visible in the list
-
I noted that I had successfully launched instances using both the
console and CLI methods
EC2 Instance Troubleshooting Experience
Challenge 1: Connecting to a Misconfigured EC2 Instance
Step 1: Identifying the Connection Problem
-
I attempted to connect to the "Misconfigured Web Server" instance
(i-01093543ce5578180) using EC2 Instance Connect
- The connection failed with an error
- I checked the instance details to investigate the issue
- I navigated to the Security tab for the instance
-
I examined the inbound rules for the attached security group
(sg-079fcfbc5b88fb328 "Challenge-SG")
-
I discovered that only port 80 (HTTP) was allowed, with no rule
permitting SSH connections on port 22
Step 2: Fixing the Security Group
-
I clicked on the security group name "Challenge-SG" to open its
configuration
- I selected the "Edit inbound rules" button
- I clicked "Add rule" to create a new inbound rule
- For Type, I selected SSH (TCP port 22)
-
For Source, I entered 0.0.0.0/0 to allow connections from any IP
address
- I clicked "Save rules" to apply the changes
- I waited for the security group update to complete
Step 3: Verifying the Connection
- I returned to the EC2 instances list
- I selected the "Misconfigured Web Server" instance again
- I clicked the Connect button to try EC2 Instance Connect again
- This time, the connection established successfully
- I confirmed I had a working terminal session to the instance
Challenge 2: Fixing the Web Server Installation
Step 1: Diagnosing the Web Server Problem
-
Using the public DNS name of the instance
(ec2-34-212-57-170.us-west-2.compute.amazonaws.com), I tried to access
the web server in my browser
-
The connection timed out, indicating the web server wasn't responding
-
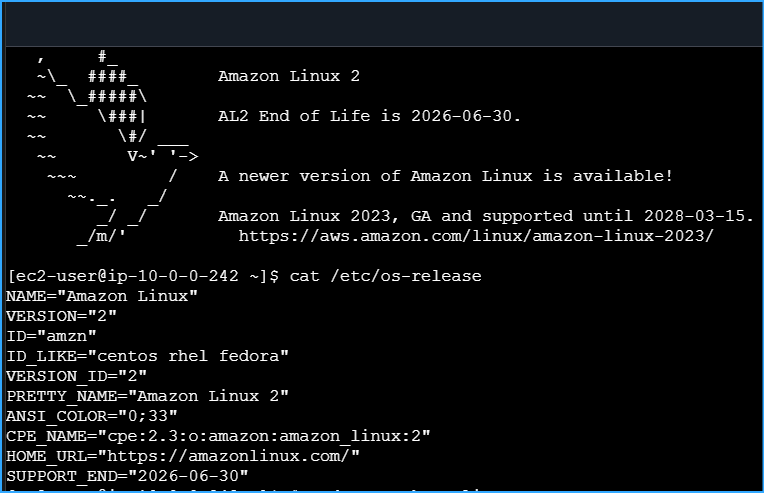
In my SSH session to the instance, I first checked the operating
system:
cat /etc/os-release
-
I confirmed the system was running Amazon Linux 2 (VERSION="2",
PRETTY_NAME="Amazon Linux 2")
- I checked if the Apache web server was installed:
systemctl status httpd
-
The command returned an error indicating the service wasn't found
-
I concluded that the web server wasn't installed on the instance
Step 2: Installing and Configuring Apache
- I updated the package lists first:
sudo yum update -y
- I installed the Apache web server package:
sudo yum install httpd -y
-
Once the installation completed, I started the web server service:
sudo systemctl start httpd
- I configured the service to start automatically on boot:
sudo systemctl enable httpd
- I verified the service was running correctly:
sudo systemctl status httpd
- The command showed the service was active and running
Step 3: Creating a Test Web Page
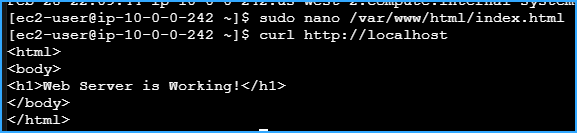
- I created a basic HTML file using nano:
sudo nano /var/www/html/index.html
- I added the following HTML content:
<html> <body> <h1>Web Server is Working!</h1>
</body> </html>
-
I saved the file by pressing CTRL+O, then ENTER, then CTRL+X to exit
nano
- I tested the web server locally:
curl http://localhost
-
The command returned the HTML content I had created, confirming the
local web server was working
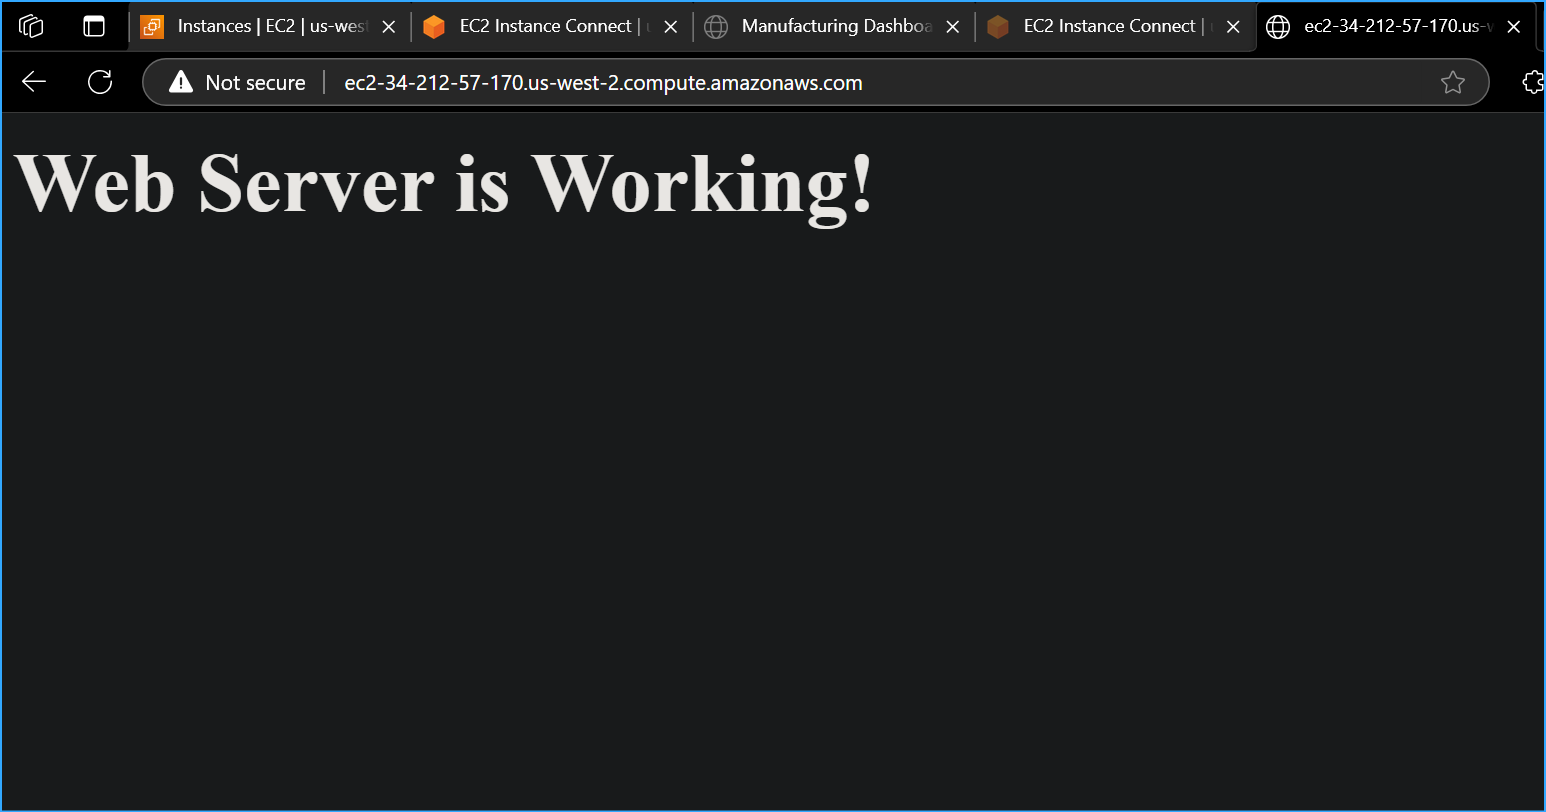
Step 4: Verifying External Access
-
I returned to my browser and refreshed the page with the instance's
public DNS
-
The page loaded successfully, displaying "Web Server is Working!"
-
I confirmed that both the security group allowing HTTP traffic and the
web server itself were now properly configured
Step 5: Additional Investigation
-
While troubleshooting, I also examined the Network ACL settings
(acl-0b4207457e8c15c4e)
- I noted its configuration with both allow and deny rules
-
I determined that the Network ACL wasn't causing the issues, as the
security group rules were the primary problems that needed addressing
Conclusion: EC2 Deployment Method Lessons
Through this comprehensive experience, I learned when to use different
EC2 deployment methods:
-
Management Console Deployment: Best for quickly
launching one-off or temporary instances when I need something set up
manually and visually.
-
Script/CLI Deployment: Ideal for automating instance
creation in a repeatable, reliable manner, especially when I need to
provision multiple similar instances or incorporate instance creation
into larger automation workflows.
-
CloudFormation Deployment: The preferred approach
when I need to launch related resources together as part of a complete
infrastructure stack, ensuring all components are deployed
consistently.
The hands-on experience of both launching and troubleshooting EC2
instances gave me practical skills that will help me manage AWS
infrastructure more effectively in production environments.
Note: If the EC2 Instance Connect session disconnects, it will lose the
information stored in the environment variables. You would need to refresh
the browser to reconnect and re-run all of the necessary steps to obtain
the AMI ID and other information.
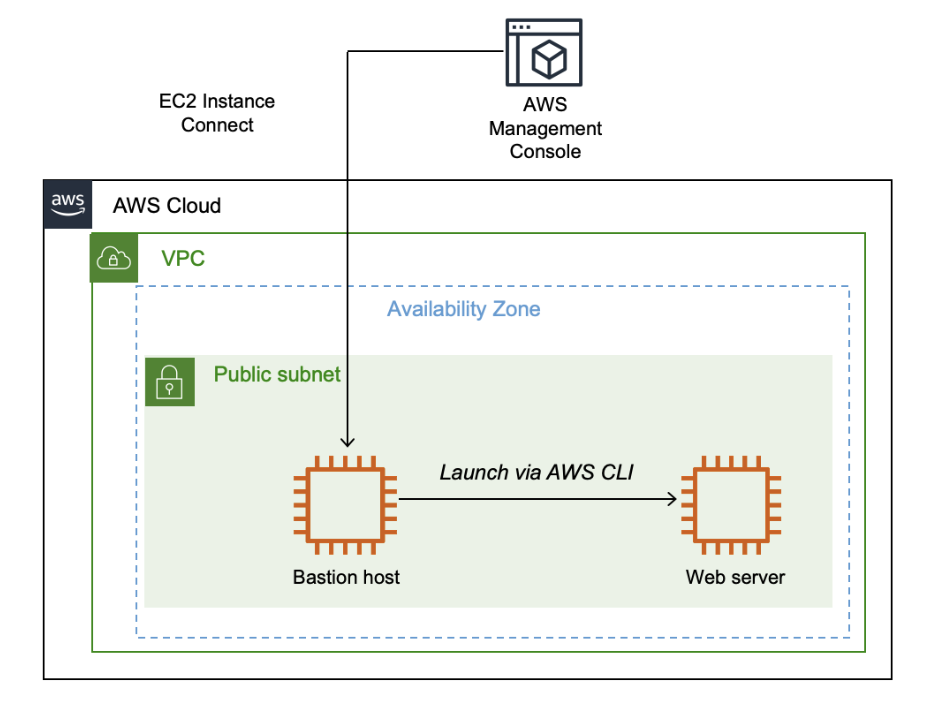 Final Architecture
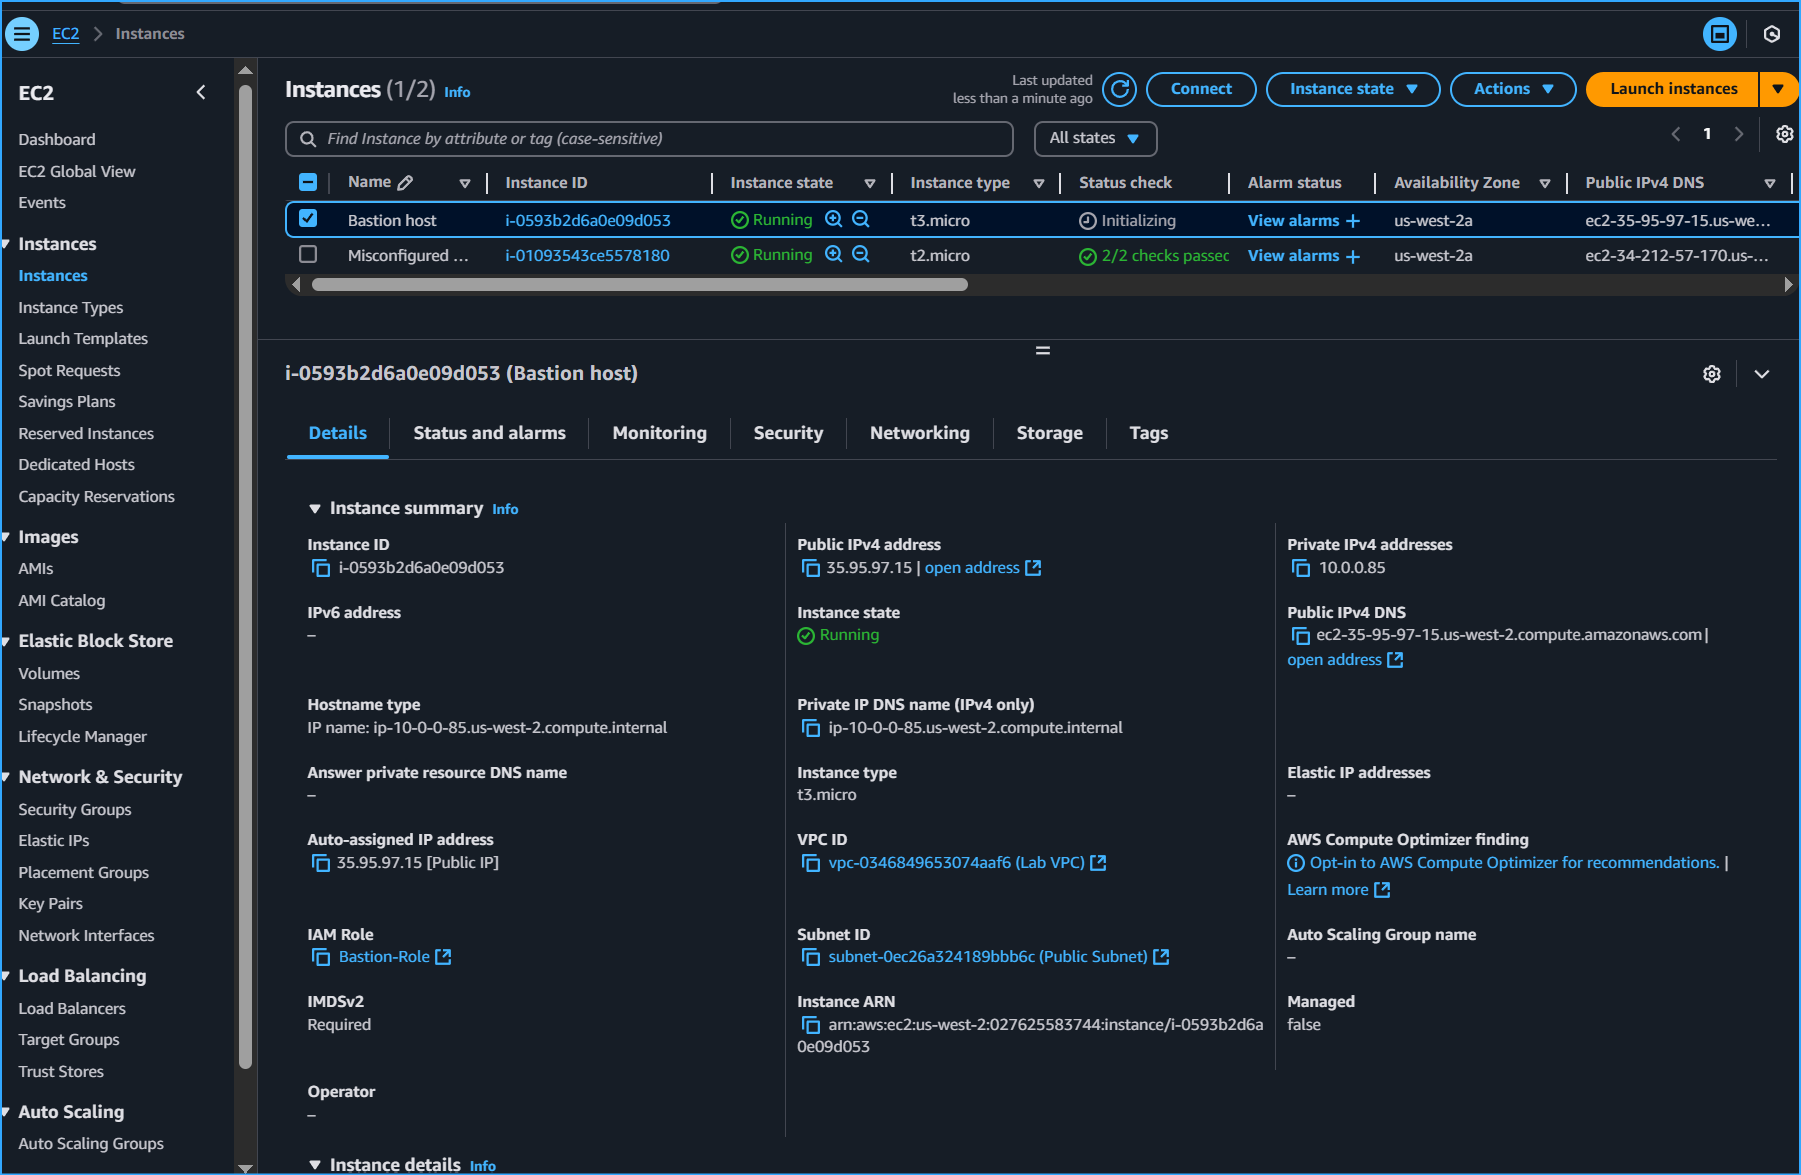 Created Bastion Host Instance
 Made Dir for AWS Credentials then Entered Values
 Ran Script for AMI ID Retrieval
 Ran Script for Subnet ID Retrieval
 Ran Script for Web Security ID Retrieval
 Downloaded User Data Script
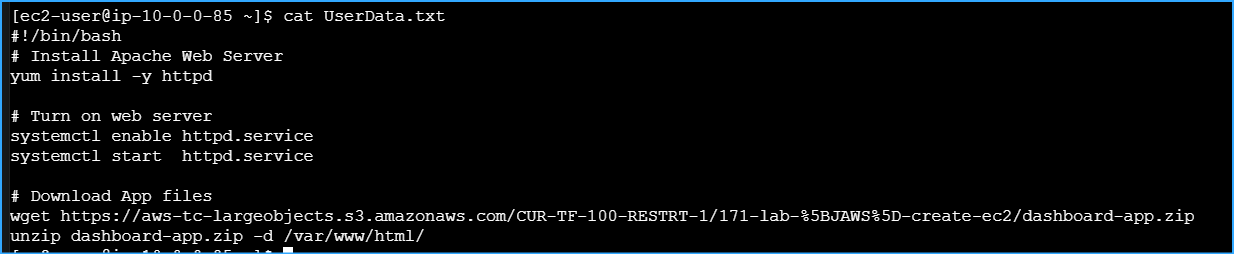 Viewed Contents of User Data Script
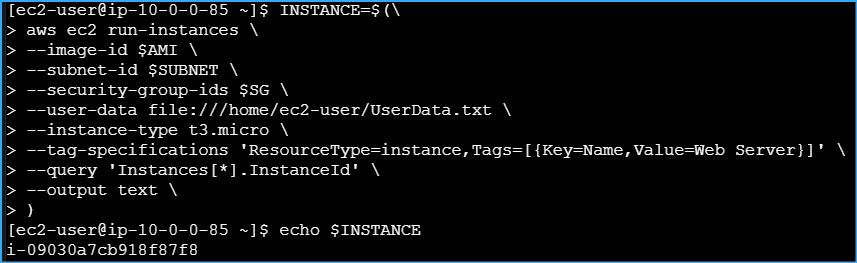 Launched New Instance Using These Parameters
 Monitored Status of Instance with This CMD
 Retrieved Specific Info By Using Query Parameter
 Ran This CMD to Retrieve Public IPv4 DNS Name of Instance
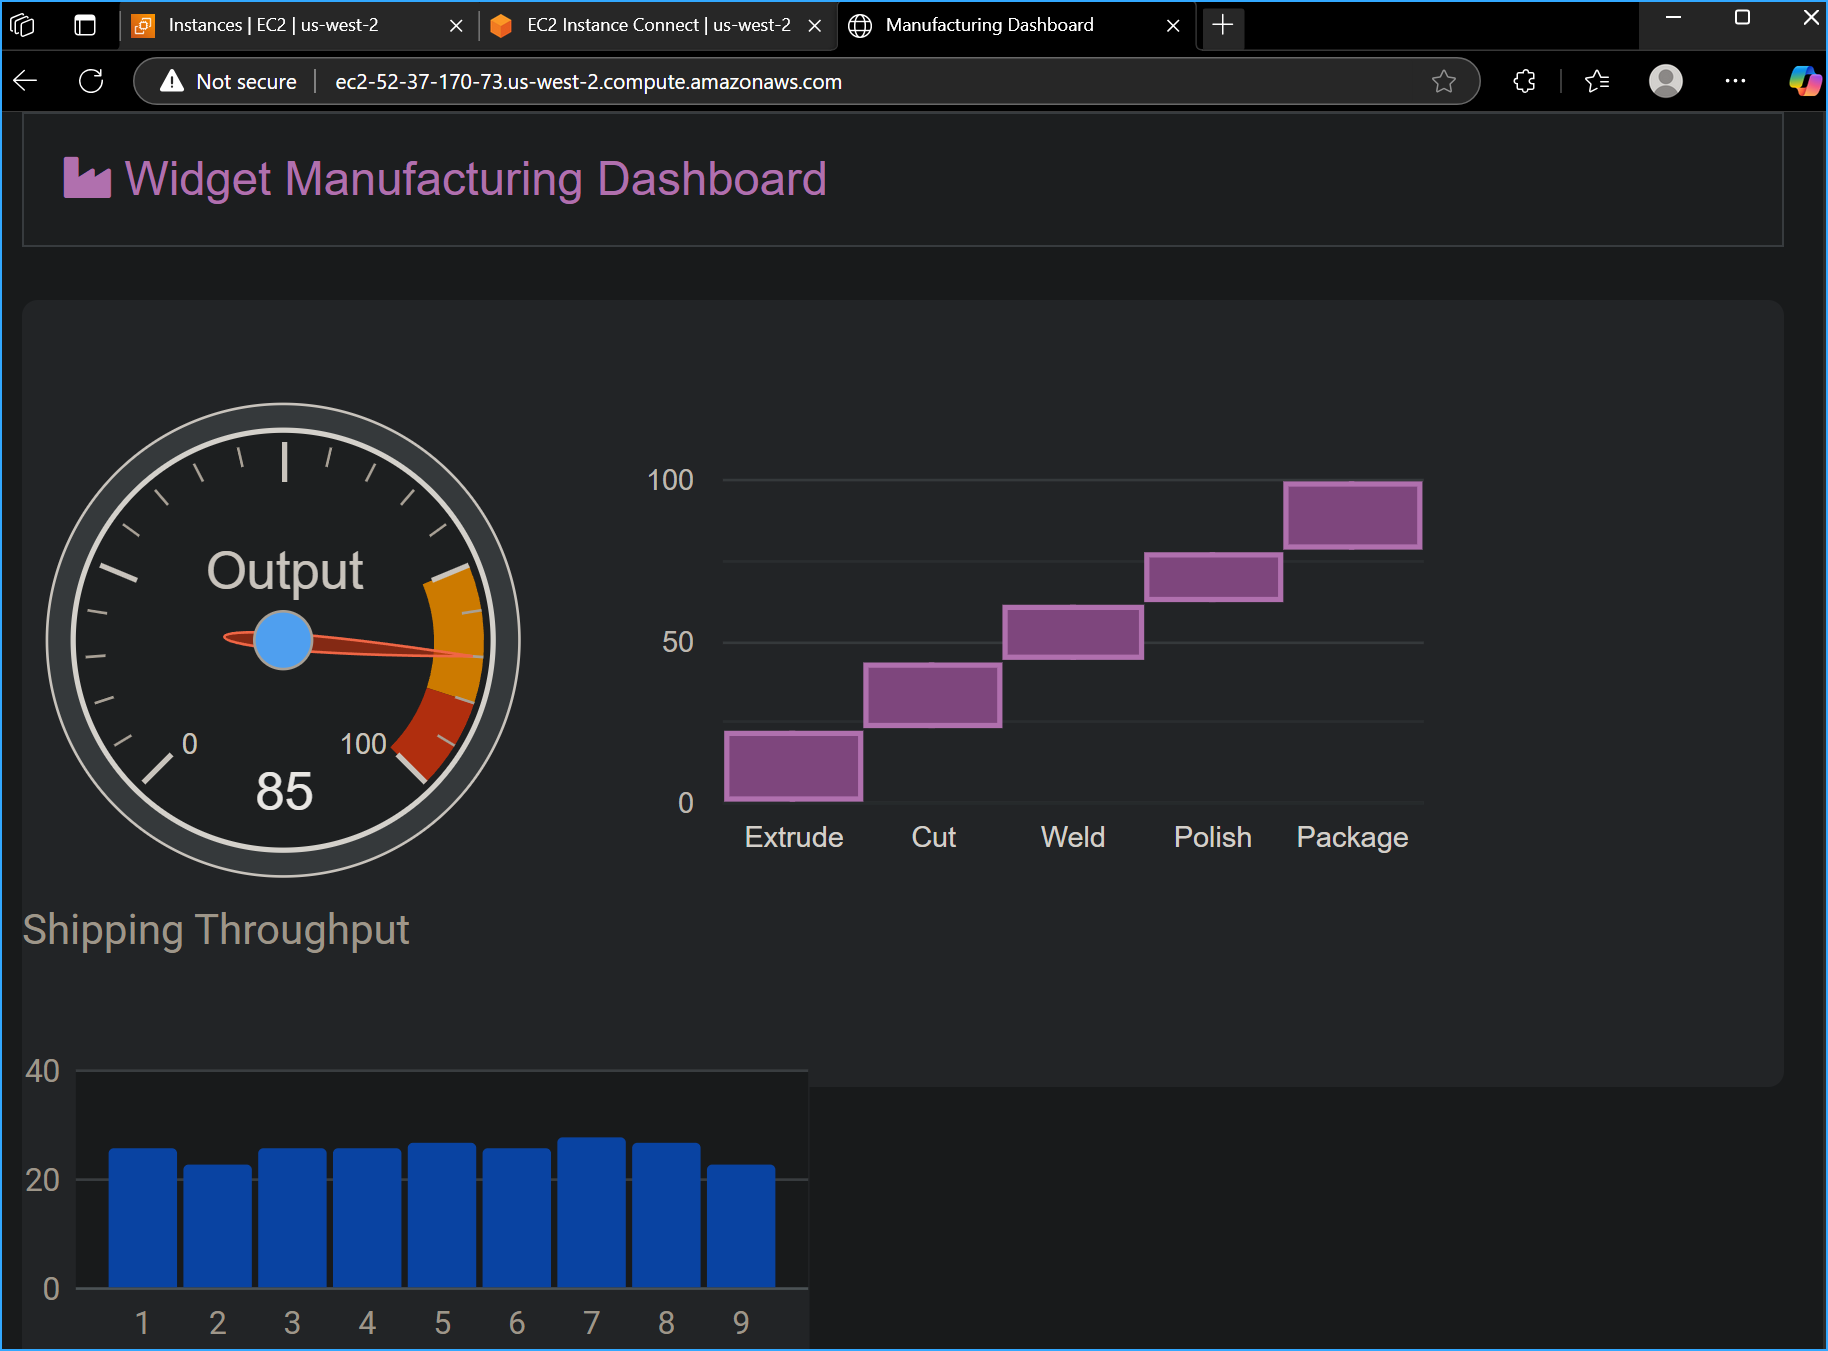 Verified Website Works When Entered in Web Browser
 Connection to Misconfigured Web Server Failed
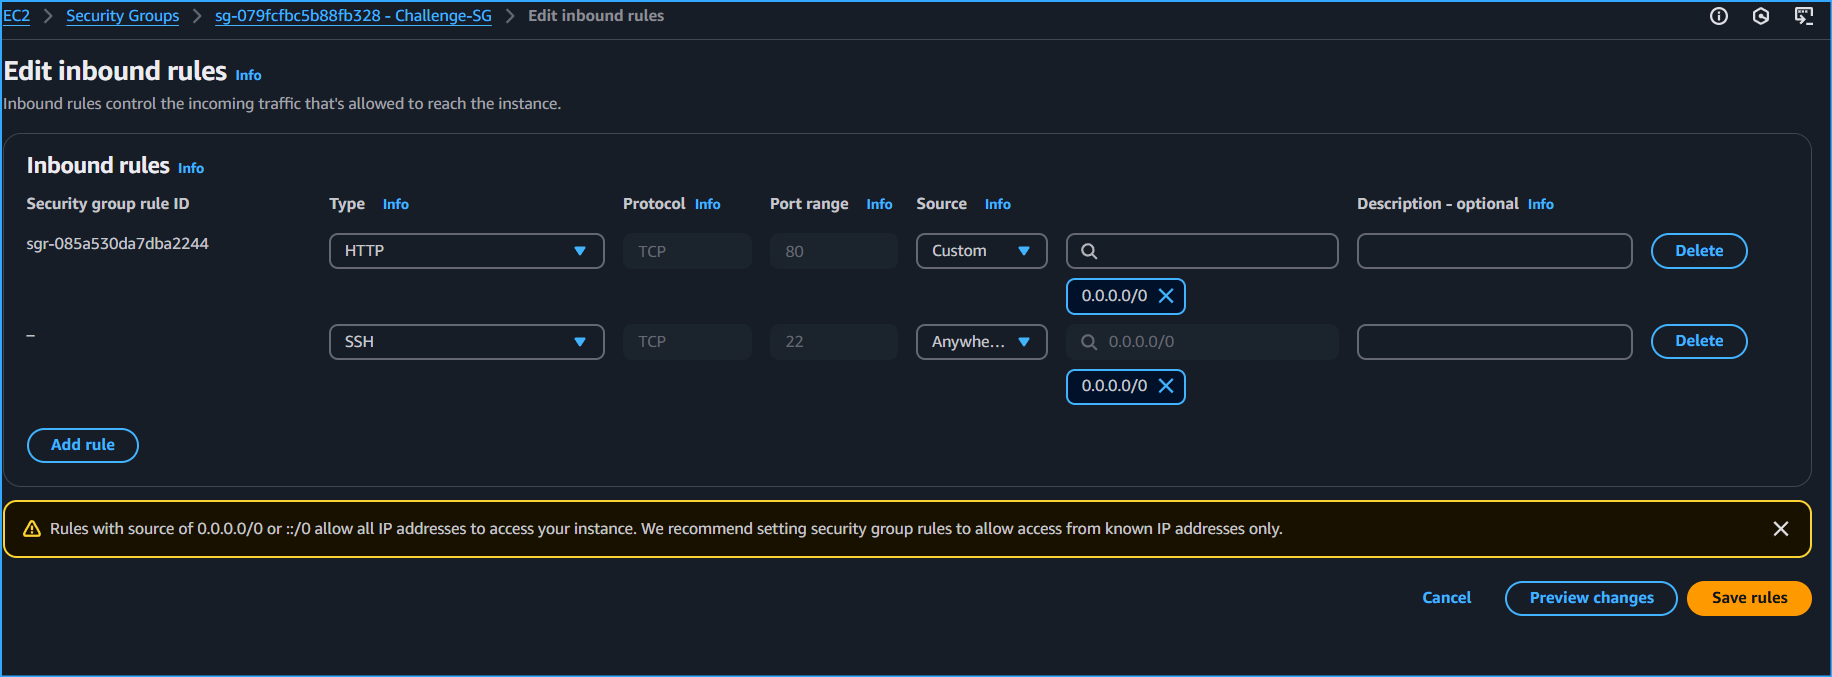 Added SSH to Inbound Rules
 After Adding SSH to Inbound Rules
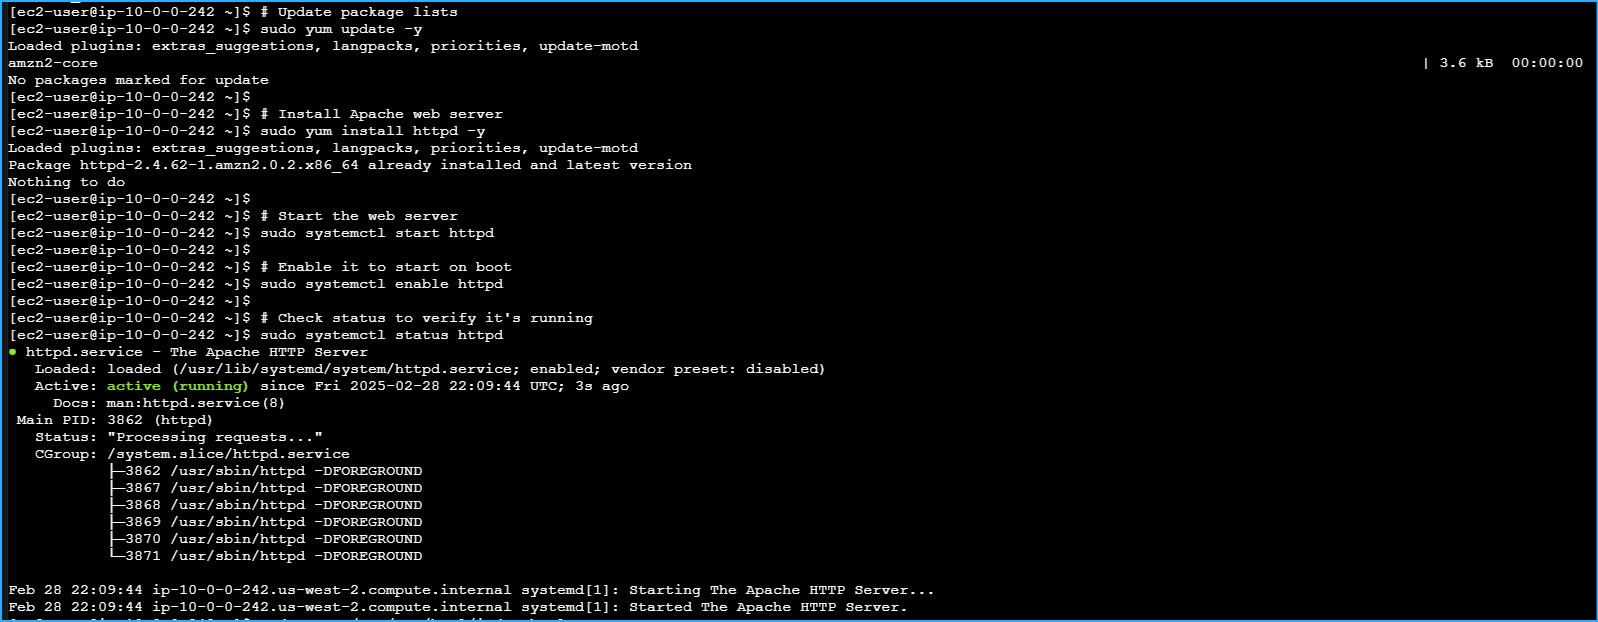 Installed Apache Web Server
 Created Test Page Index File
 Entered Public IPv4 of Web Server