Using AWS Systems Manager
Project Overview
Today I completed a comprehensive project focused on AWS Systems
Manager, which is a collection of capabilities for centralizing
operational data and automating tasks across AWS resources. Systems
Manager can configure and manage EC2 instances, on-premises servers,
virtual machines, and other AWS resources at scale. I achieved all the
objectives, which included verifying configurations and permissions,
running tasks on multiple servers, updating application settings or
configurations, and accessing the command line on an instance.
Task 1: Generating Inventory Lists for Managed Instances
I started by using Fleet Manager, a capability of Systems Manager, to
collect operating system information, application information, and
metadata from my EC2 instances. This feature allows me to query metadata
to quickly understand which instances are running the software and
configurations required by software policy and which instances need
updating.
Here's exactly what I did:
-
In the AWS Management Console, I entered "Systems Manager" in the
search box and pressed Enter, which took me to the Systems Manager
console page.
-
In the left navigation pane, under Node Management, I selected
Fleet Manager.
-
I clicked on the Account management dropdown list and chose
"Set up inventory."
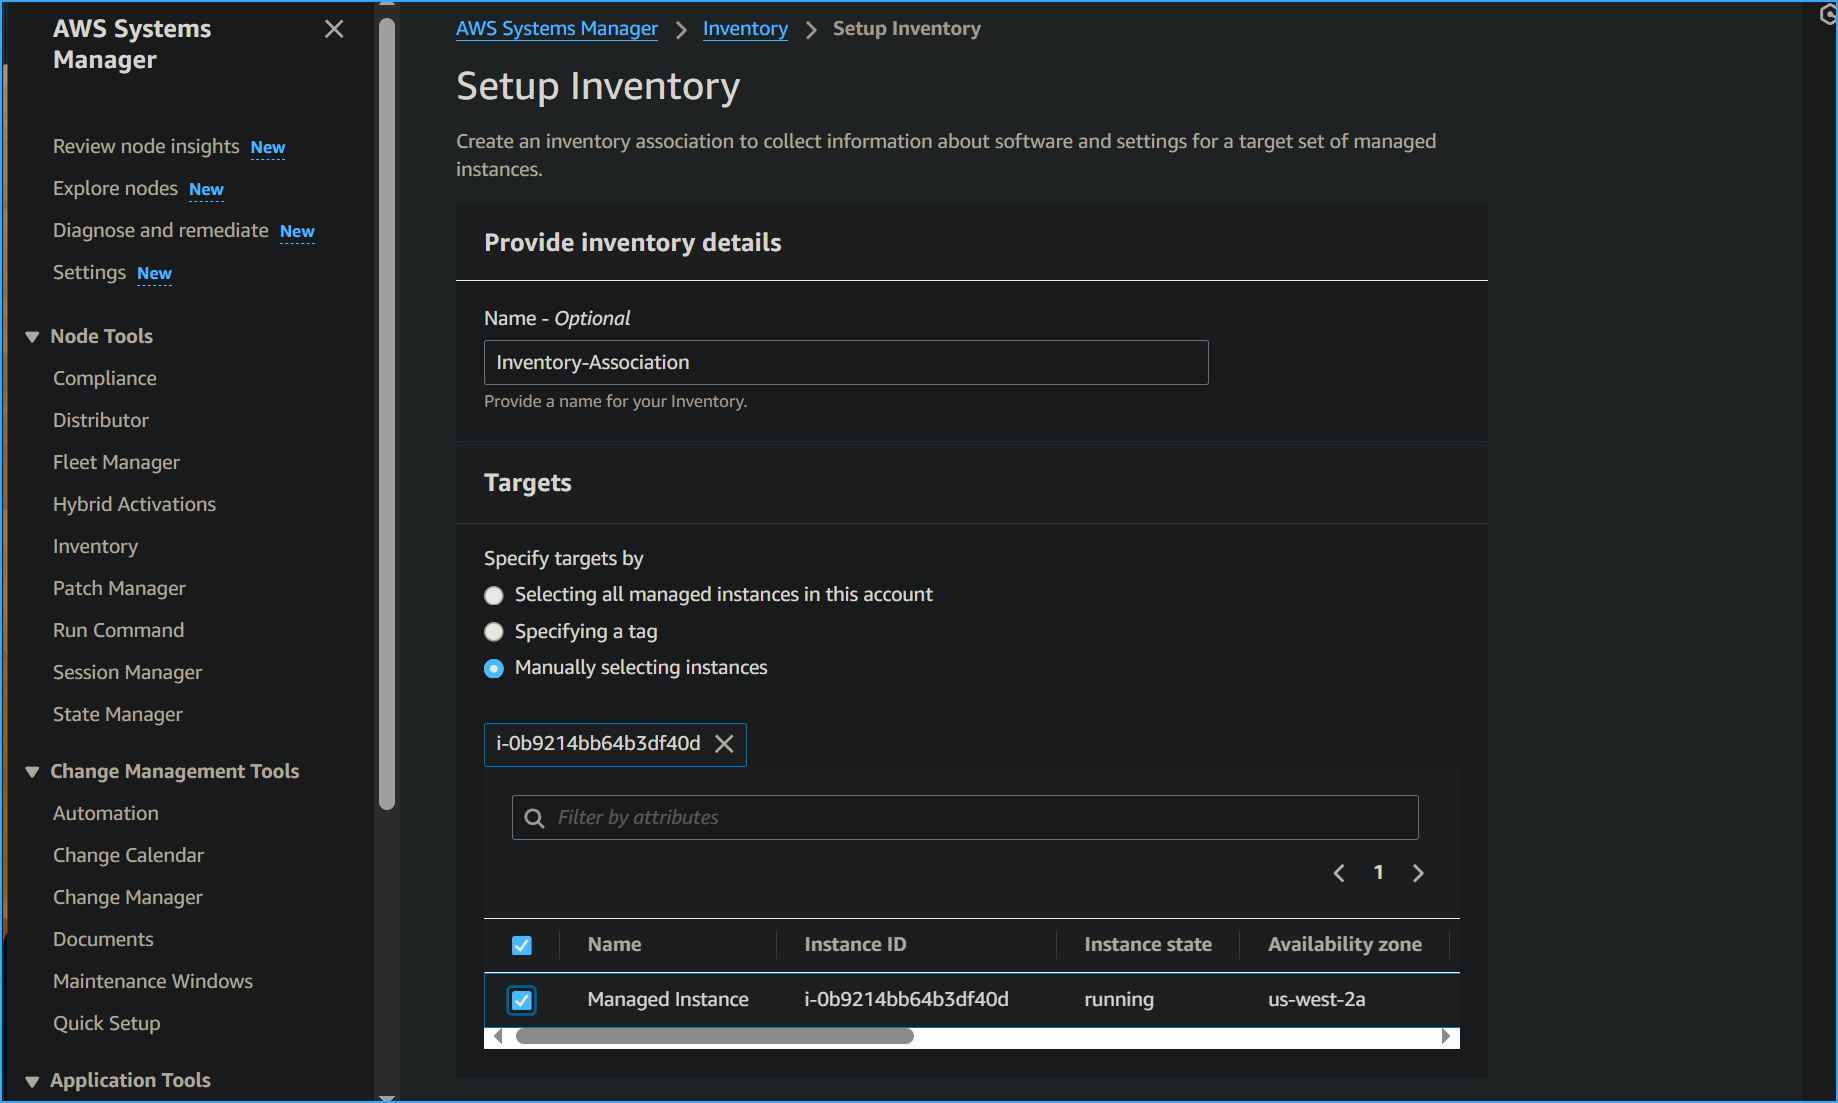
-
To create an association that collects information about software and
settings for my managed instance, I configured the following:
-
In the Provide inventory details section, for Name, I entered
Inventory-Association
-
In the Targets section, I selected
Manually selecting instances for
the "Specify targets by" option
- I selected the row for Managed Instance
- I left all other options as default settings
- I clicked "Setup Inventory"
After completing these steps, a banner with the message "Setup inventory
request succeeded" appeared on the Fleet Manager page. The Inventory
capability of Systems Manager began regularly inventorying the instance
for the selected properties.
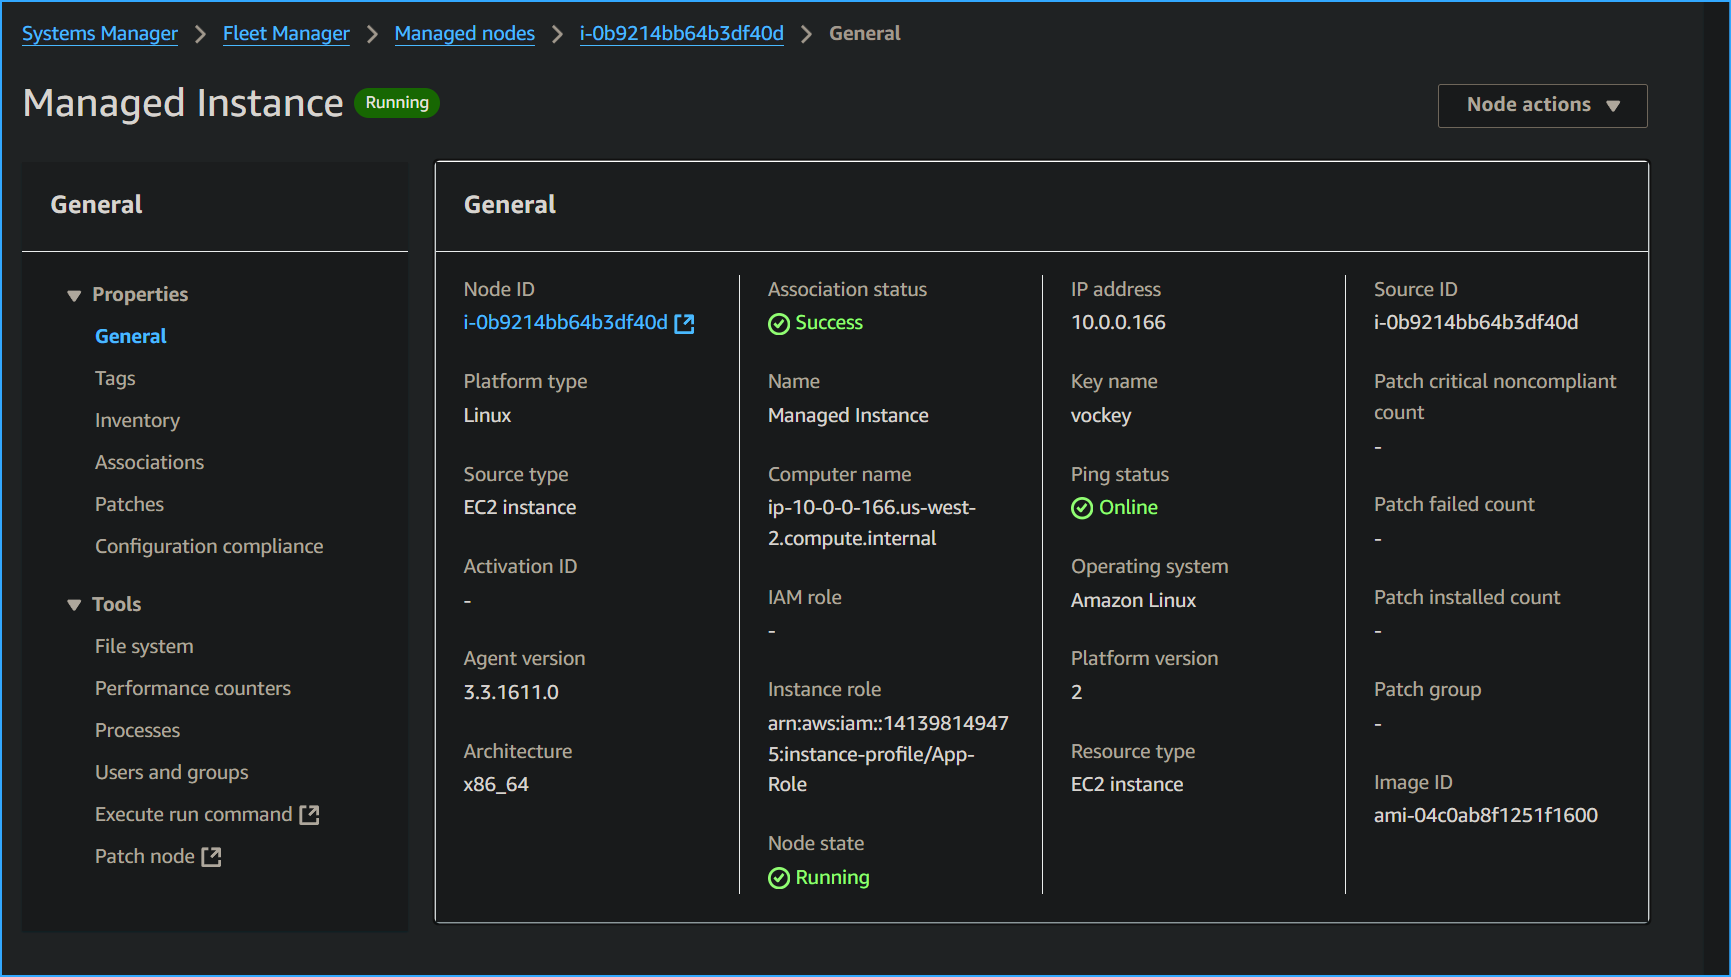
-
I then clicked on the Node ID link, which directed me
to the Node overview.
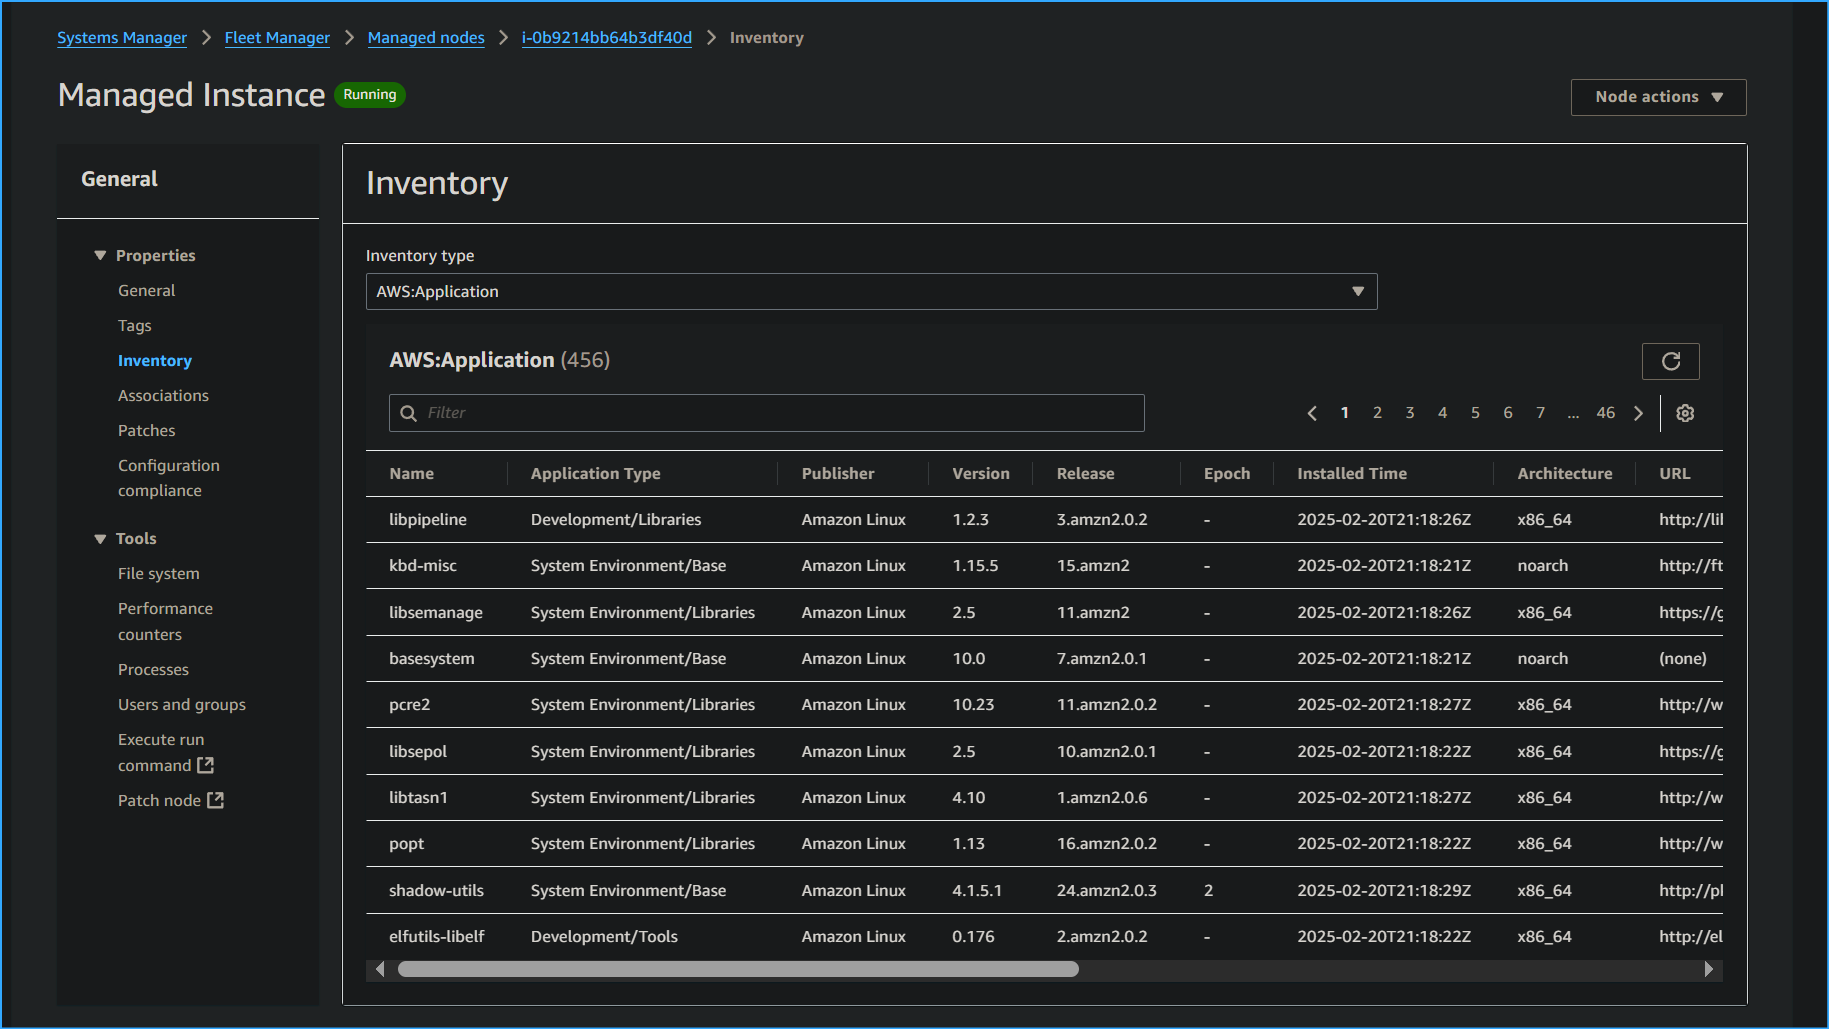
- Next, I selected the Inventory tab.
This tab listed all applications installed on the instance. I took some
time to review the installed applications and explore other options in
the Inventory type dropdown list.
I successfully created a Systems Manager inventory association for my
instance. Using Inventory, I was able to review and validate software
configurations on my instances without needing to connect to each
instance via SSH, which was quite convenient.
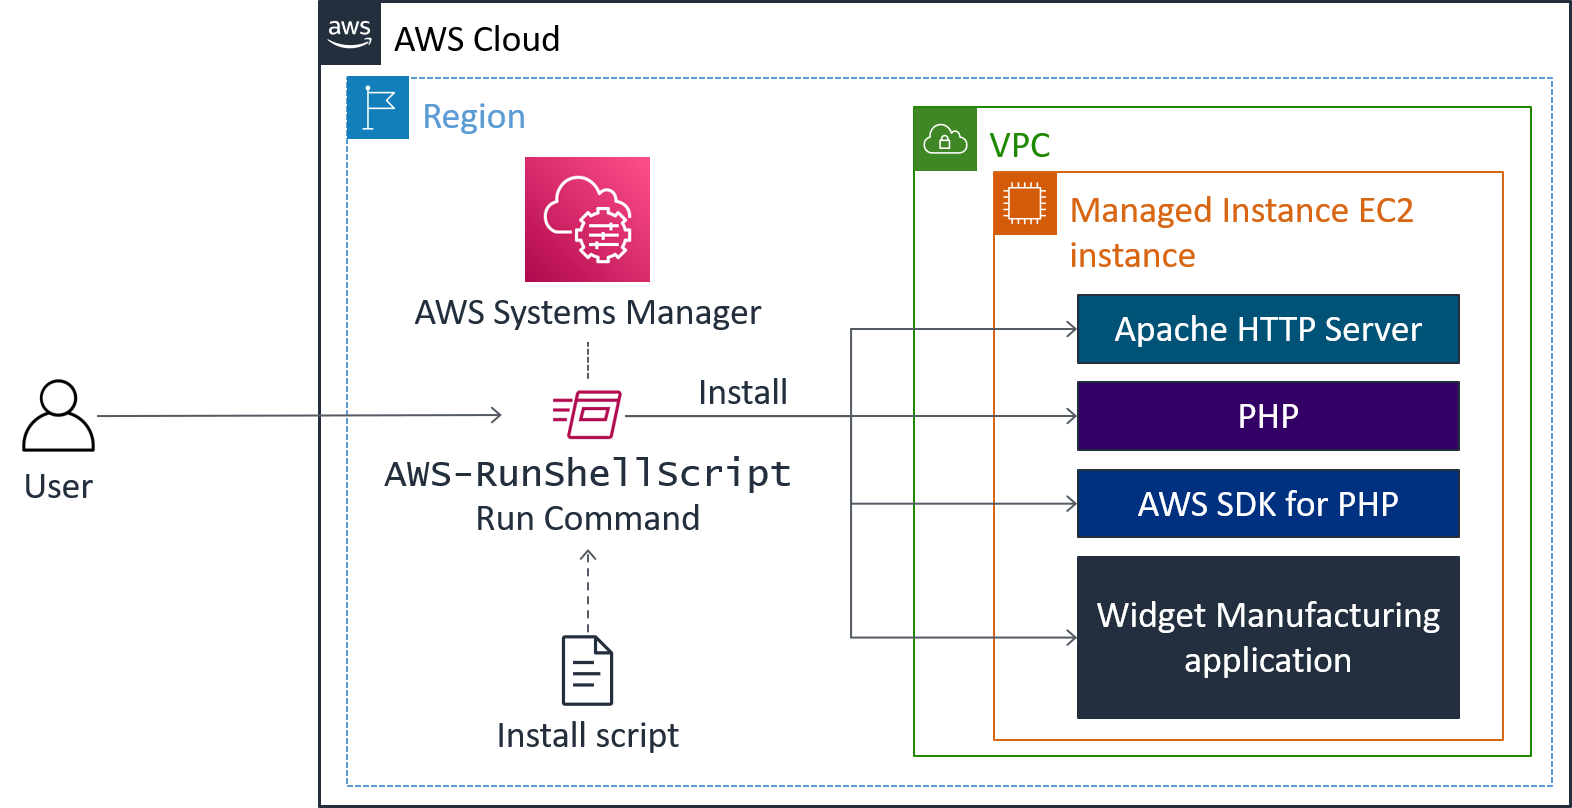
Task 2: Installing a Custom Application using Run Command
For this task, I installed a custom web application (Widget Manufacturing Dashboard) using Run Command, another capability of Systems Manager.
The process involved Systems Manager installing an application on an EC2
instance within a VPC using Run Command. The command ran an "install
script" and installed the following: Apache web server, PHP, AWS SDK,
and the web application. Once everything was installed, it also started
the web server.
Here's how I did it:
-
In the upper-left corner, I expanded the menu icon. Under
Node Management, I selected
Run Command.
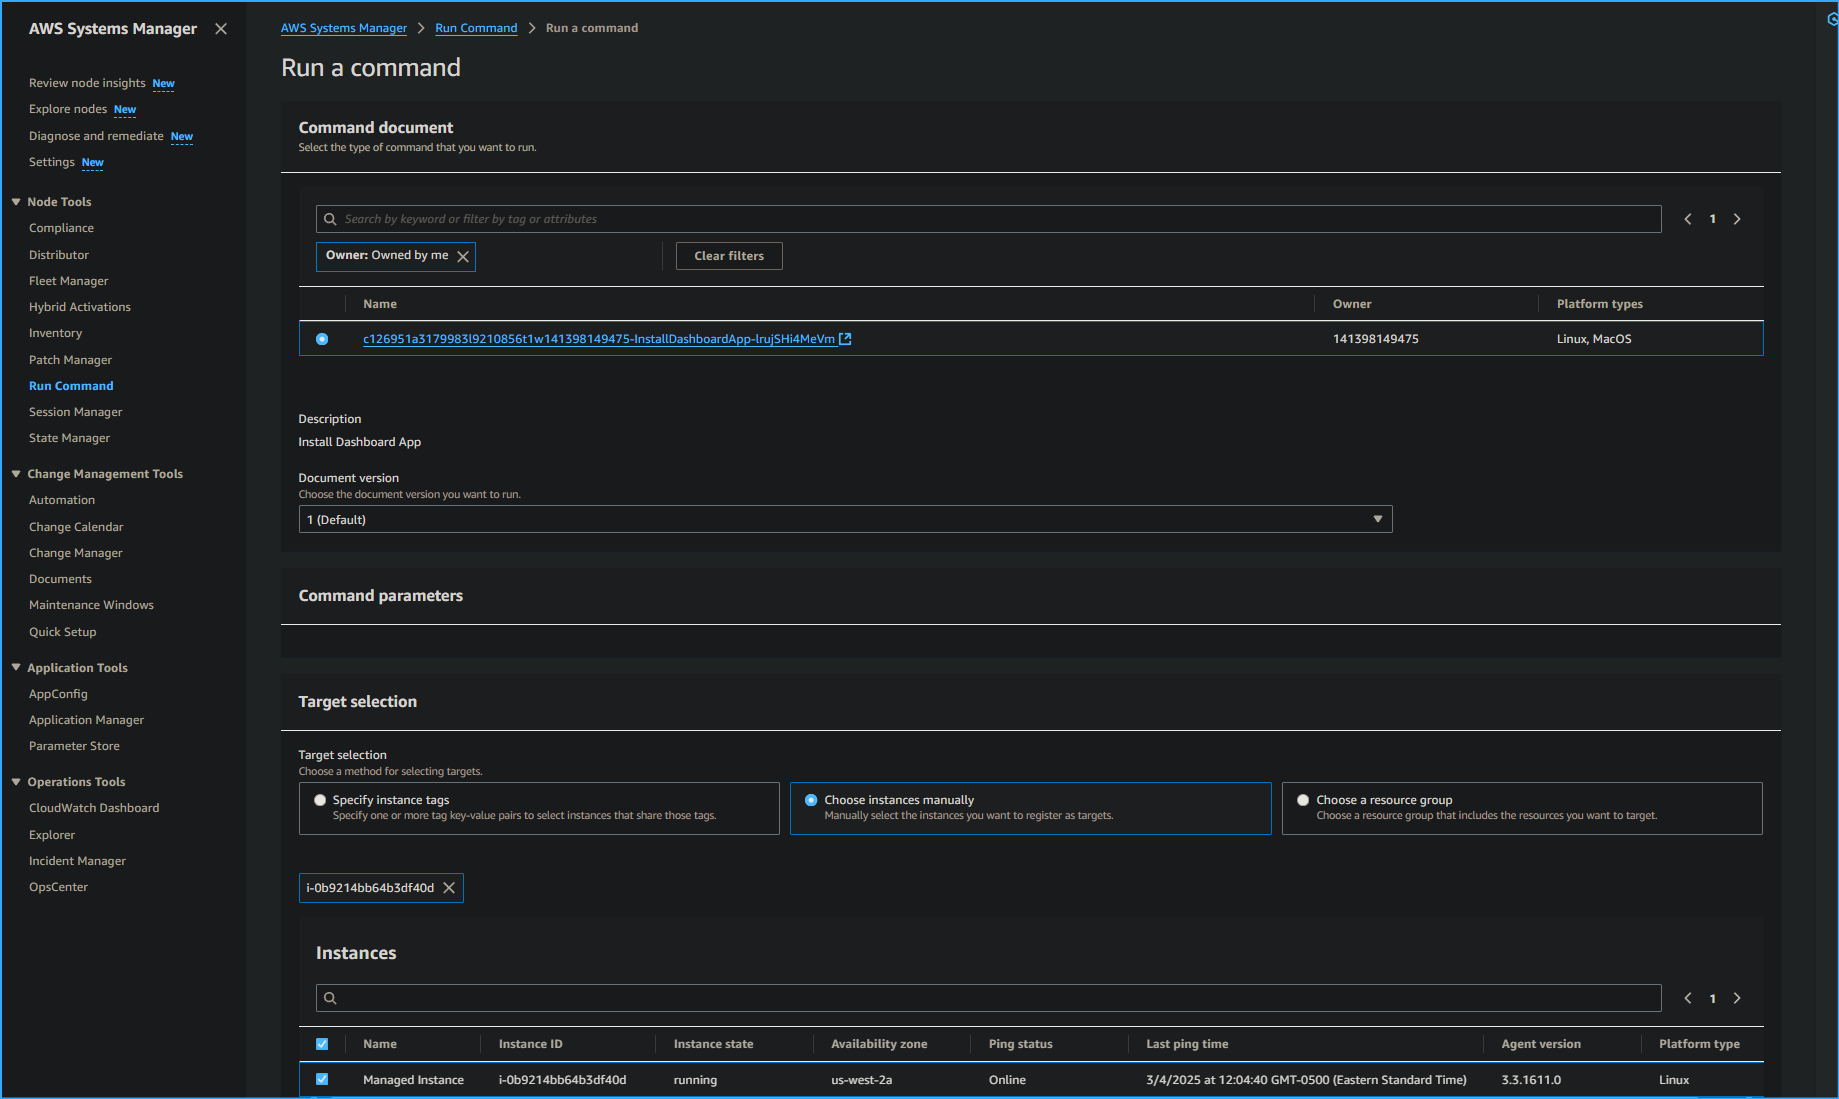
- I clicked "Run command"
-
From the list of pre-configured documents for running common commands,
I clicked the search icon in the box, and a dropdown box appeared. I
selected the following options:
-
A document appeared with the following information:
-
Description:
Install Dashboard App
-
Document version: 1 (Default)
I left the Document version option set to this default.
-
For Target selection, I selected
"Choose instances manually."
-
In the Instances section, I selected
Managed Instance.
The Managed Instance had the Systems Manager agent installed. The agent
had registered the instance to the service, which allowed it to be
selected for Run Command. I also realized it's possible to identify
target instances using tags, which allows running a single command on a
whole fleet of matching instances.
-
In the Output options section, I cleared
"Enable an S3 bucket."
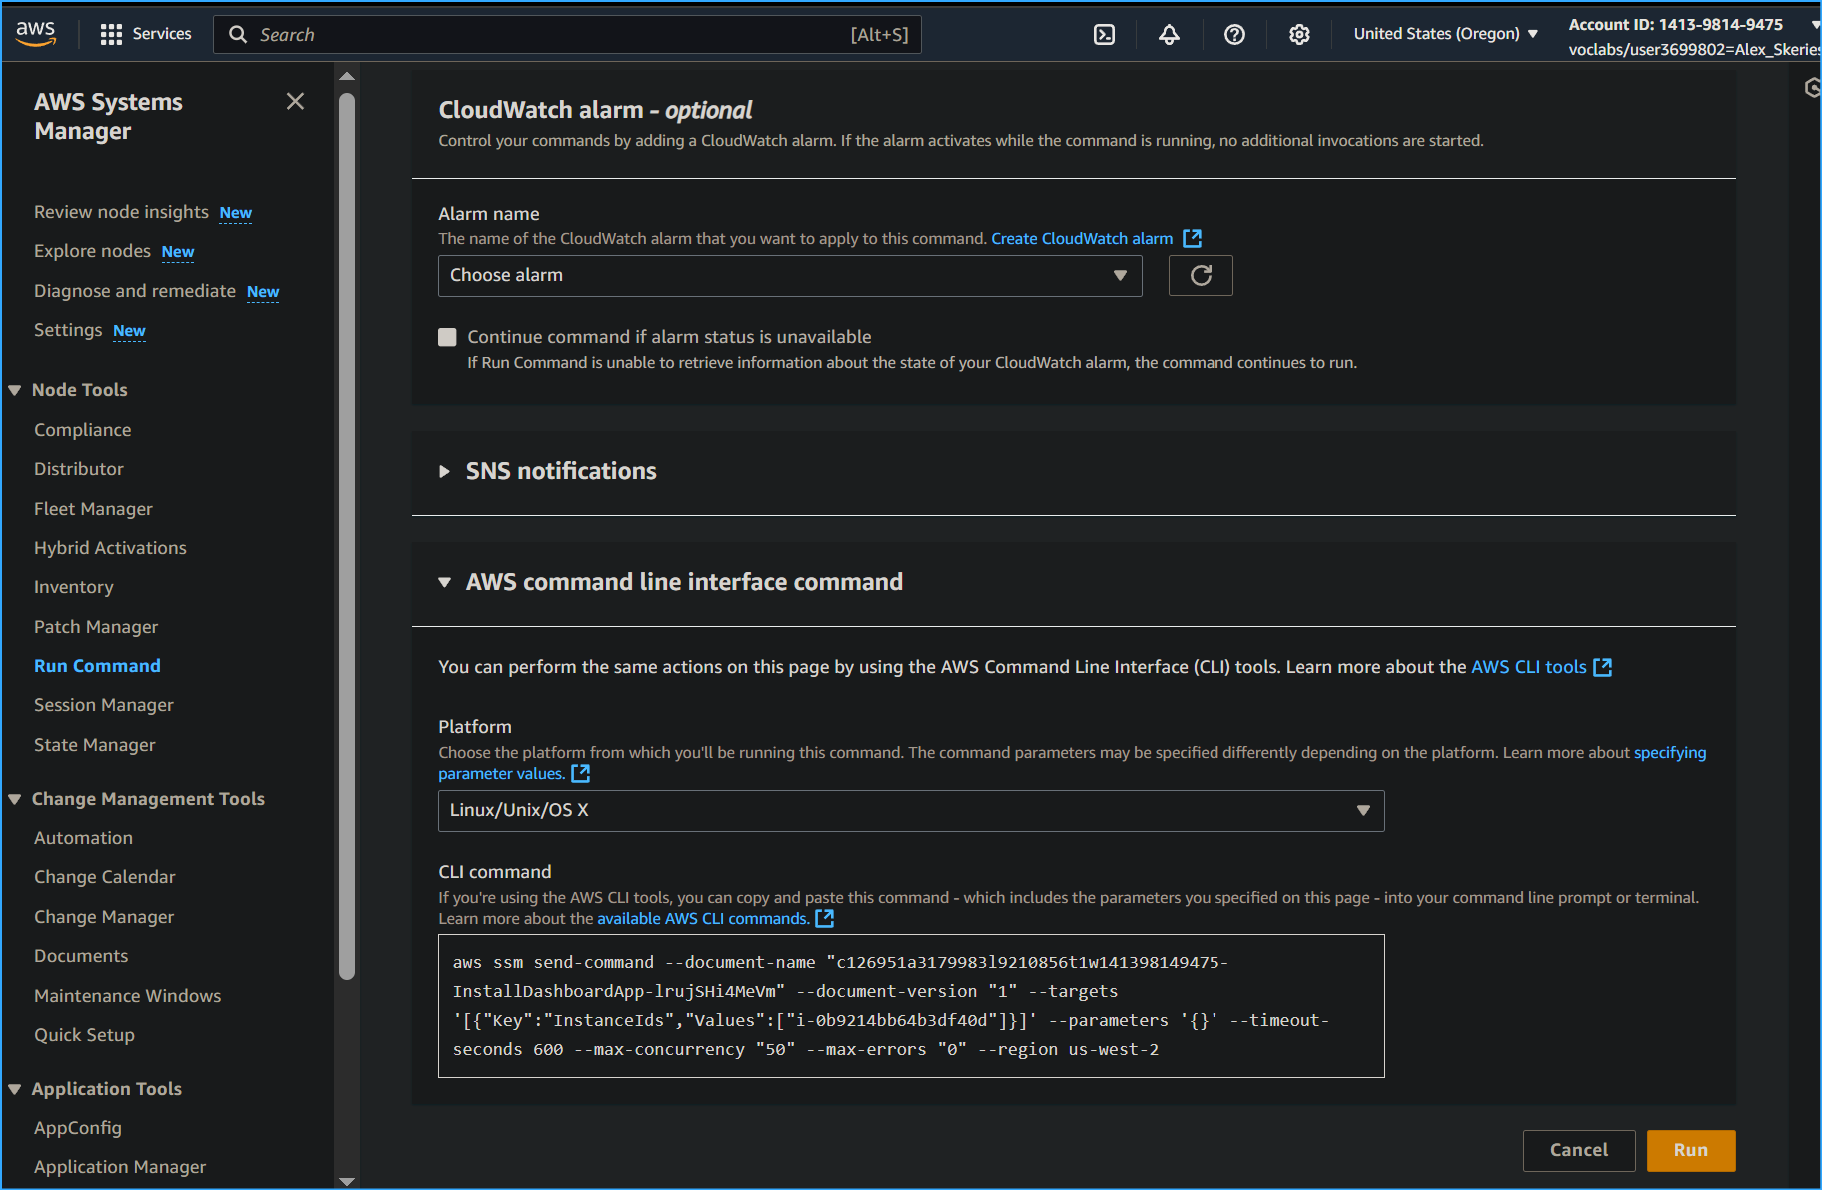
-
I expanded the
AWS command line interface command section.
This section displayed the CLI command that initiates Run Command. I
could potentially copy this command and use it in the future within a
script rather than having to use the AWS Management Console.
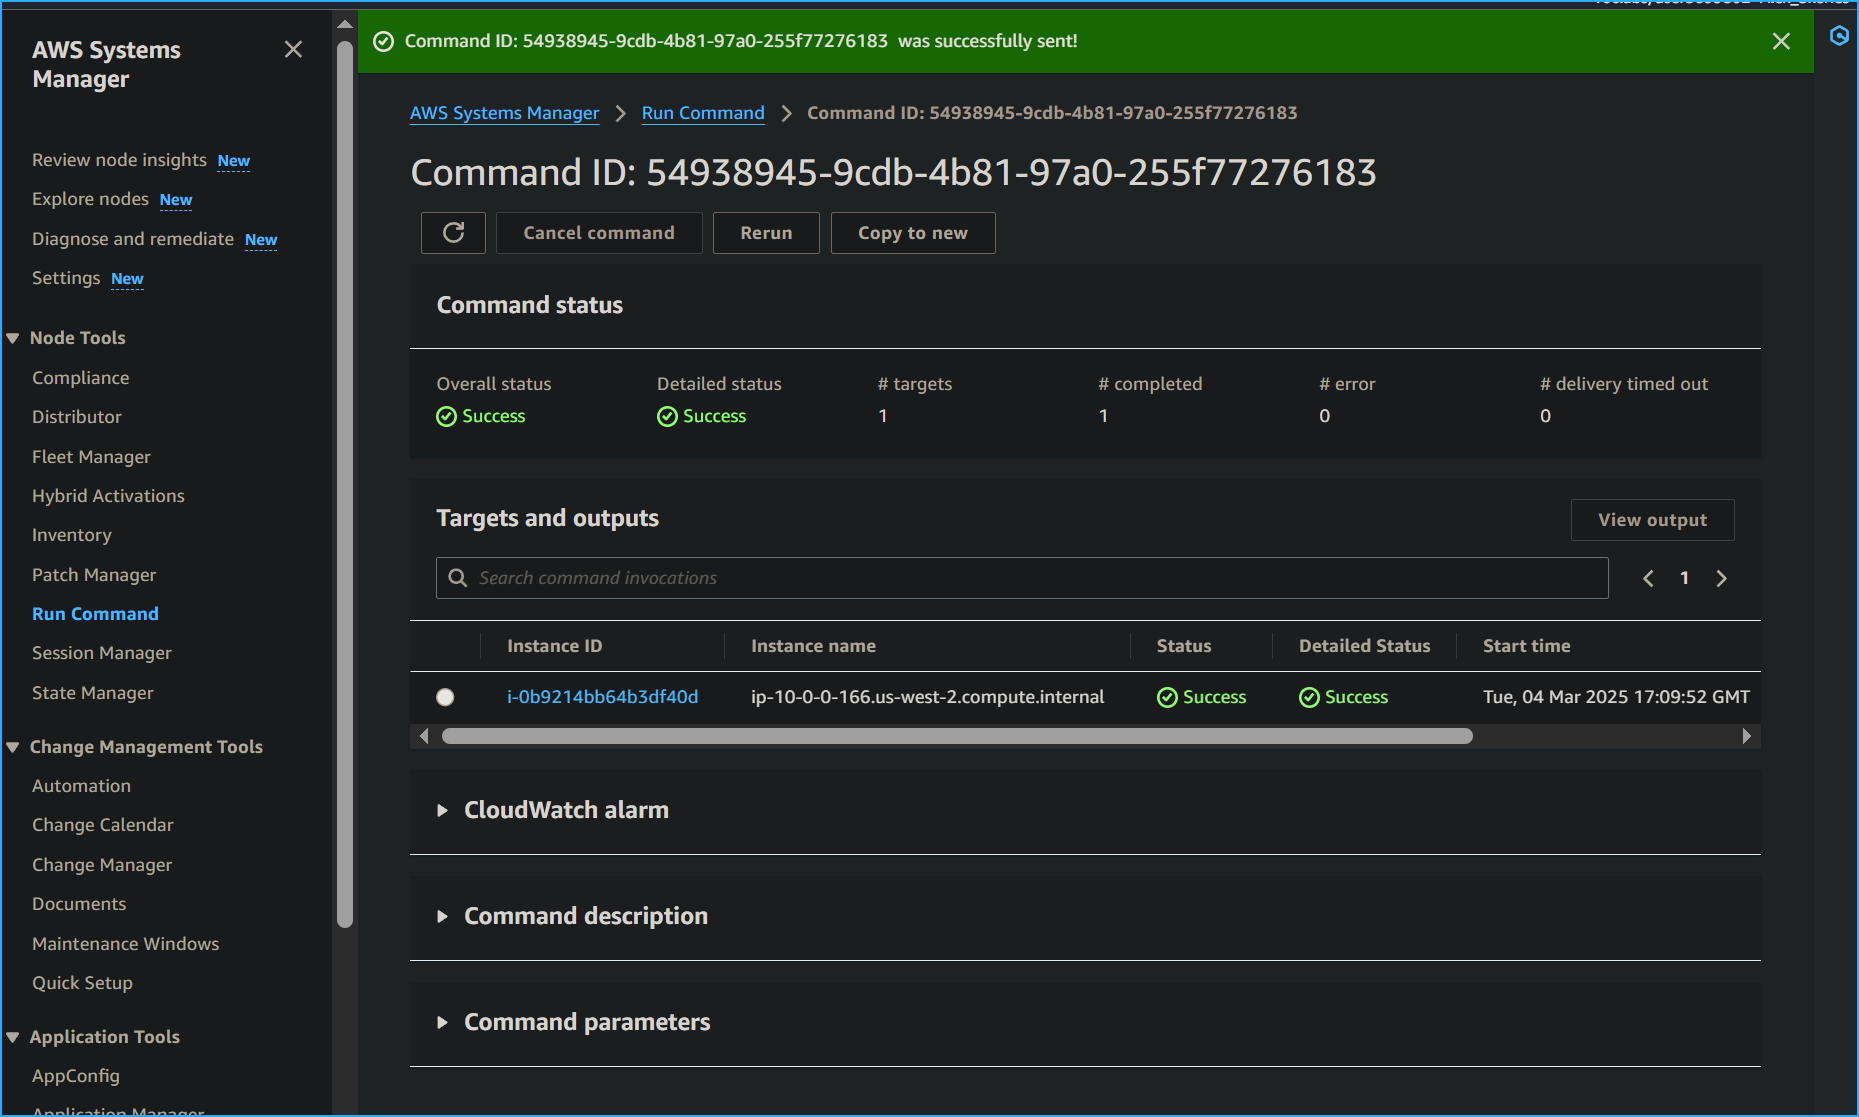
A banner with the Command ID appeared, indicating that it was
successfully sent on the Command ID page.
-
After 1–2 minutes, the Overall status changed to
Success. (I had to click the refresh icon to update
the status.)
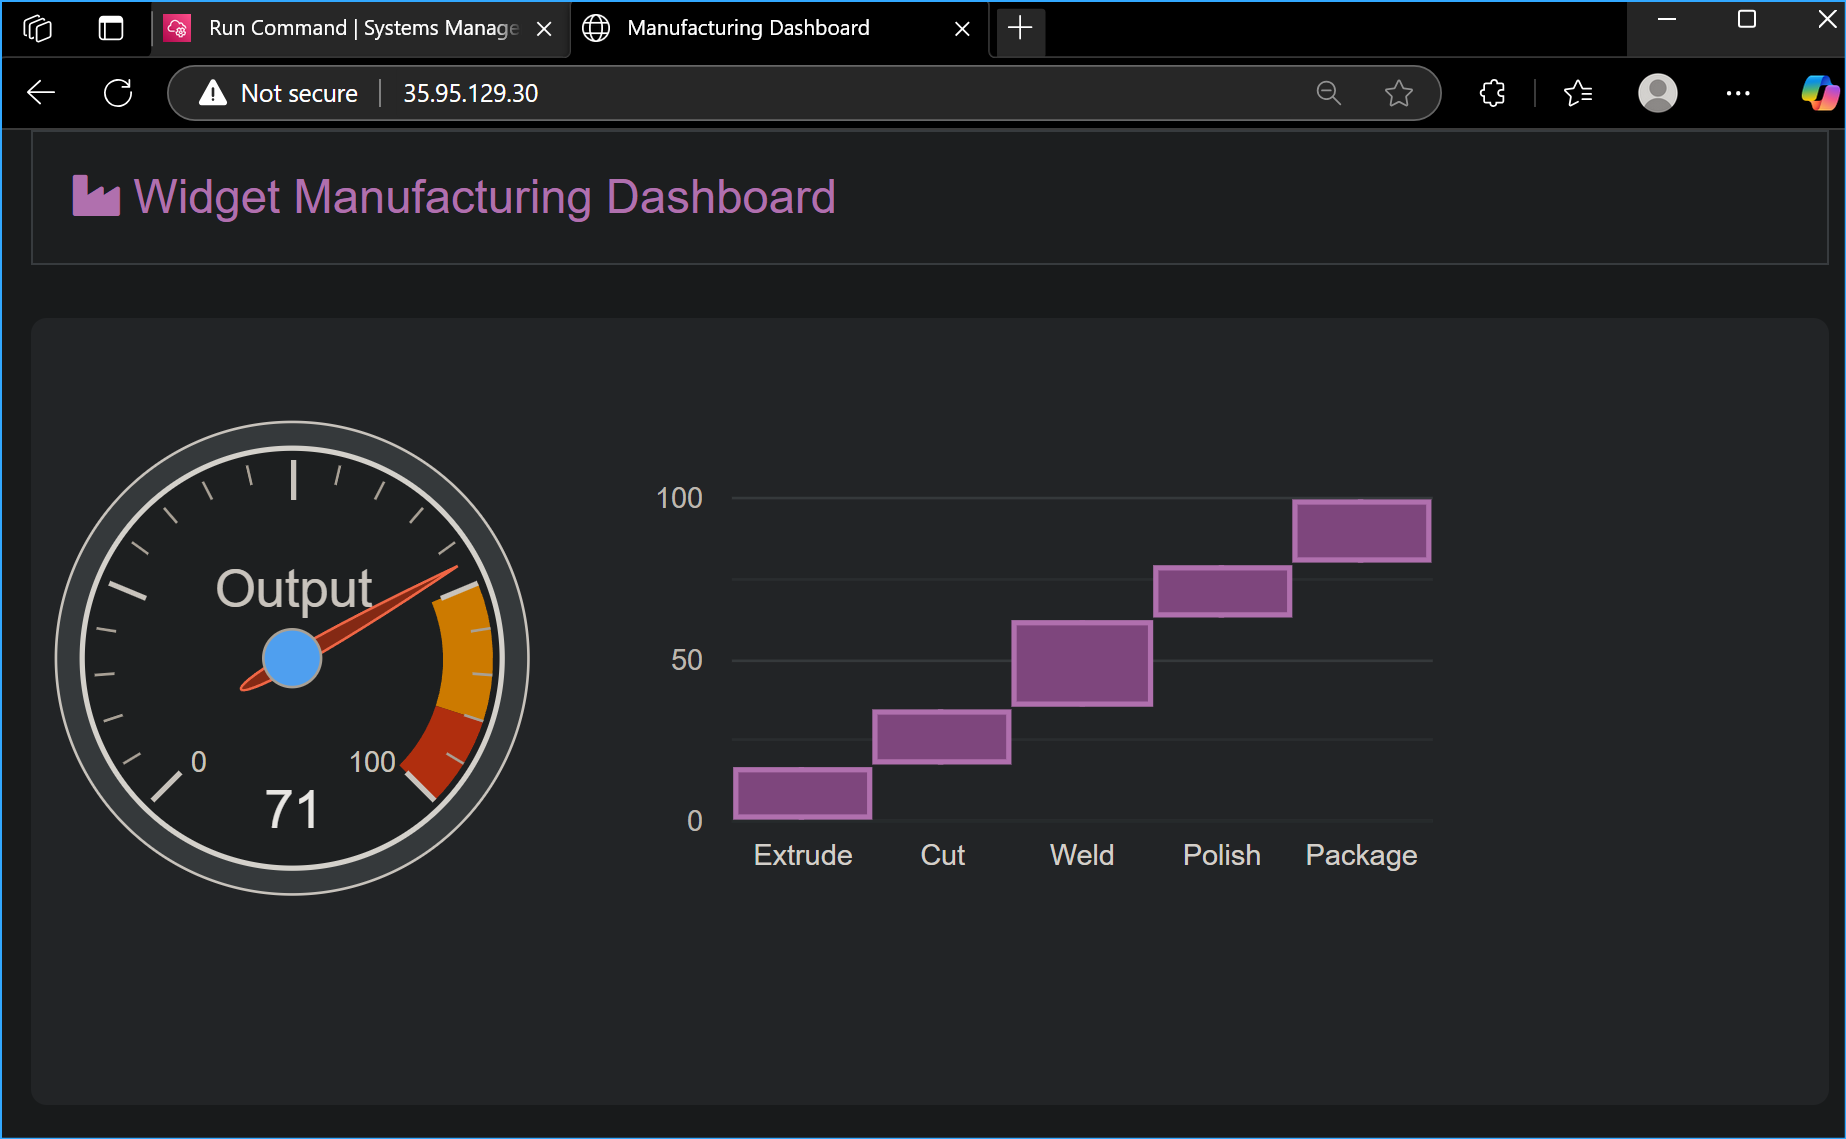
To validate the custom application installation:
-
In the Vocareum console, I clicked the
Details dropdown list at the top of the instructions,
chose Show, and copied the
ServerIP value (the public IP
address).
-
I opened a new web browser tab, pasted the IP address, and pressed
Enter.
The Widget Manufacturing Dashboard that I installed appeared, confirming
I had successfully used Run Command through Systems Manager to install a
custom application onto my instance without needing to remotely access
the instance via SSH.
Task 3: Using Parameter Store to Manage Application Settings
Parameter Store, another capability of Systems Manager, provides secure,
hierarchical storage for configuration data management and secrets
management. It can store data such as passwords, database strings, and
license codes as parameter values, either as plain text or encrypted
data. These values can then be referenced using the unique name
specified when creating the parameter.
For this task, I used Parameter Store to store a parameter that
activated a feature in my application:
-
I kept the Widget Manufacturing Dashboard browser tab open and
returned to the AWS Systems Manager tab.
-
In the left navigation pane, under
Application Management, I selected
Parameter Store.
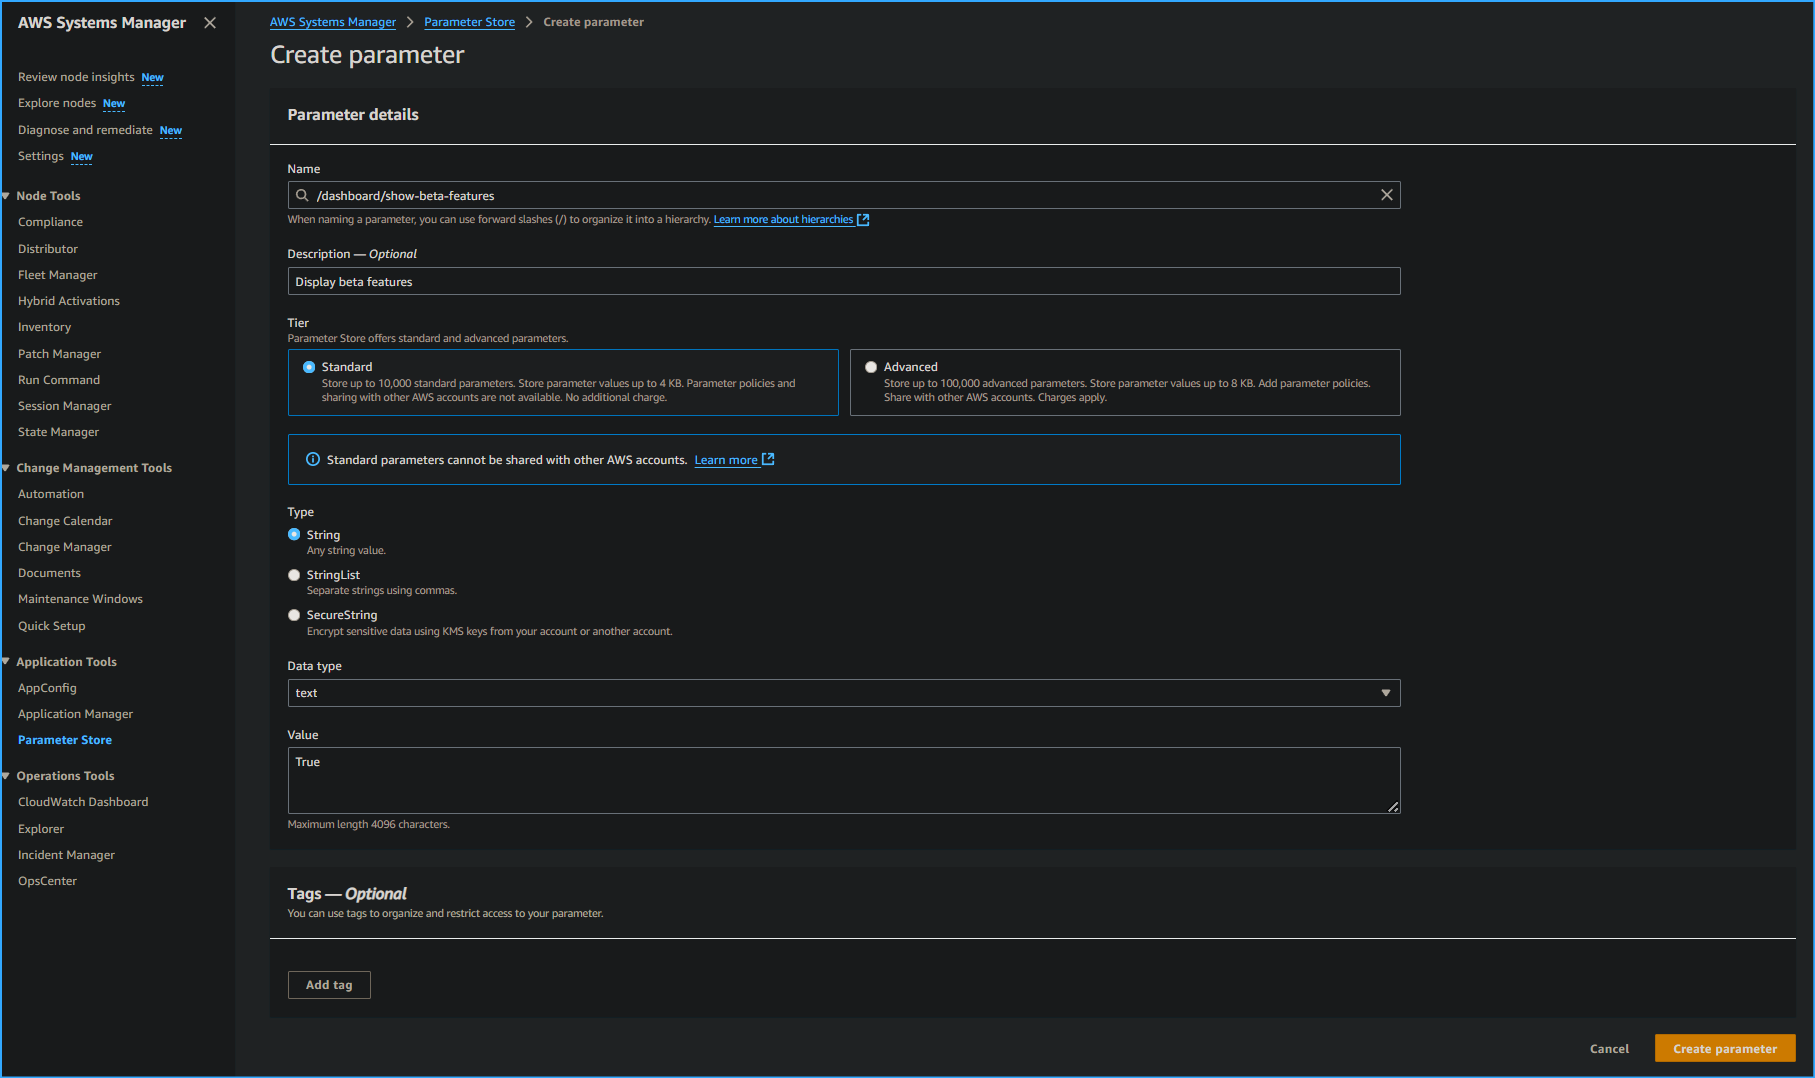
- I clicked "Create parameter"
-
I configured the following options:
-
For Name, I entered
/dashboard/show-beta-features
-
For Description, I entered
Display beta features
- For Tier, I left the default option
- For Type, I left the default option
- For Value, I entered True
- I clicked "Create parameter"
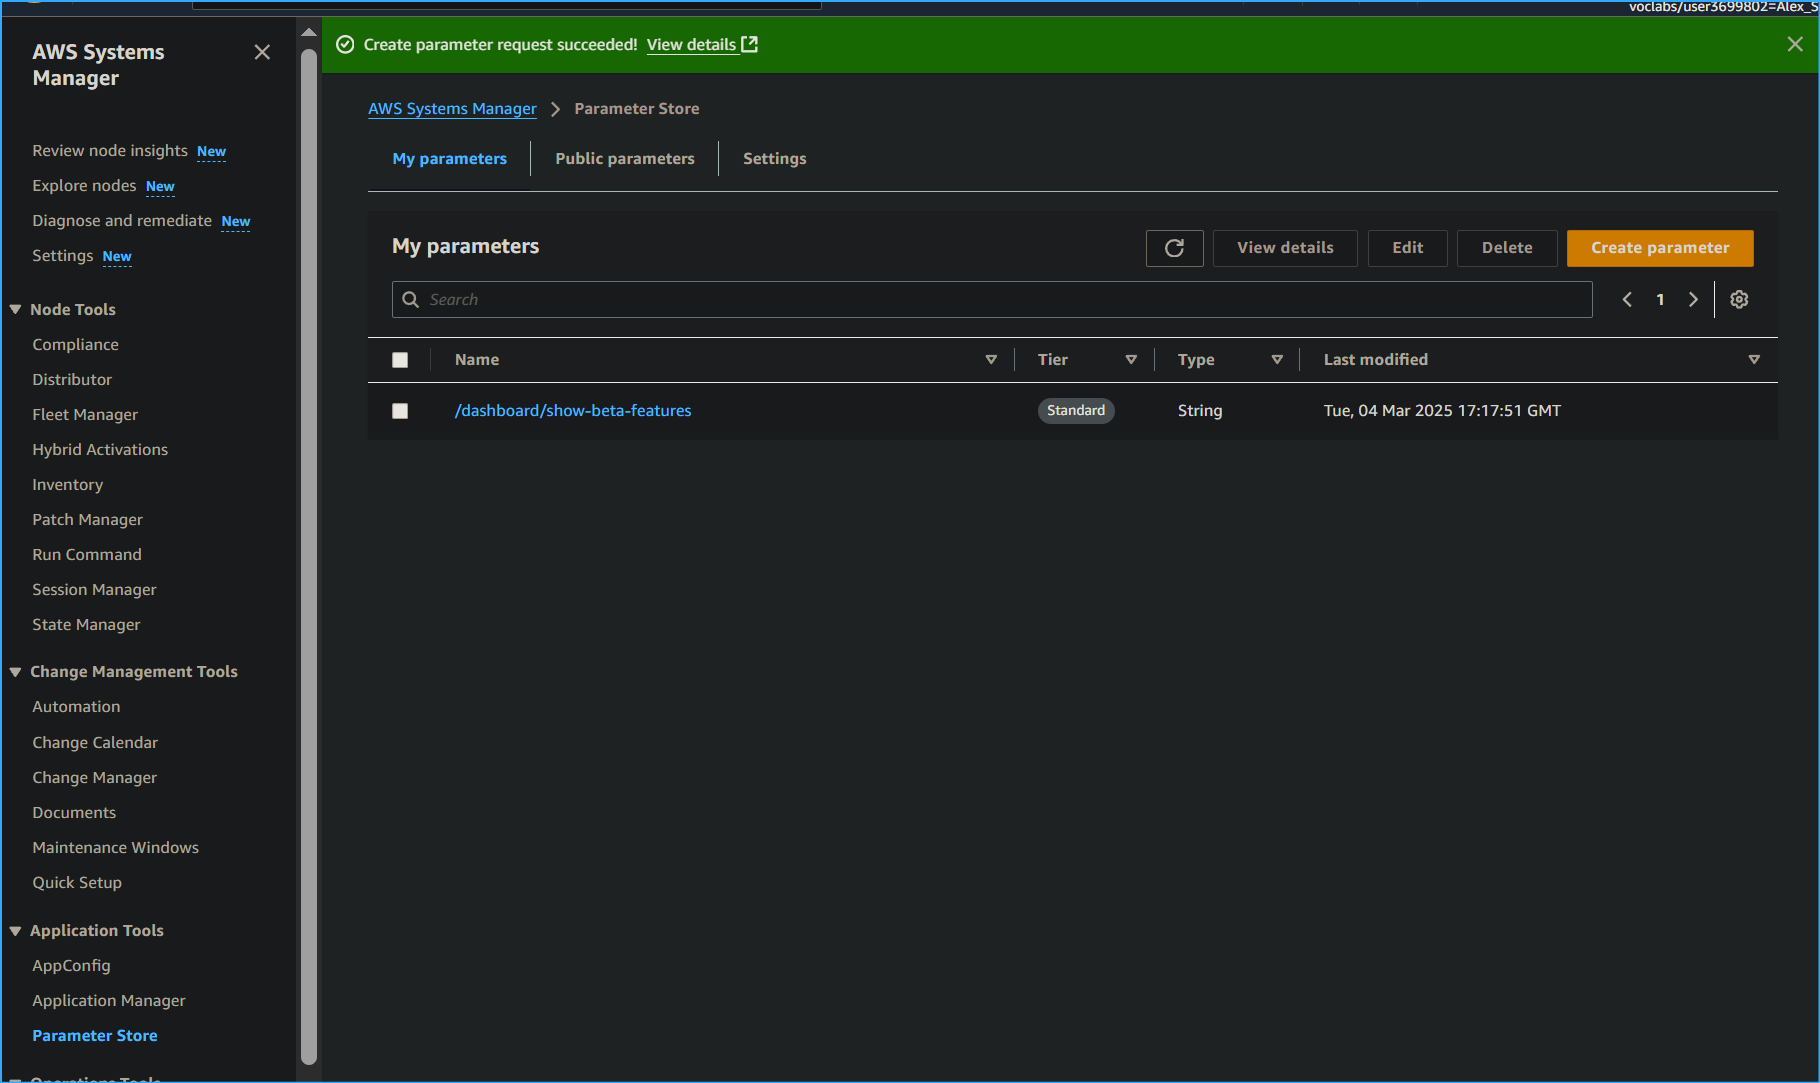
A banner with the message
"Create parameter request succeeded" appeared at the
top of the page.
I noticed the parameter can be specified as a hierarchical path, such as
/dashboard/<option>.
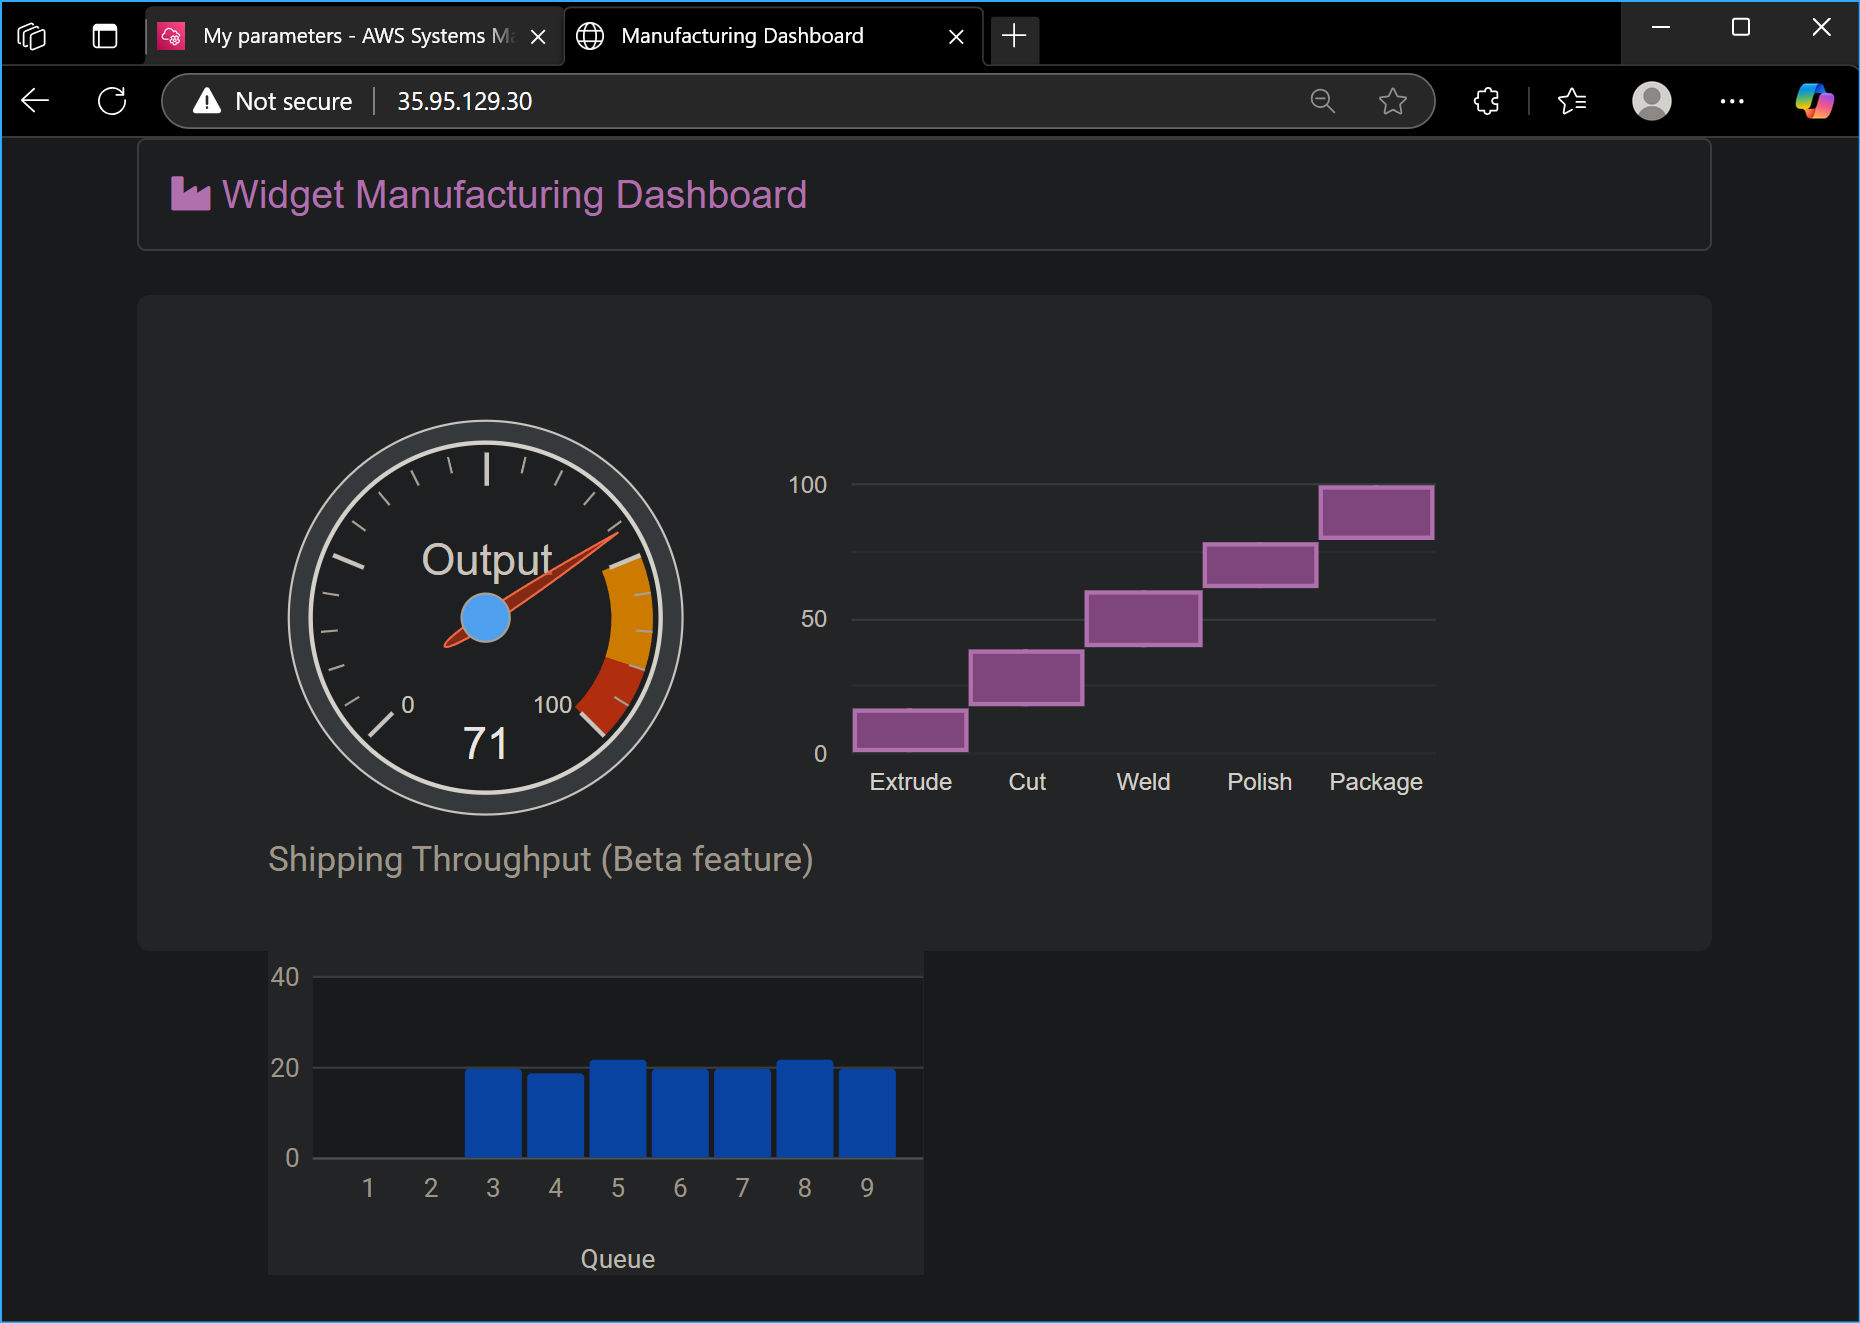
The application running on my EC2 instance automatically checks for this
parameter. When it finds this existing parameter, additional features
are displayed.
-
I returned to the web browser tab displaying the application and
refreshed the web page.
I observed that three charts were now displayed. The application was
checking Parameter Store to determine whether the additional chart
(which is still in beta) should be displayed. I learned it's common to
configure applications to display "dark features" that are installed but
not yet activated.
It is common to configure applications to display "dark features" that
are installed but not yet activated.
I also had the option to delete the parameter and refresh the browser
tab with the application, which would make the third chart disappear
again.
Task 4: Using Session Manager to Access Instances
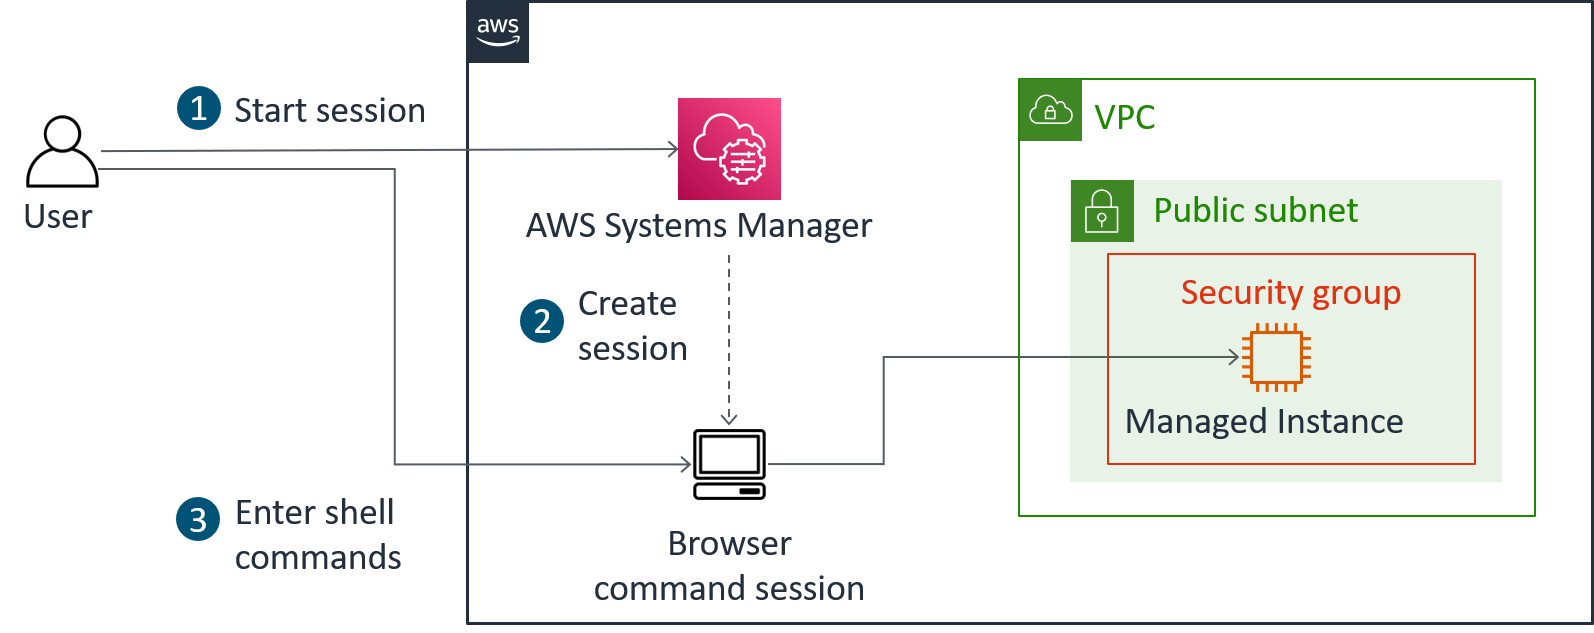
With Session Manager, another capability of Systems
Manager, I could manage my EC2 instances through an interactive one-step
browser-based shell or through the AWS CLI. Session Manager provides
secure and auditable instance management without needing to open inbound
ports, maintain bastion hosts, or manage SSH keys. It also helps comply
with corporate policies requiring controlled access to instances, strict
security practices, and fully auditable logs with instance access
details while still providing end users with one-step cross-platform
access to EC2 instances.
When using Session Manager with Microsoft Windows, it provides access to
a PowerShell console on the instance.
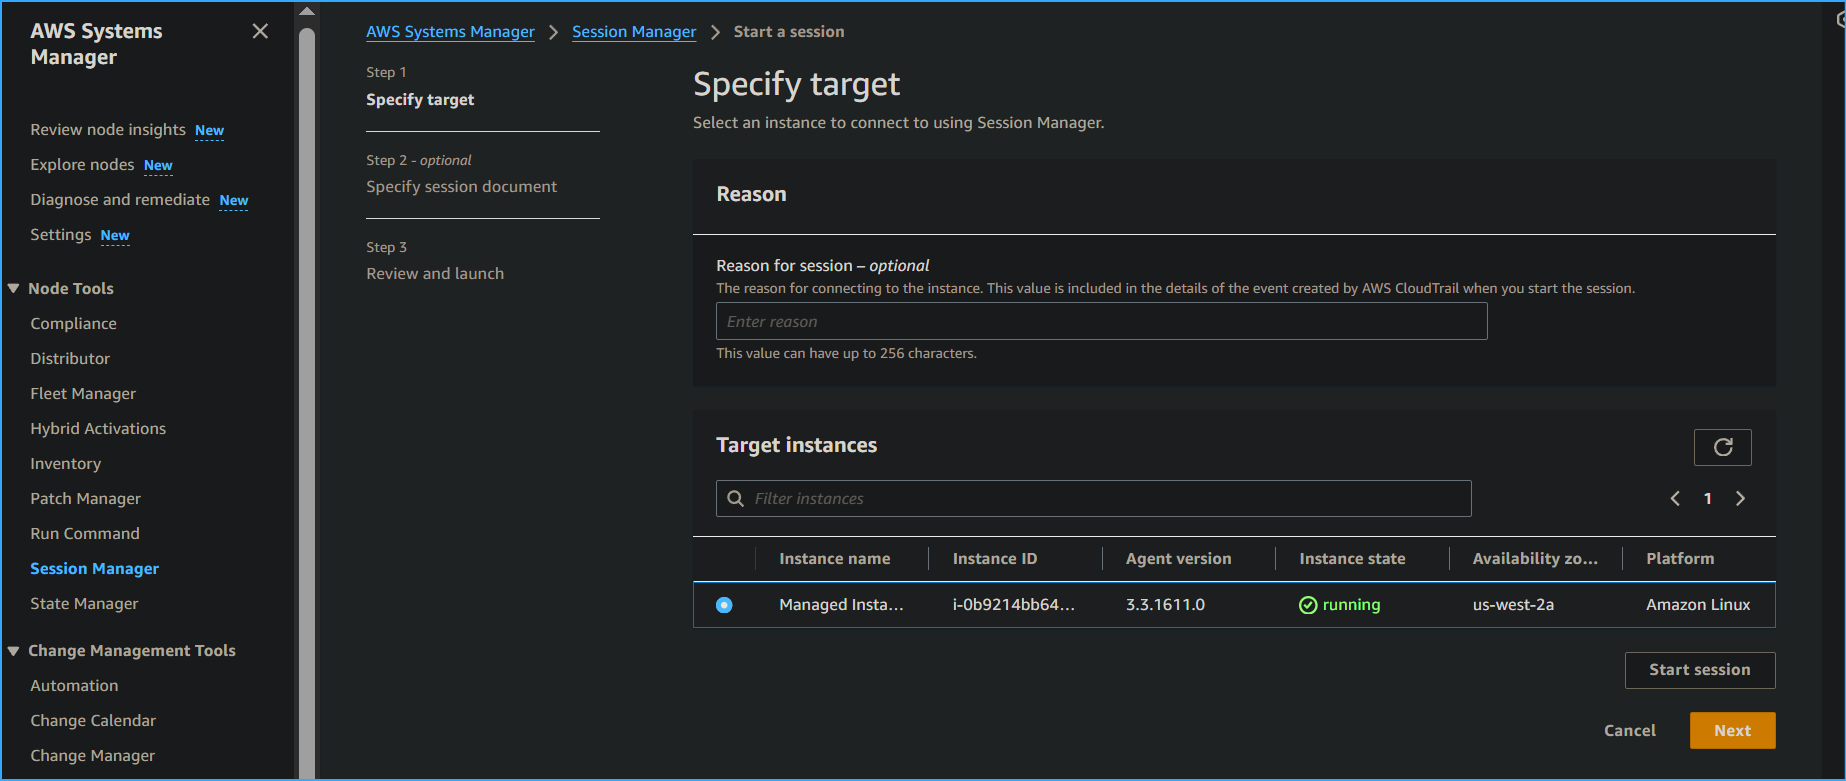
For this task, I accessed the EC2 instance through Session Manager:
-
In the left navigation pane, under Node Management, I
selected Session Manager.
- I clicked "Start session"
- I selected Managed Instance.
- I clicked "Start session"
A new session tab opened in my browser.
-
To activate the cursor, I clicked anywhere in the session window.
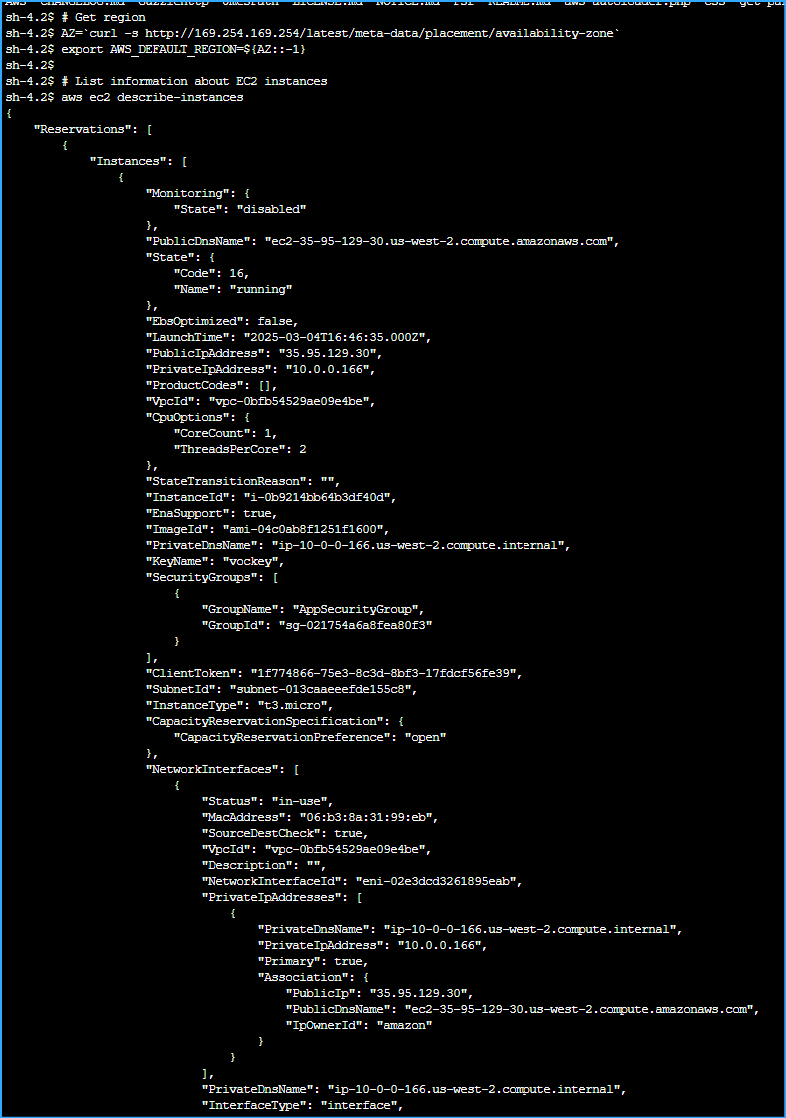
- I ran the following command in the session window:
ls /var/www/html
The output listed the application files that were installed on the
instance.
- I also ran the following commands in the session window:
# Get region AZ=`curl -s
http://169.254.169.254/latest/meta-data/placement/availability-zone`
export AWS_DEFAULT_REGION=${AZ::-1} # List information about EC2
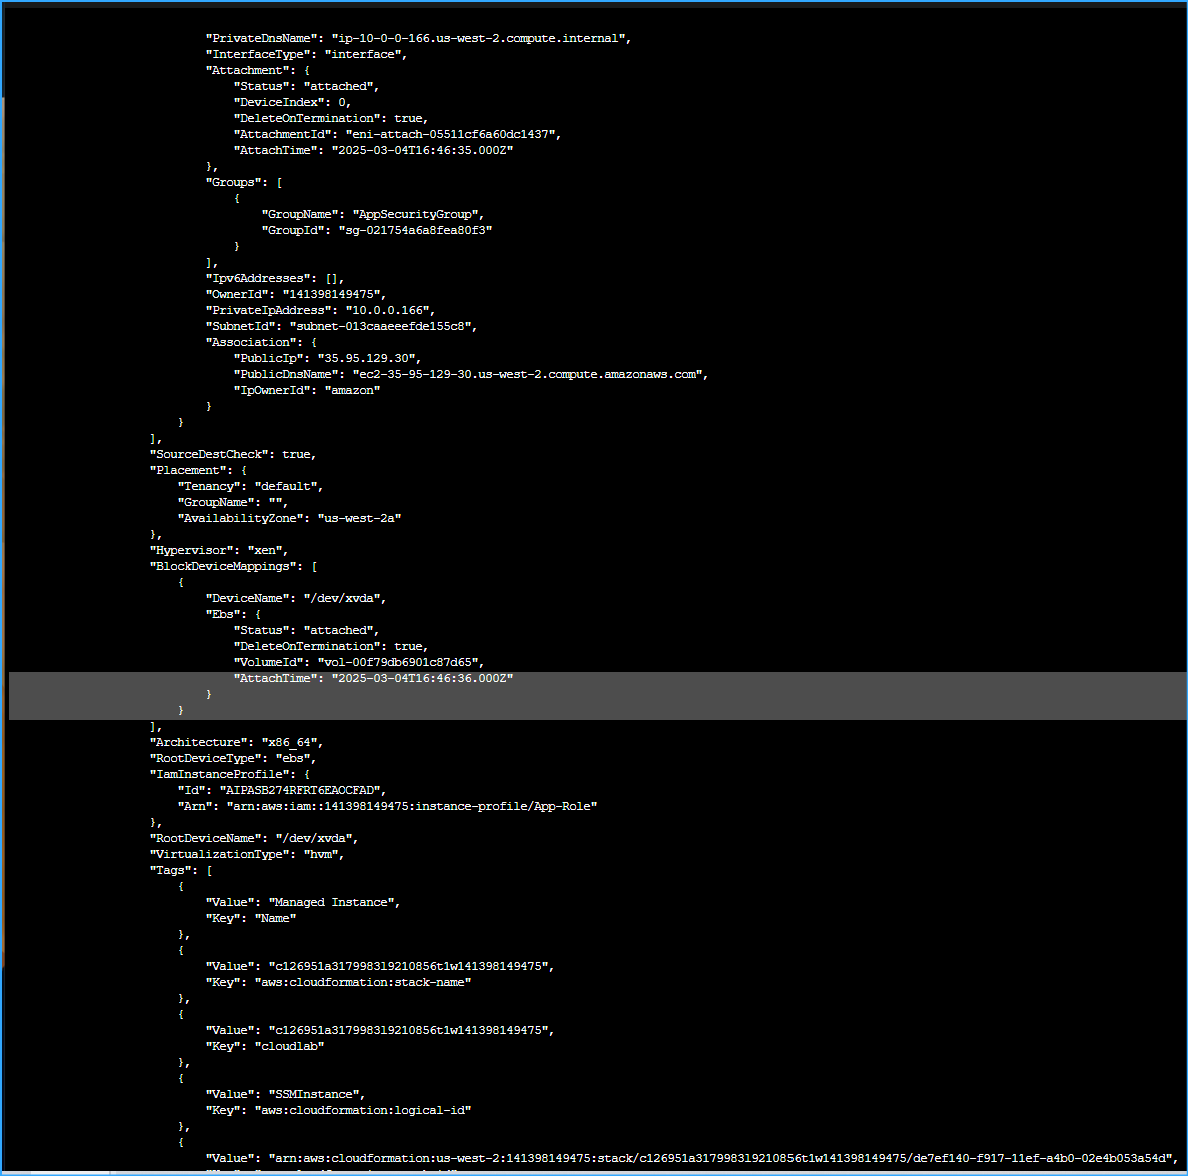
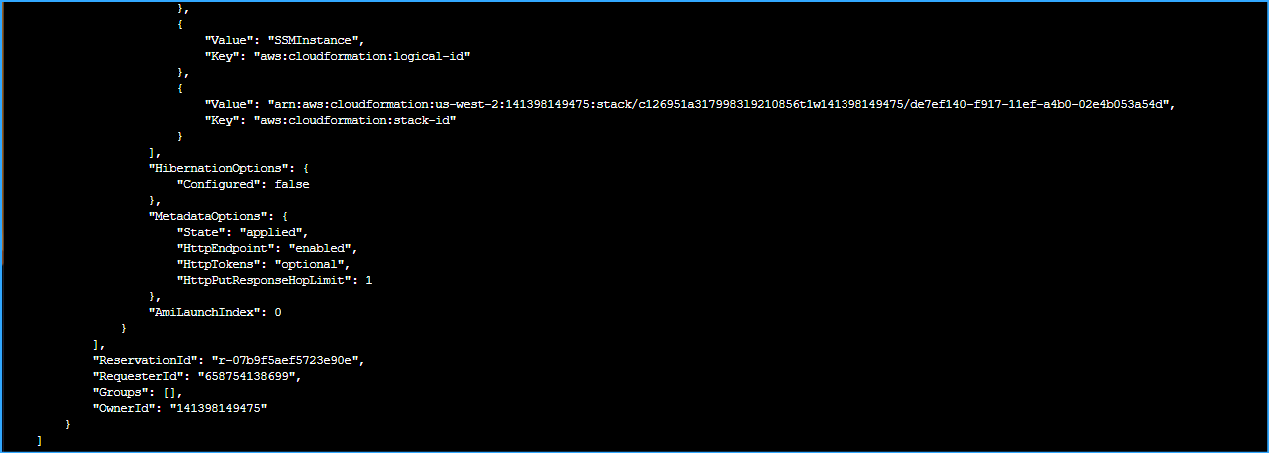
instances aws ec2 describe-instances
The output listed the EC2 instance details for the Managed Instance in
JSON format.
This task demonstrates how you can use Session Manager to log in to an
instance without using SSH. You can also verify this capability by
confirming that the SSH port is closed for the instance's security
group.
I learned that access to Session Manager can be restricted through
IAM policies, and AWS CloudTrail logs
Session Manager usage. These options provide better security and
auditing than traditional SSH access.
Conclusion
I successfully completed all the tasks using AWS Systems Manager,
including:
- Verifying configurations and permissions
- Running tasks on multiple servers
- Updating application settings or configurations
- Accessing the command line on an instance
This hands-on experience gave me a solid understanding of how AWS
Systems Manager can be used to manage AWS resources efficiently and
securely.
×
![]()
 Setting Up Inventory in Fleet Manager
 Node Overview
 Inventory Associated with Instance
 Run CMD Installs the Following
 Run CMD Document
 Run CMD for CLI
 CMD ID for Run Successful
 Installed Widget Manufacturing Dashboard Appears
 Parameter Store Create Parameter
 Parameter Created
 Third Chart Appears on Widget Dashboard After Parameter
Creation
Third Chart Appears on Widget Dashboard After Parameter
Creation
 Access Instance Using Session Manager Without SSH
 Starting Session with Managed Instance Using Session Manager
 Output Lists Application Files Installed on Instance
 Output Lists Managed Instance Details in JSON One
 Output Lists Managed Instance Details in JSON Two
 Output Lists Managed Instance Details in JSON Three